Redis tutorial: Text to Image AI assistant with Redis Search
Introduction
In recent months, both the text-to-image and Vector Database model markets have grown significantly. These two technologies are very powerful on their own, and combining them can make them even more significant! In this tutorial, I will teach you how to build a simple application to support the process of finding similar prompts and images for text-to-image models. We encourage you to join lablab.ai’s community and learn more about how to use Redis during our Hackathon artificial intelligence!
RediSearch
It's Redis Database module that enables querying and indexing data from Redis Databases. It's a very powerful tool that can be used in many different ways. In this tutorial we will use it to index data and find similar prompts/images using vector similarity search.
CLIP
CLIP is a neural network that learns visual concepts from natural language supervision. It is trained on a variety of image-text pairs, and can be used to predict the most likely image for a given text description, or the most likely text description for a given image. We will use this to find similar prompts and images based on the description we entered or the image we provided.
Coding
Okay, we can start coding. Our application will consist of two parts:
- API
- Streamlit Application (UI).
Redis Database
First, we need the Redis Database. I will use Redis Cloud for that, but you can e.g. use Docker image for that. Of course you can start with Redis for free.
Data
For the purpose of this project, we will use the popular Flickr8k dataset. You can download it from the Internet, it is readily available on Kaggle, for example.
Dependencies
To start our project, he proposes to create a proper file structure. Let's create a main directory.
mkdir t2i-assistant-redis


cd t2i-assistant-redis
Now we can create a virtual environment and install all the necessary dependencies.
python3 -m venv venv


# for linux/mac
source venv/bin/activate


# for windows
./venv/Scripts/activate
Let's create requirements.txt file and install all the necessary dependencies. File content:
redis
fastapi
python-multipart
uvicorn[standard]
Pillow
transformers
open_clip_torch
torch
streamlit
requests
Install all the dependencies:
pip install -r requirements.txt
Now we can prepare the rest of the files. My folder structure looks like this:
├── data
│   ├── captions.csv
│   ├── Images
│       ├── <image_name>.jpg
├── src
│   ├── model
│       ├── __init__.py
│       ├── clip.py
│   ├── utils
│       ├── __init__.py
│       ├── data.py
│   ├── main.py
│   ├── streamlit.py
├── venv (virtual environment)
├── requirements.txt
Let's start coding!
Model
I suggest starting by preparing the model for photo processing and captions. Let's do it in the src/model/clip.py file. First, we need to import all the necessary dependencies.
from typing import List


import open_clip
import torch
from PIL import Image
We can prepare a class for our model, and then implement some methods that will allow us to use its functionalities in a simpler way. I will use LAION AI's implementation of CLIP. You can find it on Hugging Face.
class CLIP:
    def __init__(
        self, model_name="hf-hub:laion/CLIP-ViT-H-14-laion2B-s32B-b79K", device="cpu"
    ):
        model, _, preprocess_img = open_clip.create_model_and_transforms(model_name)


        self.device = device


        self.model = model.to(self.device)
        self.preprocess_img = preprocess_img
        self.tokenizer = open_clip.get_tokenizer(model_name)


    def encode_image(self, image: Image.Image | List[Image.Image], normalize=True):
        processed_img = (
            torch.stack([self.preprocess_img(img).to(self.device) for img in image])
            if type(image) == list
            else self.preprocess_img(image).to(self.device)
        )


        if processed_img.dim() == 3:
            processed_img = processed_img.unsqueeze(0)


        image_features = self.model.encode_image(processed_img)


        if normalize:
            image_features /= image_features.norm(dim=-1, keepdim=True)


        return image_features


    def encode_text(self, text: str | List[str], normalize=True):
        text = self.tokenizer(text).to(self.device)


        text_features = self.model.encode_text(text)


        if normalize:
            text_features /= text_features.norm(dim=-1, keepdim=True)


        return text_features
Utils
Now we can move on to the utility functions that will be needed to index our data in the Redis database. I will start importing dependencies.
import os
from uuid import uuid4


import pandas as pd
from redis.commands.search.field import TextField, VectorField
I will also define a constant value - EMBEDDING_DIM. It will be used to define the size of the vector that will be used to index our data (size returned from CLIP model, you can get it from model itself or from Hugging Face Docs).
EMBEDDING_DIM = 1024
Another thing will be the function that will embed our descriptions.
def embed_record(clip, caption):
    caption_features = clip.encode_text(caption).squeeze()


    return caption_features.cpu().detach().numpy()
Now we can create a function that will index our data in Redis database.
def index_data(redis_client, clip):
    # when running for the first time, we don't need to drop index.
    redis_client.ft().dropindex()


    DATA_DIR = os.path.join("data")
    df = pd.read_csv(os.path.join(DATA_DIR, "captions.csv"))


    redis_client.ft().create_index(
        [
            TextField("image"),
            TextField("caption"),
            VectorField(
                "caption_features",
                "FLAT",
                {
                    "TYPE": "FLOAT32",
                    "DIM": EMBEDDING_DIM,
                    "DISTANCE_METRIC": "COSINE",
                },
            ),
        ]
    )


    selected_data = (
        # select every 5th row (each image has 5 similar captions)
        df.iloc[::5, :]
        .apply(
            lambda x: (x["image"], x["caption"], embed_record(clip, x["caption"])),
            axis=1,
        )
        .to_numpy()
    )


    pipe = redis_client.pipeline()
    i = 0
    for img_filename, caption, caption_features in selected_data:
        pipe.hset(
            uuid4().hex,
            mapping={
                "image": img_filename,
                "caption": caption,
                "caption_features": caption_features.tobytes(),
            },
        )
        i += 1
    pipe.execute()
API
Let's move on to our API. We will implement this in the src/main.py file. We need to create two endpoints - one for image-based search and one for description-based search. But let's start with the necessary dependencies.
import numpy as np
import redis
from fastapi import FastAPI, HTTPException, UploadFile, status
from PIL import Image
from pydantic import BaseModel
from redis.commands.search.query import Query


from src.model import CLIP
from src.utils import index_data
At this point we can move on to initializing the model and the Redis client. Also at this point it would be useful to index our data.
clip = CLIP()


redis_client = redis.Redis(
    host="redis-10292.c23738.us-east-1-mz.ec2.cloud.rlrcp.com",
    port=10292,
    password="newnative",
)


index_data(redis_client, clip)
The last thing you would want to prepare before moving on to the API implementation is a function to query images.
def query_image(caption_features: np.array, n=1):
    if caption_features.dtype != np.float32:
        raise TypeError("caption_features must be of type float32")


    query = (
        Query(f"*=>[KNN {n} @caption_features $caption_features]")
        .return_fields("image", "caption")
        .dialect(2)
    )


    result = redis_client.ft().search(
        query=query, query_params={"caption_features": caption_features.tobytes()}
    )


    return result.docs
The time has come for API implementations. We need to create two endpoints:
- one for image processing
- one for processing the description. Both should return a description and a path to the most similar object to the entered data.
My code will look like the following:
class SearchBody(BaseModel):
    description: str


app = FastAPI()


@app.post("/search/image/")
async def search_by_image(image: UploadFile):
    # check if image is valid
    if not image.content_type.startswith("image/"):
        raise HTTPException(
            status_code=status.HTTP_422_UNPROCESSABLE_ENTITY,
            detail="File is not an image",
        )


    image = Image.open(image.file)


    # embed image using CLIP
    img_features = clip.encode_image(image)


    img_features = img_features.squeeze().cpu().detach().numpy().astype(np.float32)


    # search for similar images/prompts
    result = query_image(img_features)


    result = result[0]


    return {
        "image": result["image"],
        "caption": result["caption"],
    }


@app.post("/search/description/")
async def search_description(body: SearchBody):
    # embed description using CLIP
    caption_features = clip.encode_text(body.description)


    # cast to float32
    caption_features = (
        caption_features.squeeze().cpu().detach().numpy().astype(np.float32)
    )


    # search for similar images/prompts
    result = query_image(caption_features)


    result = result[0]


    return {
        "image": result["image"],
        "caption": result["caption"],
    }
To run our API we can use the command in terminal:
uvicorn src.main:app --host 0.0.0.0 --port 8000
UI
The last part of our application is the UI implementation. For this we will use Streamlit. We will create a simple interface that will consist of Text Input, File Input (for images) and submit button.
Let's do it!
import json
import os


import requests


import streamlit as st


# Add a prompt to the app
prompt = st.text_input("Prompt")


# Add file uploader to the app
image = st.file_uploader("Upload an image")


# Add a button to the app
button = st.button("Find similar images/prompts")


# when the button is clicked
if button:
    # if the user uploaded an image
    if image:
        URL = "http://localhost:8000/search/image"
        IMG_EXT = ["jpg", "jpeg", "png"]


        file_extension = image.name.split(".")[-1]
        print(file_extension)


        if not file_extension in IMG_EXT:
            print("Invalid file extension")


        # send the image to the server (form data)
        files = {
            "image": (
                image.name,
                image.read(),
                f"image/{file_extension}",
            ),
        }


        response = requests.post(
            URL,
            files=files,
        )


        # display the response
        res = response.json()


        caption = res["caption"]
        image = os.path.join("data", "Images", res["image"])


        st.image(image, caption=caption)


    if prompt and not image:
        URL = "http://localhost:8000/search/description"
        response = requests.post(
            URL,
            data=json.dumps({"description": prompt}),
        )


        res = response.json()


        caption = res["caption"]
        image = os.path.join("data", "Images", res["image"])


        st.image(image, caption=caption)
Okay, I think we are ready to go.
Let's run our application.
streamlit run src/streamlit.py
Conclusion
Let's check how our application works. We can do so by entering a description or uploading an image.
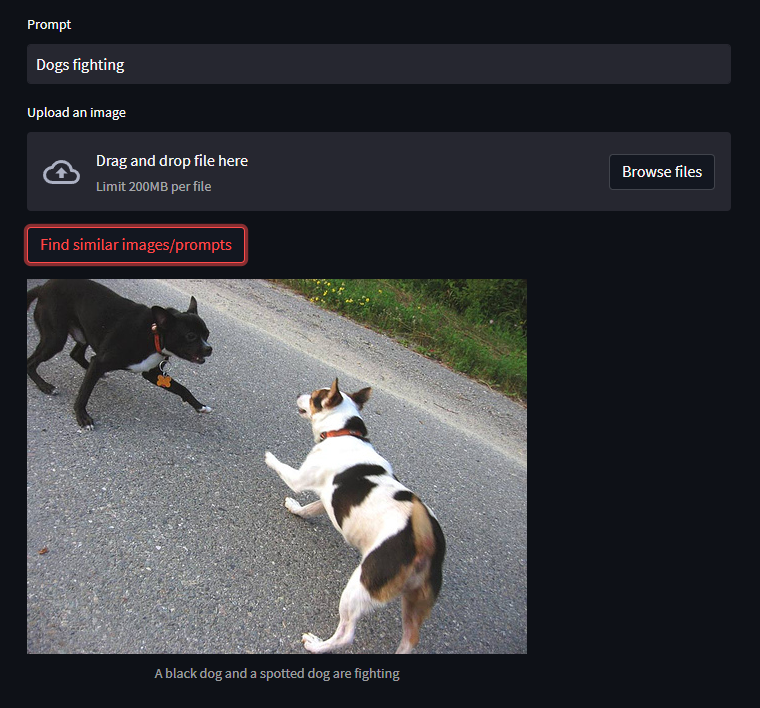
As you can see the result is pretty cool!
If you have managed to rub it in to this point - well done! Hope you learnt a lot. I encourage you to explore other technologies. Maybe you want to build GPT3 app? Or just upgrade your project with it? Or you want to get inspired and build Cohere app - potential is limitless with the power of AI!
Thank you for your time! - Jakub Misiło @newnative