TruLens and OpenAI Turbo: Crafting Advanced Customer Service Solutions
Developing a GPT-4 Turbo App with TruLens Evals: Step-by-Step Guide
Part 1: Theoretical Foundations
Welcome, fellow innovators and curious minds! I'm Sanchay Thalnerkar, and I'm thrilled to guide you through the fascinating world of AI and customer service integration. Before we roll up our sleeves and get our hands dirty with code and configurations, let's take a moment to understand the building blocks of our project. We're about to embark on a journey that marries the analytical prowess of TruLens with the powerful AI capabilities of GPT-Turbo. So buckle up, as we prepare to dive deep into the mechanics of creating intelligent systems that will transform the way we approach customer service.
GPT-4 Turbo: The AI Language Model
GPT-4 Turbo is an advanced language model developed by OpenAI. It's known for its ability to understand and generate human-like text based on the input it receives. Key features include:
- Advanced Natural Language Processing: Ability to comprehend and respond to a wide range of language-based queries.
- Scalability: Suitable for high-volume and real-time applications.
TruLens Evals: Model Insights and Fine-Tuning
TruLens Evals offers analytical tools to gain insights into AI models. It's essential for:
- Understanding Model Decisions: It helps in deciphering the 'why' behind model outputs.
- Fine-Tuning: Provides feedback mechanisms for improving model accuracy and relevance.
Flask: The Web Framework
Flask is a lightweight WSGI web application framework. It's chosen for its simplicity and flexibility, making it ideal for prototyping and small to medium-sized applications.
Part 2: Setting Up the Project
Now, let's set up our project environment and integrate these technologies into a functional application.
Step 1: Installing Python and Flask
-
Install Python: Ensure Python 3.6 or later is installed on your system. You can download it from python.org.
-
Install Flask: Flask can be installed using pip, Python's package installer.
pip install Flask
Step 2: Creating a Virtual Environment
Using a virtual environment is best practice for Python development. It keeps dependencies required by different projects separate by creating isolated environments for them.
-
Create a Virtual Environment: Navigate to your project directory and run:
python -m venv venv -
Activate the Virtual Environment:
- On Windows:
venv\Scripts\activate - On Unix or MacOS:
source venv/bin/activate
- On Windows:
Step 3: Installing OpenAI and TruLens Evals Libraries
-
Install OpenAI Python Library: This library allows you to interact with OpenAI's GPT-4 Turbo model.
pip install openai -
Install TruLens Evals: For analytical and fine-tuning capabilities.
pip install trulens_eval
Step 4: Setting Up Your Flask Application
Flask is a lightweight WSGI web application framework. It's chosen for its simplicity and flexibility, making it ideal for prototyping and small to medium-sized applications.
Let's delve into a detailed breakdown of the entire app.py script, including both the code and an explanatory narrative for each section.
1. Import Statements and Flask App Initialization
from flask import Flask, render_template, request, jsonify
import os
from openai import OpenAI
import chromadb
from chromadb.utils.embedding_functions import OpenAIEmbeddingFunction
from trulens_eval import Tru, Feedback, Select
from trulens_eval.tru_custom_app import instrument
from trulens_eval.feedback import Groundedness
from trulens_eval.feedback.provider.openai import OpenAI as fOpenAI
from trulens_eval import TruCustomApp
import numpy as np

app = Flask(__name__)
Explanation:
This segment of the code imports necessary libraries and initializes the Flask application. Libraries like flask, os, openai, and chromadb are imported to handle web requests, environment variables, AI functionalities, and database operations. The TruLens related imports are crucial for providing analytical insights and feedback on model performance. The app object is an instance of the Flask class and serves as the central object for the Flask web application.
2. Configuration and Client Initialization
os.environ["OPENAI_API_KEY"] = "your-openai-api-key"

oai_client = OpenAI()
tru = Tru()
fopenai = fOpenAI()
Explanation:
Here, the environment variable for the OpenAI API key is set. This is a critical security practice, ensuring sensitive information is not hard-coded in the application. Following this, instances of OpenAI, Tru, and fOpenAI are created. These instances are used to interact with OpenAI's API, TruLens's evaluation and feedback functionalities.
3. TruLens Feedback Setup
grounded = Groundedness(groundedness_provider=fopenai)
f_groundedness = (
    Feedback(grounded.groundedness_measure_with_cot_reasons, name="Groundedness")
    .on(Select.RecordCalls.retrieve.rets.collect())
    .on_output()
    .aggregate(grounded.grounded_statements_aggregator)
)
f_qa_relevance = (
    Feedback(fopenai.relevance_with_cot_reasons, name="Answer Relevance")
    .on(Select.RecordCalls.retrieve.args.query)
    .on_output()
)
f_context_relevance = (
    Feedback(fopenai.qs_relevance_with_cot_reasons, name="Context Relevance")
    .on(Select.RecordCalls.retrieve.args.query)
    .on(Select.RecordCalls.retrieve.rets.collect())
    .aggregate(np.mean)
)
Explanation:
This part of the code sets up various feedback mechanisms using TruLens. Groundedness is used to evaluate the groundedness of the AI's responses. The feedback instances (f_groundedness, f_qa_relevance, f_context_relevance) are configured to measure different aspects of the AI responses, such as relevance and context. This is crucial for ensuring the AI's output is accurate and reliable.
4. The RAG_from_scratch Class
class RAG_from_scratch:
    def __init__(self, vector_store):
        self.vector_store = vector_store

    @instrument
    def retrieve(self, query: str) -> list:
        results = self.vector_store.query(query_texts=query, n_results=2)
        return results["documents"][0]

    @instrument
    def generate_completion(self, query: str, context_str: list) -> str:
        completion = (
            oai_client.chat.completions.create(
                model="gpt-4-turbo-preview	",
                temperature=0,
                messages=[
                    {
                        "role": "user",
                        "content": f"We have provided context information below. \n"
                        f"---------------------\n"
                        f"{context_str}"
                        f"\n---------------------\n"
                        f"Given this information, please answer the question: {query}",
                    }
                ],
            )
            .choices[0]
            .message.content
        )
        return completion

    @instrument
    def query(self, query: str) -> str:
        context_str = self.retrieve(query)
        completion = self.generate_completion(query, context_str)
        return completion
Explanation:
The RAG_from_scratch class is a custom implementation for the Retrieval-Augmented Generation (RAG) model. It has three primary methods: retrieve, generate_completion, and query. retrieve fetches relevant documents based on a query, generate_completion uses
OpenAI's GPT-3.5-turbo model to generate a response based on the context and query, and query combines these two functionalities to provide a complete answer. The @instrument decorator is likely used for logging or monitoring purposes within the TruLens framework.
5. Flask Routes
@app.route("/")
def index():
    return render_template("index.html")

@app.route("/process_query", methods=["POST"])
def process_query():
    try:
        data = request.json
        university_info = data.get("university_info")
        query_text = data.get("query")

        if not university_info or not query_text:
            return jsonify({"error": "Both university information and query are required."}), 400

        embedding_function = OpenAIEmbeddingFunction(api_key=os.environ["OPENAI_API_KEY"], model_name="text-embedding-ada-002")
        chroma_client = chromadb.Client()
        vector_store_local = chroma_client.get_or_create_collection(name="CustomerProductData", embedding_function=embedding_function)
        vector_store_local.add("uni_info", documents=university_info)

        rag = RAG_from_scratch(vector_store_local)
        tru_rag = TruCustomApp(rag, app_id="CS_RAG_v1", feedbacks=[f_groundedness, f_qa_relevance, f_context_relevance])
        with tru_rag as recording:
            result = rag.query(query_text)

        tru.get_leaderboard(app_ids=["CS_RAG_v1"])
        tru.run_dashboard()

        return jsonify({"result": result})
    except Exception as e:
        print(f"Error processing query: {e}")
        return jsonify({"error": str(e)}), 500
Explanation:
This section defines two routes for the Flask application. The first route is the home route ("/") that renders the index.html template, providing the frontend interface. The second route ("/process_query") handles POST requests. It processes the input data, validates it, and then uses the RAG model to generate a response. In case of an error, it returns an error message. This setup is crucial for the application's interaction with users, handling their queries and providing responses.
6. Flask Application Execution
if __name__ == "__main__":
    app.run(debug=False, host="0.0.0.0", port=4000)
Explanation:
This final part of the script is a standard Python idiom for running a script as a standalone program. It ensures that the Flask application runs only if the script is executed directly (not imported as a module). The app.run method starts the Flask web server with the specified host and port.
Certainly! Let's craft a complete and detailed tutorial on creating the frontend for your Flask application. This guide will walk you through the process step-by-step.
Creating a Frontend for Your Flask Application
Step 1: Setting Up the templates Directory
Flask applications use a templates directory to store HTML files. These templates are then rendered using Flask’s routes. Here’s how to set it up:
- Create the Directory: In the root of your Flask project, create a new folder named
templates. - HTML File: Inside this
templatesdirectory, you'll create an HTML file namedindex.html. This file will serve as the main interface of your application.
Step 2: Crafting the index.html File
Now, we'll create and dissect the index.html file that will be your application's frontend. Below is the complete HTML code with explanations for each section.
<!DOCTYPE html>
<html lang="en">
  <head>
    <meta charset="UTF-8" />
    <meta name="viewport" content="width=device-width, initial-scale=1.0" />
    <title>Query Processor</title>
    <style>
      body {
        font-family: "Segoe UI", Tahoma, Geneva, Verdana, sans-serif;
        background-color: #eaeaea;
        margin: 0;
        padding: 0;
        display: flex;
        justify-content: center;
        align-items: center;
        height: 100vh;
        color: #333;
      }
      .container {
        width: 90%;
        max-width: 400px;
        background: #fff;
        padding: 25px;
        border-radius: 10px;
        box-shadow: 0 5px 15px rgba(0, 0, 0, 0.1);
        display: flex;
        flex-direction: column;
        align-items: center;
      }
      h2 {
        margin: 0 0 20px;
        font-size: 1.8em;
        color: #007bff;
        text-align: center;
        width: 100%;
      }
      input,
      textarea,
      button,
      .loader {
        width: 100%;
        margin-bottom: 20px;
        box-sizing: border-box;
      }
      textarea,
      input {
        padding: 15px;
        border: 2px solid #ddd;
        border-radius: 5px;
        font-size: 14px;
      }
      button {
        padding: 15px;
        border: none;
        background-color: #007bff;
        color: white;
        border-radius: 5px;
        cursor: pointer;
        font-size: 16px;
        transition: background-color 0.3s;
      }
      button:hover {
        background-color: #0056b3;
      }
      .loader {
        display: none;
        border: 4px solid #f3f3f3;
        border-top: 4px solid #007bff;
        border-radius: 50%;
        width: 40px;
        height: 40px;
        animation: spin 1s linear infinite;
      }
      @keyframes spin {
        0% {
          transform: rotate(0deg);
        }
        100% {
          transform: rotate(360deg);
        }
      }
      .checkbox-group {
        text-align: center;
        width: 100%;
        margin-bottom: 20px;
      }
      label {
        margin-left: 8px;
        font-size: 14px;
      }
    </style>
  </head>
  <body>
    <div class="container">
      <h2>Customer Service Model Response Checker</h2>
      <textarea
        id="university_info"
        placeholder="Enter University Information"
      ></textarea>
      <input type="text" id="query" placeholder="Enter Query" />
      <div class="checkbox-group">
        <input type="checkbox" id="groundedness" name="groundedness" checked />
        <label for="groundedness">Groundedness</label><br />
        <input type="checkbox" id="qa_relevance" name="qa_relevance" checked />
        <label for="qa_relevance">QA Relevance</label><br />
        <input
          type="checkbox"
          id="context_relevance"
          name="context_relevance"
          checked
        />
        <label for="context_relevance">Context Relevance</label>
      </div>
      <button onclick="processQuery()">Process Query</button>
      <div class="loader" id="loader"></div>
      <div id="result"></div>
    </div>

    <script>
      function processQuery() {
        var universityInfo = document.getElementById("university_info").value;
        var query = document.getElementById("query").value;
        var loader = document.getElementById("loader");
        var resultDiv = document.getElementById("result");

        var feedbackOptions = {
          groundedness: document.getElementById("groundedness").checked,
          qa_relevance: document.getElementById("qa_relevance").checked,
          context_relevance:
            document.getElementById("context_relevance").checked,
        };

        loader.style.display = "block";
        resultDiv.innerHTML = "";

        fetch("/process_query", {
          method: "POST",
          headers: {
            "Content-Type": "application/json",
          },
          body: JSON.stringify({
            university_info: universityInfo,
            query: query,
            feedback_options: feedbackOptions,
          }),
        })
          .then((response) => response.json())
          .then((data) => {
            loader.style.display = "none";
            resultDiv.innerHTML = "<strong>Result:</strong> " + data.result;
          })
          .catch((error) => {
            loader.style.display = "none";
            console.error("Error:", error);
            resultDiv.innerHTML = "Error: " + error;
          });
      }
    </script>
  </body>
</html>
Detailed Breakdown:
- DOCTYPE and HTML Tags: These define the document type (HTML5) and the language used.
- Head Section: Includes meta tags for character encoding and viewport settings, the title of the web page, and internal CSS for styling.
- Body Section: Contains the interactive elements of your web page:
- A container div for layout.
- Form elements (
<textarea>and<input>) for user inputs
. - Checkboxes for selecting feedback options. - A submit button to process the query. - Elements for showing a loader during processing and displaying results.
- JavaScript: Handles the logic to send data to the Flask backend and display the results. It uses the Fetch API to asynchronously communicate with the server.
Step 3: Integrating with Flask
Ensure your Flask application is set up to render this template:
- In your Flask routes, use
render_template('index.html')to serve this page. - Handle the data sent from this frontend in your Flask routes, process it, and send back the results.
Demonstrating the Flask Application
With our frontend and backend fully set up, it's time to bring our Flask application to life. Let's run it locally and see how it performs in action. This demonstration will give you a clear picture of how your application looks and functions in a real-world scenario.
Running the Application Locally
-
Start the Flask Server:
- Open your terminal or command prompt.
- Navigate to the root directory of your Flask project.
- Run the command:
flask run. - This will start the Flask development server.
-
Accessing the Application:
- Open a web browser of your choice.
- Go to
http://localhost:5000. This is the default address for Flask applications running locally. - You should now see the main page of your application, as defined in
index.html.
Viewing the Demo
Once the application is running, you can interact with it:
- Enter information in the text area and input field.
- Select the feedback options as per your requirement.
- Click the "Process Query" button to see how the application processes the input and returns results.
A Walkthrough of Our Flask App's UI
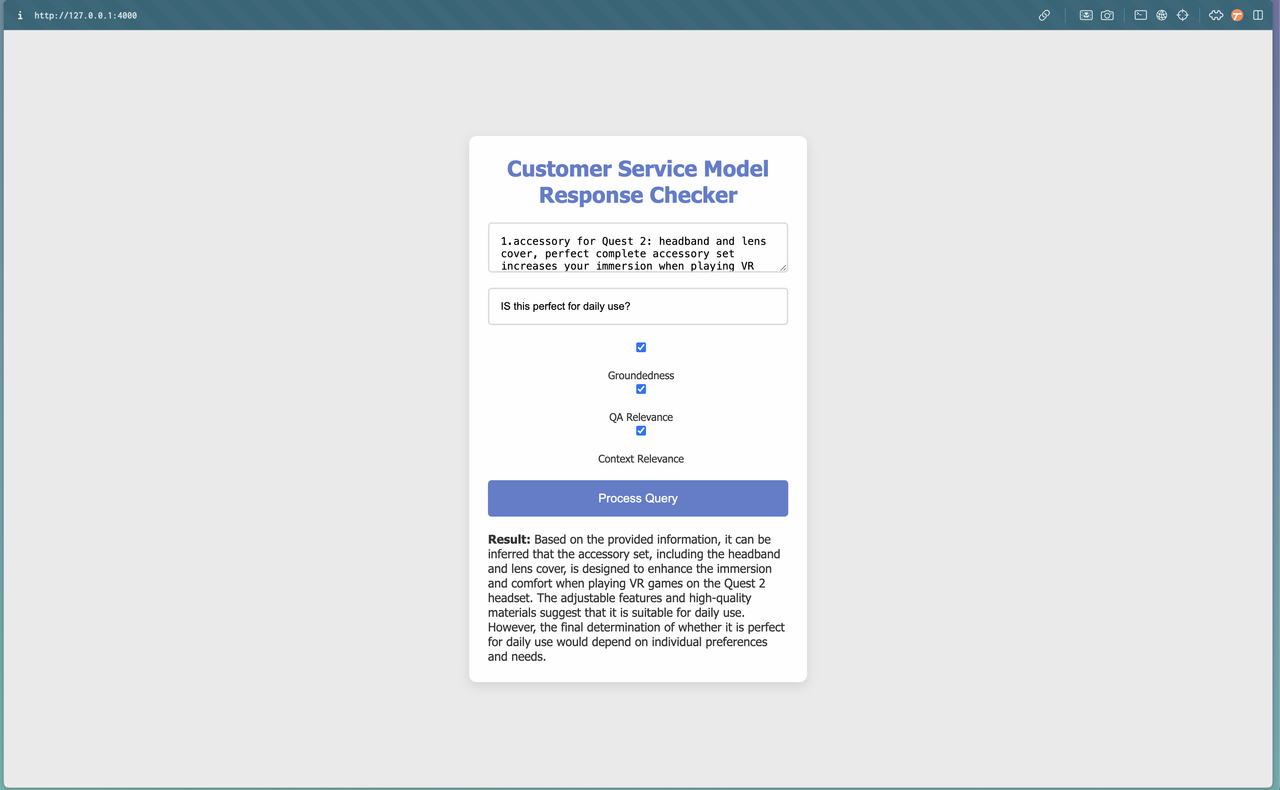
Let's take a virtual tour of the interface that greets us when we fire up our Flask application.
Imagine walking into a cozy café with a clear sign that says "Customer Service Model Response Checker". That's our application's title, sitting right at the top of the page, giving off a welcoming vibe that says, "You're in the right place."
Just below the title, you've got a spacious area to jot down notes – or in our case, the details about a university or product. It's like a digital notepad, ready for you to spill all the beans.
Right underneath, there's a neat little box where you can pop in a question. It's like asking the barista, "Hey, would this coffee work for my all-nighter?"
And you see those little tick boxes? They're your way of telling the barista exactly how you like your coffee. Groundedness? That's the strong foundation of your brew. QA Relevance? It's making sure the coffee hits the right notes. Context Relevance? It's about getting the perfect coffee for the time of day.
Once you've poured out all the details and ticked your preferences, there's that big, blue "Process Query" button. It's like placing your order with a confident tap.
Now, the magic happens: the barista whips up your order. But instead of a coffee, you get a crisp, clear answer in the space below where you first scribbled down your notes. No mess, no fuss, just a straight-up response served just how you asked for it.
And there you have it – a user interface that's as straightforward and pleasant as ordering your favorite drink at a café, designed to make getting information as simple and enjoyable as possible.
TruEra Analysis
Once you've got your Flask app up and running, you'll notice that the TruLens dashboard is also live and kicking on port 4000.
Dashboard started at http://192.168.1.12:8501 . Network URL: http://192.168.1.12:8501 External URL: http://103.220.81.94:8501
You'll be greeted with a dashboard full of stats and insights, all thanks to the magic happening behind the scenes with TruLens.
Exploring the TruLens Evaluation Dashboard
After you launch your Flask app, you'll be able to access the TruLens Evaluation Dashboard on port 4000. Here's what you'll find when you navigate to the dashboard:
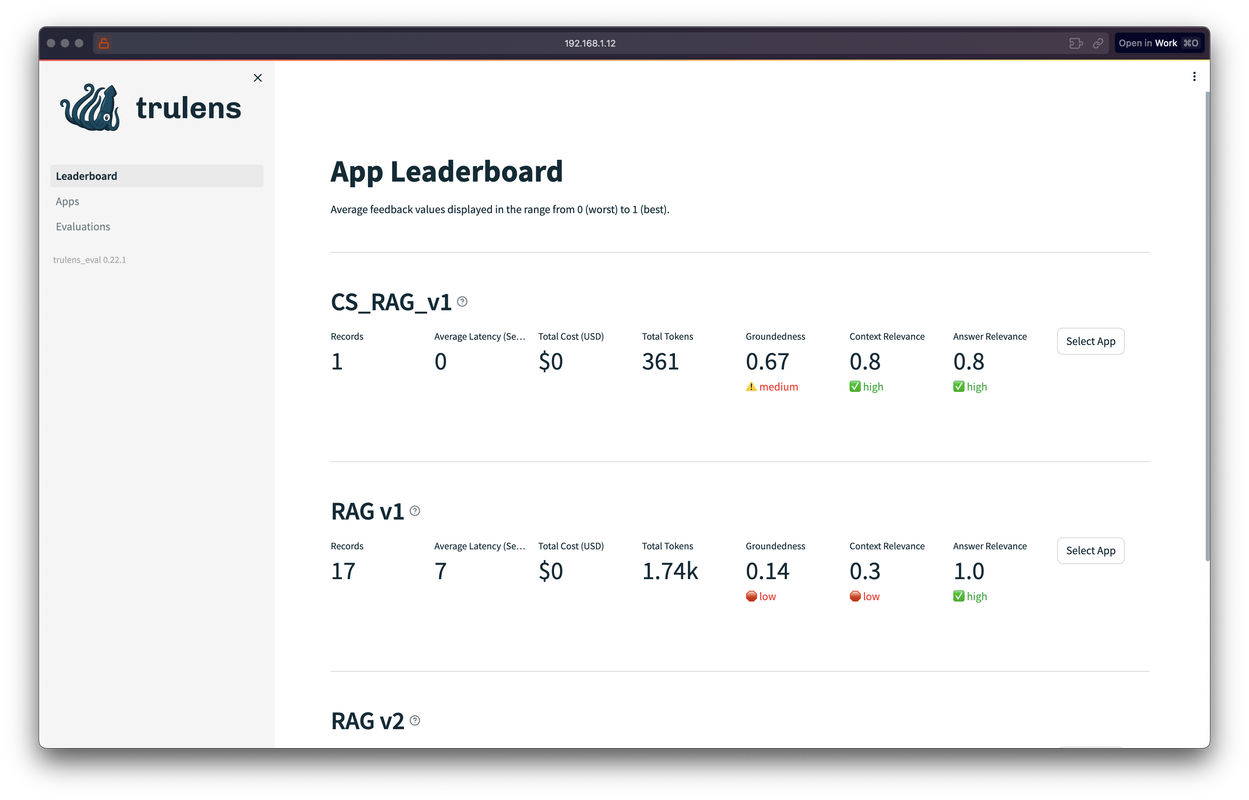
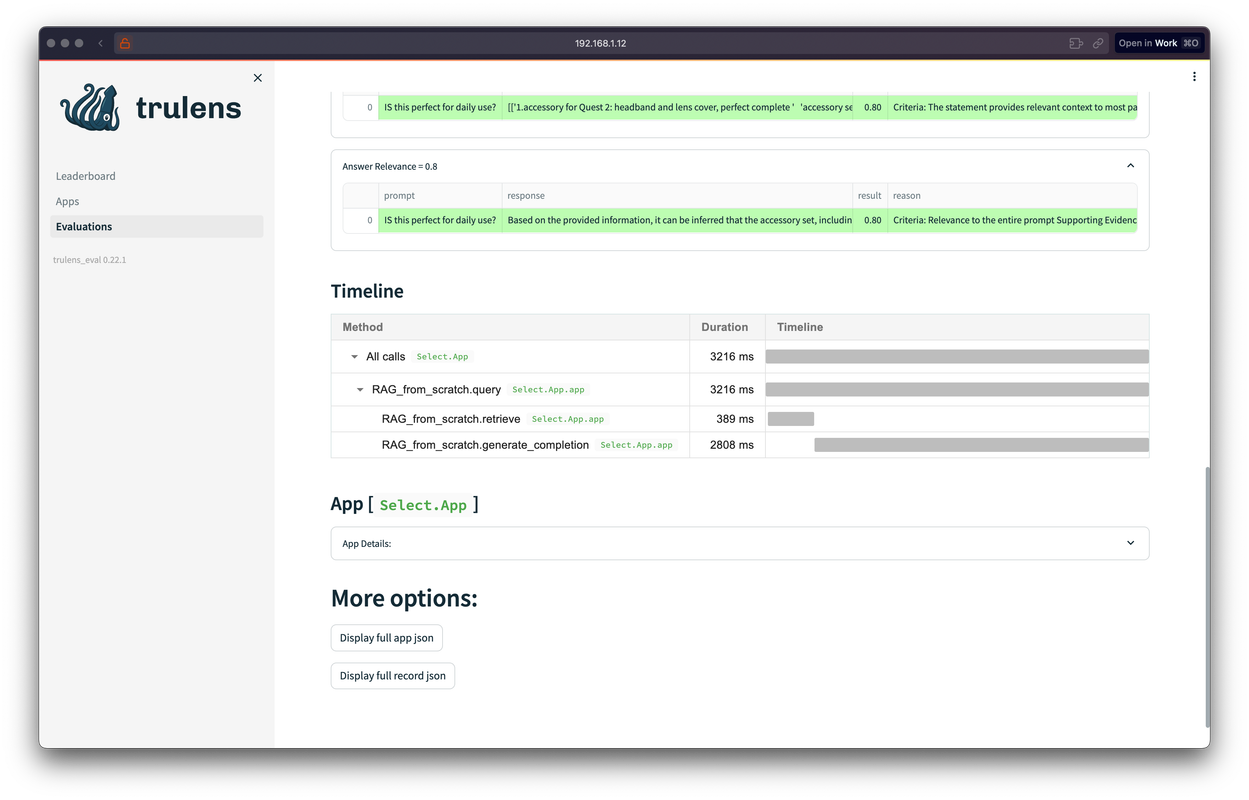
A Snapshot of Your App's Performance
The dashboard presents a sleek and informative snapshot of how your app is performing. Think of it as a report card showing different grades for your app's features.
-
App Leaderboard: At the top of the dashboard, you'll see a leaderboard. It's like a high-score table in video games, except here it's for your app's feedback metrics.
-
Feedback Values: The leaderboard showcases average feedback values ranging from 0 (could be better) to 1 (top-notch). These numbers give you an idea of what's working well and what might need a tweak or two.
-
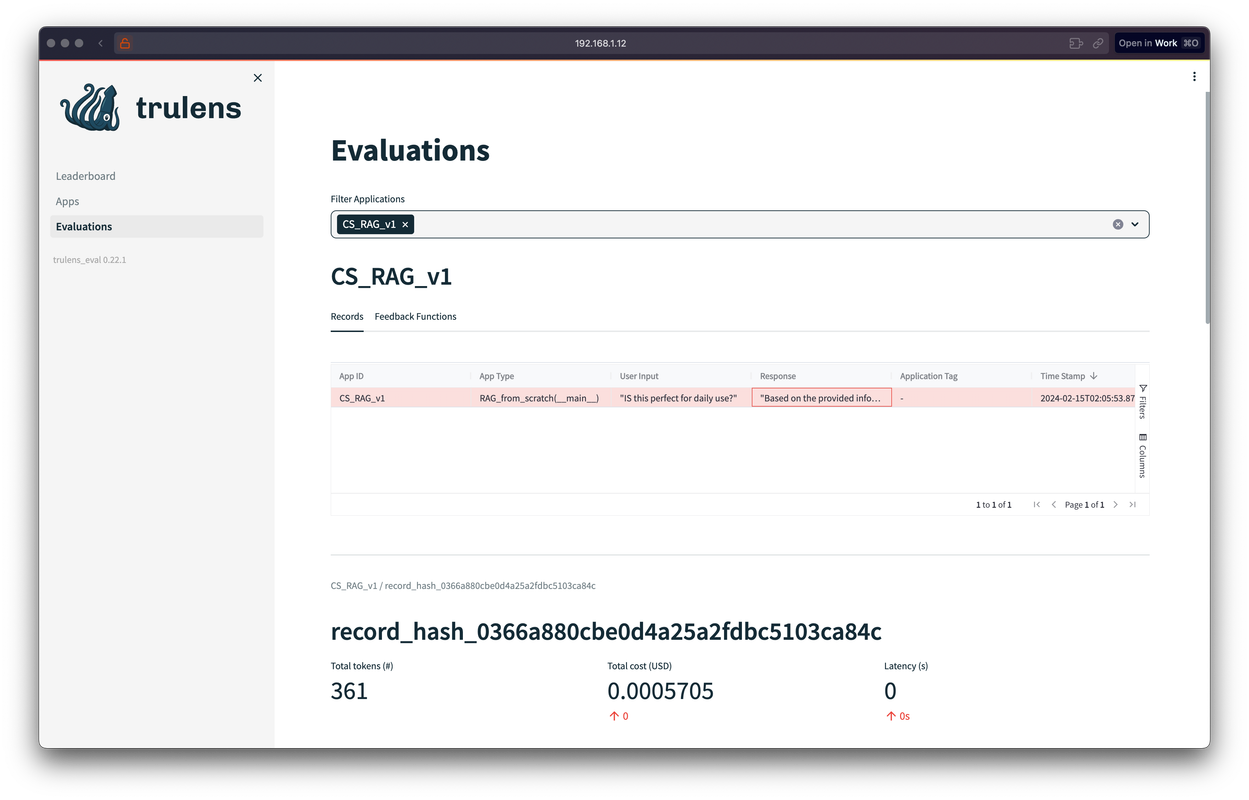
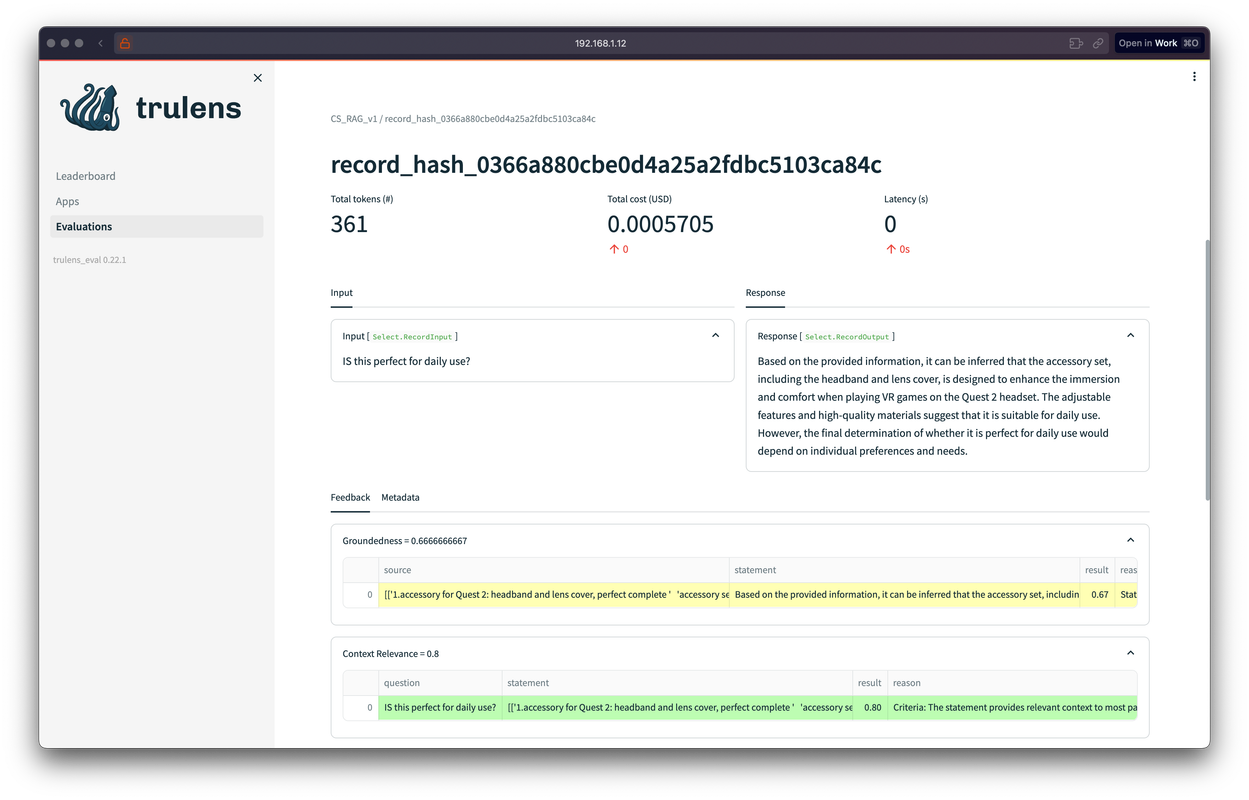
App Records: You'll see entries for different versions of your app, each with their own statistics.
- Look at the "CS_RAG_v1" and notice the number of records, latency, cost, and token usage. It's a quick way to check the app's efficiency and resource usage.
- The feedback scores for "Groundedness", "Context Relevance", and "Answer Relevance" are right there too, with color-coded indicators for a quick visual cue: green for good, yellow for okay, and red for needs attention.
Why This Matters
This dashboard is where you can monitor and understand the intricacies of your app's interactions. By keeping an eye on these stats, you can optimize your app to provide better responses, improve performance, and manage your resources more effectively.
Conclusion
By reaching the end of this tutorial, you've not only built a functional Flask app integrated with OpenAI and TruLens Evals but also gained the insights to monitor and improve it. The TruLens Evaluation Dashboard is your mission control, giving you the data and feedback you need to take your app to the next level. So, go ahead and dive into those numbers—your app's future is looking bright!