Visionary Data: Leveraging Trulens with MongoDB & LlamaIndex
Visionary Data: Leveraging Trulens with MongoDB & LlamaIndex
Hello everyone! 👋 I'm Sanchay Thalnerkar, an engineering student with a passion for creating in-depth and engaging tutorials. Today, we're going to build a Query and Feedback System for Customer Care. This system will help businesses efficiently manage customer queries and feedback, ensuring a smoother and more responsive customer service experience. 🚀
We'll be using a modern tech stack including TruLens, LlamaIndex, MongoDB Atlas, and Vector Index. Let’s dive into what each component does and how they integrate into our project.
Step 1: Understanding the Tech Stack
TruLens
TruLens is a model interpretability library designed to provide insights into the inner workings of machine learning models. In our project, TruLens can be used to analyze how our model processes queries and feedback, helping us to understand and improve the decision-making process behind the scenes.
LlamaIndex
LlamaIndex is a high-performance vector search engine. It is built for efficiently searching through large volumes of data based on vector similarities. For our customer care system, LlamaIndex will allow us to quickly find similar customer queries and responses, enhancing the efficiency of our query handling.
MongoDB Atlas
MongoDB Atlas is a fully-managed cloud database service. It offers powerful, scalable storage solutions for modern applications. We will use MongoDB Atlas to store and manage customer queries and feedback, ensuring that data is easily accessible and secure.
Setting Up the Project Directory for the Query and Feedback System
Great, now that you understand the tech stack and have your environment ready, it's time to set up the project directory! Let's start by creating the project directory and adding the necessary files for our Query and Feedback System. This setup will provide a structured foundation for developing our application. 📂✨
Step 1: Create the Project Directory
First, you'll need to create a new directory for your project. Here's how you can do it:
- Open your terminal or command prompt.
- Navigate to the location where you want to create your project directory. This can be done with the
cdcommand (change directory). - Create the directory:
mkdir CustomerCareSystem - Navigate into your new directory:
cd CustomerCareSystem
Step 2: Creating Project Files
In this section we focus on the importance of modularization, detailed responsibilities of each file, and integrating TruLens into our feedback manager. Modularizing your code is not just about keeping it organized; it's about creating a maintainable, scalable, and collaborative environment. Let’s detail each component and explain how they work together to create a robust system.
Why Modularize?
Modularization in software development offers several key benefits:
- Clarity: Each module has a specific responsibility, which makes the system easier to understand at a glance.
- Isolation: Errors are contained within a module, which reduces the impact on the overall system.
- Extensibility: New functionality can be added with minimal modifications to existing code.
- Collaboration: Developers can work on separate modules simultaneously without interference.
Detailed File Structure and Responsibilities
config.py
This file acts as the central repository for all configuration-related settings, such as database connection strings, API keys, and environment variables. By isolating configurations, you ensure that changes in the setup do not require code changes across multiple files, thereby simplifying maintenance and scalability.
query_manager.py
This module is dedicated to handling all query-related operations. It interacts with the database and LlamaIndex to retrieve and manage queries efficiently. The QueryManager class within this file would include methods to process incoming queries, search for similar queries in the database using vector indexing, and return relevant answers.
feedback_manager.py
The FeedbackManager class in this file manages user feedback. Importantly, it utilizes the TruLens library to analyze the machine learning model’s decision-making process. This analysis helps understand which features are influencing the model’s responses, providing insights that can be used to refine and improve the model. Parameters for TruLens might include layer names to inspect, types of analysis (e.g., gradient or activation analysis), and specific outputs to focus on.
setup.py
This file is used primarily for managing dependencies and packaging the application for distribution. It includes metadata about the project like name, version, and author, as well as a list of dependencies that can be installed with the project (using pip install .).
app.py
Serving as the entry point of the Flask application, this file sets up the web server and routes HTTP requests to the appropriate handlers. It initializes the application, sets up routing, and might also include error handling and security settings.
data_manager.py
This module manages interactions with MongoDB Atlas. The DataManager class includes methods for connecting to the database, as well as for inserting, updating, and retrieving data. This abstraction allows other parts of the application to interact with the database without needing to know the specifics of the database operations.
Ecommerce_FAQ_Chatbot_dataset.json
This JSON file, downloaded from Kaggle, serves as the initial dataset for training our model and populating the database with sample queries and responses. It provides a realistic set of data that helps in developing and testing the query processing and feedback mechanisms. If you want to follow along with me you can download the dataset I used here: Download eCommerce FAQ Chatbot Dataset from Kaggle
Integrating TruLens with FeedbackManager
The FeedbackManager class would use TruLens as follows:
- Initialization: Incorporate TruLens during the initialization of the feedback manager to set up necessary model hooks.
- Analysis: After receiving feedback on specific responses, use TruLens to analyze how the model processed the input that led to the response. This involves looking at the contributions of different features or embeddings.
- Reporting: Generate reports or logs that detail the influence of various features, which can be used to adjust the model or its training data.
By understanding the functionality and responsibility of each module, developers can better appreciate how they contribute to the overall functionality of the Query and Feedback System. This modular approach not only ensures a clean and organized codebase but also enhances the system's adaptability to new requirements as they arise.
Step 3: Open Your Project in an IDE
- Open your preferred Integrated Development Environment (IDE) like PyCharm, Visual Studio Code, or any other that supports Python development.
- Open the project folder you just created by selecting 'Open' from the file menu and navigating to your 'CustomerCareSystem' directory.
Now your project structure is set up, and you're ready to start coding! In the next steps of this tutorial, we will delve into writing the actual code for each of these components. Remember, a well-organized project directory is key to maintaining an efficient development process. Happy coding! 🚀💻
Step 3: Setting Up the Virtual Environment and Installing Dependencies
Now that we have our project structure in place, the next crucial step is to set up a virtual environment. This will isolate our project dependencies from the global Python environment, preventing conflicts and ensuring consistency across different setups. After setting up the environment, we'll install the necessary libraries and prepare our environment variables.
Creating a Virtual Environment
A virtual environment is essential for Python projects to manage package versions and dependencies effectively. Here’s how you can set up one:
-
Open your terminal and navigate to your project directory:
cd path/to/CustomerCareSystem -
Create the virtual environment:
- If you are using Python 3.x, which includes the
venvmodule, run:python -m venv venv - This command creates a new directory called
venvwhere the virtual environment files are stored.
- If you are using Python 3.x, which includes the
-
Activate the virtual environment:
- On Windows, run:
.\venv\Scripts\activate - On macOS or Linux, run:
source venv/bin/activate
- On Windows, run:
Installing Dependencies
With the virtual environment activated, install the following packages using pip. These commands install various libraries that are crucial for our system:
pip install llama-index
pip install llama-index-vector-stores-mongodb
pip install llama-index-embeddings-openai
pip install pymongo
pip install datasets
pip install pandas
pip install trulens_eval
pip install python-dotenv
pip install streamlit
pip install watchdog
Creating and Configuring the .env File
- Create a new file named
.envin the root of your project directory if it doesn't already exist. - Open the
.envfile with a text editor.
Adding the OPENAI_API_KEY
Add the following line to your .env file:
OPENAI_API_KEY=your_openai_api_key_here
Replace your_openai_api_key_here with the actual API key you retrieve from OpenAI.
Retrieving Your OpenAI API Key
To retrieve your OpenAI API key, you'll need to access the OpenAI dashboard. Follow these steps:
- Visit the OpenAI Dashboard: Go to OpenAI API Dashboard.
- Log in with your account credentials. If you don't have an account, you will need to sign up.
- Navigate to the API keys section: Here, you can view your existing API keys or generate a new one.
- Copy your API key: Ensure that you handle and store this key securely.
Why is the API Key Important?
The OPENAI_API_KEY is necessary for authenticating requests to OpenAI's APIs, which can include services like GPT models for generating text or Codex for writing code. In your project, this key enables the use of OpenAI embeddings through LlamaIndex, enhancing the ability to process and understand complex query inputs in your customer care system.
Security Note
Keep your .env file secure and do not share it or include it in version control systems. This file contains sensitive information that can compromise your application if exposed.
By setting up your .env file with the OpenAI API key, you are ready to leverage OpenAI's powerful capabilities within your project, ensuring that your application can efficiently handle and interpret user queries and feedback.
Configuring the Application with config.py
Now that we have our environment variables set up, the next step is to establish the application configurations in the config.py file. This file plays a crucial role in setting up and integrating the essential components for our project, specifically focusing on how we handle OpenAI's embeddings and models via LlamaIndex.
Understanding config.py
Here’s a breakdown of the provided code and its functions:
Code Explanation
from dotenv import load_dotenv
import os
from llama_index.core.settings import Settings
from llama_index.llms.openai import OpenAI
from llama_index.embeddings.openai import OpenAIEmbedding

class Configuration:
    def __init__(self):
        print("Loading environment variables...")
        load_dotenv()  # Loads the environment variables from the .env file.
        self.openai_api_key = os.getenv('OPENAI_API_KEY')  # Retrieves the OpenAI API key from the environment.

        if not self.openai_api_key:
            print("ERROR: OpenAI API key not found.")  # Error handling if API key is not found.

        self.embed_model = OpenAIEmbedding(model="text-embedding-3-small", dimensions=256)  # Setting up the embedding model.
        self.llm = OpenAI(api_key=self.openai_api_key)  # Initializing the OpenAI model with the API key.
        self.configure()  # Apply the configurations to the settings.

    def configure(self):
        print("Configuring settings...")
        Settings.llm = self.llm  # Sets the global LlamaIndex settings for the language model.
        Settings.embed_model = self.embed_model  # Sets the global embedding model.
Key Components
-
Environment Variables: The use of
load_dotenv()at the start of the initialization ensures that the environment variables from the.envfile are loaded into the system’s environment. -
API Key Management: It retrieves the
OPENAI_API_KEYusingos.getenv(). Proper management and retrieval of this key are crucial for authenticating requests to OpenAI. -
OpenAI Embeddings and Model: Initializes
OpenAIEmbeddingwith specific model details and dimensions, andOpenAIwith the retrieved API key. This setup is vital for processing queries as it allows us to utilize powerful text embedding capabilities for vectorizing queries. -
Configuration Application: The
configure()method applies these initialized objects to theSettingsclass from LlamaIndex. This approach centralizes the configuration of LlamaIndex, simplifying further integrations and adjustments in the embedding and language model handling.
Understanding and Setting Up data_manager.py
Certainly! Let's delve deeper into the data_manager.py script, breaking down its components and functionalities with proper explanations and code formatting. This will help to understand how each part contributes to the overall functionality of managing data operations in the project.
Script Breakdown and Explanation
DataManager Class
The DataManager class handles MongoDB connections and document management, which includes loading data from JSON and creating document entries.
from llama_index.core import Document, VectorStoreIndex
from llama_index.core.node_parser import SentenceSplitter
from llama_index.vector_stores.mongodb import MongoDBAtlasVectorSearch
from pymongo import MongoClient
import json


class DataManager:
    def __init__(self, mongo_uri, db_name, collection_name, json_path=None):
        print("Initializing DataManager...")
        self.client = MongoClient(mongo_uri)
        self.db = self.client[db_name]
        self.collection = self.db[collection_name]
        self.json_path = json_path
        self.parser = SentenceSplitter()

    def load_json_data(self):
        print(f"Loading data from {self.json_path}...")
        with open(self.json_path, 'r') as file:
            return json.load(file)

    def create_documents(self, faq_data):
        print("Creating documents...")
        documents = []
        for item in faq_data['questions']:
            document = Document(
                text=f"Question: {item['question']}\nAnswer: {item['answer']}",
                metadata={'question': item['question'], 'answer': item['answer']},
                text_template="Metadata: {metadata_str}\n-----\nContent: {content}"
            )
            documents.append(document)
        return documents

    def process_documents(self):
        faq_data = self.load_json_data()
        documents = self.create_documents(faq_data)
        for document in documents:
            self.collection.insert_one({
                'text': document.text,
                'metadata': document.metadata
            })
Key Functions:
- MongoDB Connection Setup: Establishes connection to the MongoDB database and specific collection.
- JSON Data Loader: Loads FAQ data from a specified JSON file.
- Document Creation: Converts JSON data into a format suitable for database insertion and further processing.
DocumentProcessor Class
This class is tasked with processing documents by generating embeddings, which are crucial for indexing and search functionalities.
class DocumentProcessor:
    def __init__(self, data_manager, embedding_service):
        print("Initializing DocumentProcessor...")
        self.data_manager = data_manager
        self.embedding_service = embedding_service

    def process_documents(self):
        print("Processing documents...")
        documents = self.data_manager.create_documents(self.data_manager.load_json_data())
        nodes = []
        for document in documents:
            print(f"Getting embedding for document content: {document.text[:60]}...")
            embedding = self.embedding_service.get_text_embedding(document.text)
            document.embedding = embedding  # Set the embedding attribute
            document.metadata['embedding'] = ",".join(map(str, embedding))  # Convert embedding to string
            nodes.append(document)
        return nodes
Key Functions:
- Embedding Generation: Retrieves embeddings for each document using the configured OpenAI service, enhancing the document's utility in vector-based search operations.
IndexManager Class
Responsible for the management and creation of indices in the MongoDB database, facilitating efficient data retrieval.
class IndexManager:
    def __init__(self, mongo_uri, db_name, collection_name, index_name):
        print("Initializing IndexManager...")
        self.client = MongoClient(mongo_uri)
        self.vector_store = MongoDBAtlasVectorSearch(self.client, db_name=db_name, collection_name=collection_name, index_name=index_name)

    def add_to_index(self, nodes):
        print("Adding nodes to index...")
        self.vector_store.add(nodes)

    def create_index(self):
        print("Creating vector store index...")
        return VectorStoreIndex.from_vector_store(self.vector_store)
Key Functions:
- **Index Setup
**: Configures the vector store in MongoDB for storing document embeddings.
- Index Creation: Generates a new vector store index, enabling efficient query operations based on vector similarity.
Putting It All Together
Each component of the script works in harmony to manage the application’s data flow—from initialization and configuration through to data processing and indexing. This ensures a robust backend capable of handling complex query functionalities efficiently.
Understanding the FeedbackManager Class and implementing feedback_manager.py
The FeedbackManager class in your project plays a critical role in enhancing the quality of the customer care system by integrating feedback mechanisms. This class utilizes the TruLens library to provide detailed insights into how well the system is handling queries. Below, I'll explain the key components of the FeedbackManager class and highlight the importance of TruLens in evaluating the system's responses.
Code Breakdown and Explanation
Imports and Initialization
from trulens_eval.feedback.provider import OpenAI
from trulens_eval import Feedback, TruLlama
from trulens_eval.app import App
import numpy as np
from trulens_eval.feedback import Groundedness

class FeedbackManager:
    def __init__(self, query_engine):
        self.query_engine = query_engine
        self.provider = OpenAI()
        self.context = App.select_context(self.query_engine)
        self.setup_feedback()
Key Components:
- Query Engine: The system component that processes queries. This is passed to the
FeedbackManagerto integrate feedback directly with query processing. - Provider Setup: Initializes the OpenAI feedback provider which will offer functionalities for evaluating various aspects of the response.
- Context Selection: Determines the appropriate context for feedback based on the query engine, ensuring that feedback is relevant and accurately targeted.
Feedback Setup Method
    def setup_feedback(self):
        grounded = Groundedness(groundedness_provider=OpenAI())
        self.f_groundedness = (
            Feedback(grounded.groundedness_measure_with_cot_reasons)
            .on(self.context.collect())
            .on_output()
            .aggregate(grounded.grounded_statements_aggregator)
        )

        self.f_answer_relevance = (
            Feedback(self.provider.relevance)
            .on_input_output()
        )

        self.f_context_relevance = (
            Feedback(self.provider.context_relevance_with_cot_reasons)
            .on_input()
            .on(self.context)
            .aggregate(np.mean)
        )
Key Functionalities:
- Groundedness: Measures how well the system's responses are grounded in reality or the given context, using measures from TruLens's OpenAI provider.
- Answer Relevance: Evaluates whether the system's responses are relevant to the queries posed, crucial for ensuring the system correctly understands user needs.
- Context Relevance: Assesses the relevance of the system’s responses within the broader context of the conversation, enhancing the overall user experience by maintaining conversation coherence.
Record Query Method
    def record_query(self, query):
        with TruLlama(self.query_engine, app_id='LlamaIndex_App1', feedbacks=[self.f_groundedness, self.f_answer_relevance, self.f_context_relevance]) as recording:
            self.query_engine.query(query)
        return recording.records
Functionality:
- Recording Session: Utilizes
TruLlamato create a recording session that captures the system's response to a query along with the associated feedback metrics. This method encapsulates the query processing and feedback evaluation in a single operation, allowing for comprehensive analysis.
Importance of TruLens
TruLens is integral to the FeedbackManager class for several reasons:
- Enhanced Model Understanding: By using feedback metrics like groundedness and relevance, TruLens helps understand how well the model's responses align with user expectations and the factual context.
- Continuous Improvement: Feedback data can be used to continually refine and improve the model, ensuring that it adapts to new data and user interactions.
- Quality Assurance: By systematically evaluating response quality, TruLens ensures high standards of customer interaction, directly contributing to better user satisfaction.
This class is a pivotal component of your system, leveraging advanced feedback analysis to maintain and enhance the quality of interactions within the customer care system. By integrating TruLens, you ensure that your system is not just functional but also effective and user-centric.
Exploring the QueryManager Class and implementing query_manager.py
The QueryManager class is designed to handle query operations within your customer care system. It utilizes the LlamaIndex library to perform efficient search operations based on vector similarity. Below, I'll break down the functionality of the QueryManager class, detailing each component and its purpose in the system. Write the following code in the query_manager.py file
Code Breakdown and Explanation
Imports and Class Definition
from llama_index.core.response.notebook_utils import display_response
import pprint

class QueryManager:
    def __init__(self, index):
        self.query_engine = index.as_query_engine(similarity_top_k=3)
Key Components:
- index.as_query_engine: Converts a given index into a query engine. The
similarity_top_k=3parameter configures the engine to retrieve the top 3 most similar results, which is useful for providing users with a few relevant options without overwhelming them with too many.
Method to Perform Queries
    def perform_query(self, query):
        response = self.query_engine.query(query)
        display_response(response)
        pprint.pprint(response.source_nodes)
        return response
Key Functionalities:
- Query Execution: The
query_engine.query(query)function performs the actual query against the indexed data, retrieving results based on vector similarity. - Display Response: The
display_response(response)function is likely a utility for visualizing responses in a more readable or user-friendly format. This can be particularly useful in debugging or demonstration scenarios to quickly assess how well the query engine is performing. - Print Response Details:
pprint.pprint(response.source_nodes)prints the details of the response nodes. This step is important for understanding the underlying data that was matched in the query, which can help in fine-tuning the search results or diagnosing issues with the query engine. - Return Response: The response object is returned, allowing further processing or logging outside of this method if necessary.
Importance of Query Management
The QueryManager class plays a critical role in the functionality of the customer care system by managing the retrieval of information in response to user queries. Here are a few reasons why effective query management is crucial:
- Efficiency: Efficient retrieval of information is essential in customer care environments to ensure that users receive timely and relevant responses.
- Relevance: By using a similarity-based approach, the system ensures that the responses are as relevant as possible to the user's inquiry, which is key to maintaining user engagement and satisfaction.
- Scalability: Handling queries through a dedicated manager allows for easier scalability. As the volume of data or number of users grows, the system can be scaled to maintain performance without major changes to the core logic.
- Debugging and Maintenance: Having a centralized query manager makes it easier to maintain and debug the system, as all query-related functionalities are encapsulated in a single class.
Setting Up MongoDB Atlas and Initializing the Project with setup.py
Before you can run the setup.py script in your project, you need to set up a MongoDB Atlas account and configure your database cluster. MongoDB Atlas serves as a robust platform for both operational and vector database operations, offering streamlined database maintenance, management, and cost-efficiency. Here's a step-by-step guide on setting up your MongoDB Atlas account and retrieving your connection URI, which is essential for the setup.py script.
Step 1: Register or Sign In to MongoDB Atlas
-
Register for a Free MongoDB Atlas Account:
- Visit the MongoDB Atlas Registration page to create a new account.
- Fill in the necessary details and sign up.
-
For Existing Users:
- Sign into MongoDB Atlas if you already have an account.
Step 2: Create a New Database Cluster
-
Navigate to the Database Section:
- Once logged in, select the “Database” option on the left-hand pane to go to the Database Deployment page.
-
Start a New Cluster:
- Click on the "+Create" button to initiate a new database cluster setup.

- Configure Your Cluster:
- Choose the configurations applicable for your project needs. For trial purposes, you can select a free cluster on the “Shared Tab.”
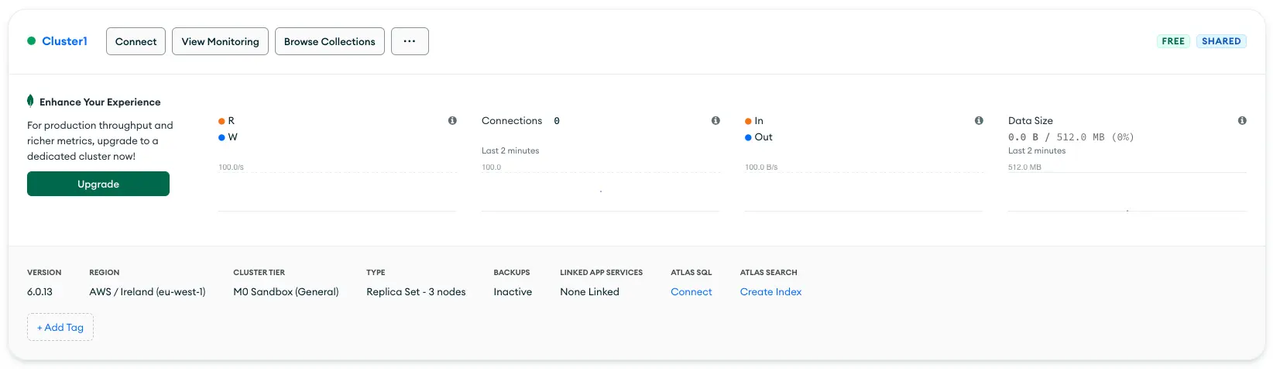
- Deploy Your Cluster:
- After configuring, click the “Create Cluster” button. Remember to whitelist the IP for the Python host or set it to 0.0.0.0/0 for broader access during development.
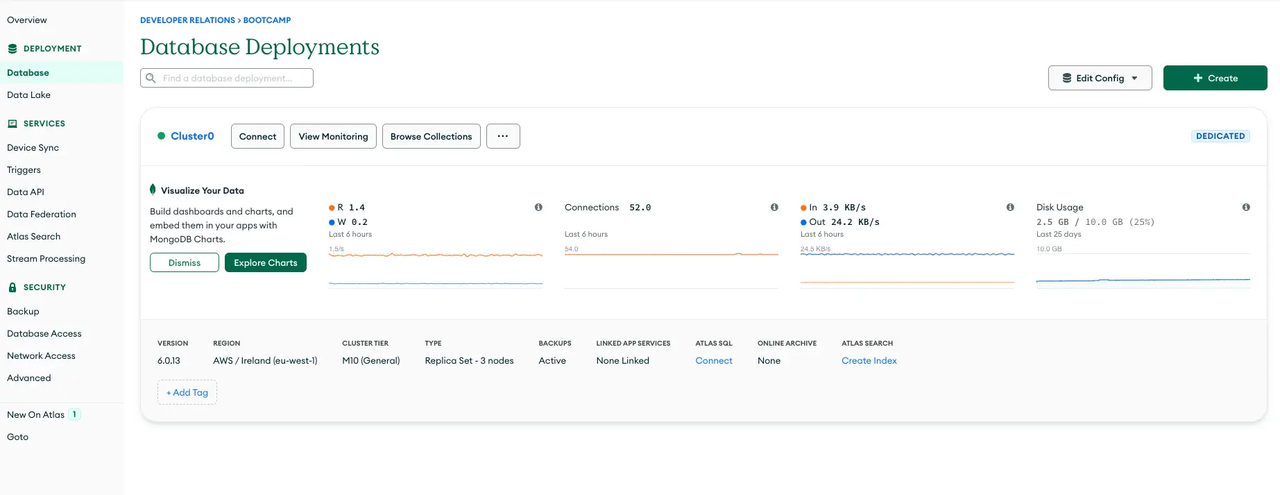
Step 3: Connect to Your Cluster
-
Access the Cluster:
- Once the cluster is deployed, it will be accessible from the “Database Deployment” page.
-
Setup Connection:
- Click on the “Connect” button of your cluster to view the options for connection setup.

- Retrieve the MongoDB URI:
- Choose to connect with a MongoDB driver for Python. The setup will provide you with a URI (unique resource identifier).
- Securely copy this URI and save it in your project’s
.envfile asMONGO_URI, or use it directly in yoursetup.pyscript.

Implementing setup.py
Once you have your MongoDB URI, you can proceed with the setup.py script:
from data_manager import DataManager, DocumentProcessor, IndexManager
from config import Configuration

def setup():
    config = Configuration()
    mongo_uri = 'your_mongo_uri_here'  # Replace with your actual MongoDB URI
    db_name = 'CustomerService'
    collection_name = 'data'
    json_path = 'Ecommerce_FAQ_Chatbot_dataset.json'

    data_manager = DataManager(mongo_uri, db_name, collection_name, json_path=json_path)
    document_processor = DocumentProcessor(data_manager, config.embed_model)
    nodes = document_processor.process_documents()

    index_manager = IndexManager(mongo_uri, db_name, collection_name, index_name='vector_index')
    index_manager.add_to_index(nodes)
    vector_index = index_manager.create_index()

    return vector_index
In this script:
- DataManager: Manages data loading and document creation.
- DocumentProcessor: Processes documents to generate embeddings.
- IndexManager: Handles the indexing of documents in the MongoDB database.
This setup establishes the necessary components for your Query and Feedback System to function efficiently, leveraging MongoDB's capabilities to handle large-scale vector data.
Setting Up Vector Index in MongoDB Atlas
Creating a vector search index within your MongoDB collection is essential for enabling efficient document retrieval based on vector similarities. This process is particularly important in applications involving large datasets and the need for quick search functionalities, such as in your customer care system where responses are retrieved based on query similarities.
Step-by-Step Guide to Creating a Vector Search Index
Step 1: Access Your MongoDB Atlas Dashboard
First, ensure that you are logged into your MongoDB Atlas account. Navigate to your project where your database cluster resides.

Step 2: Navigate to Your Collection
- Select the cluster that contains the database you want to work with.
- Click on the "ATLAS SEARCH" tab to view the indexes.
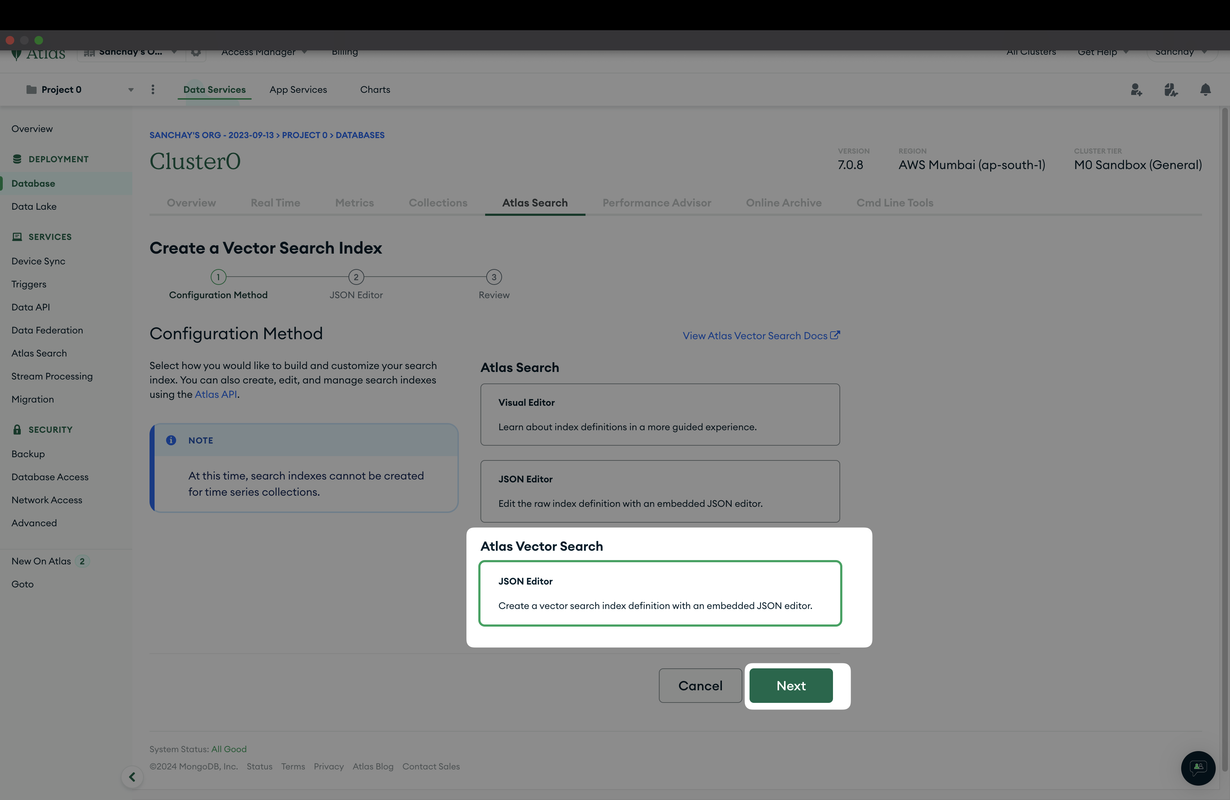
Step 3: Create the Vector Search Index
- Open the collection where you want to create the index, such as
movies_records. - In the collection's interface, look for the "Indexes" tab and click on it.
- Click on the "Create Index" button, then choose the JSON editor option.

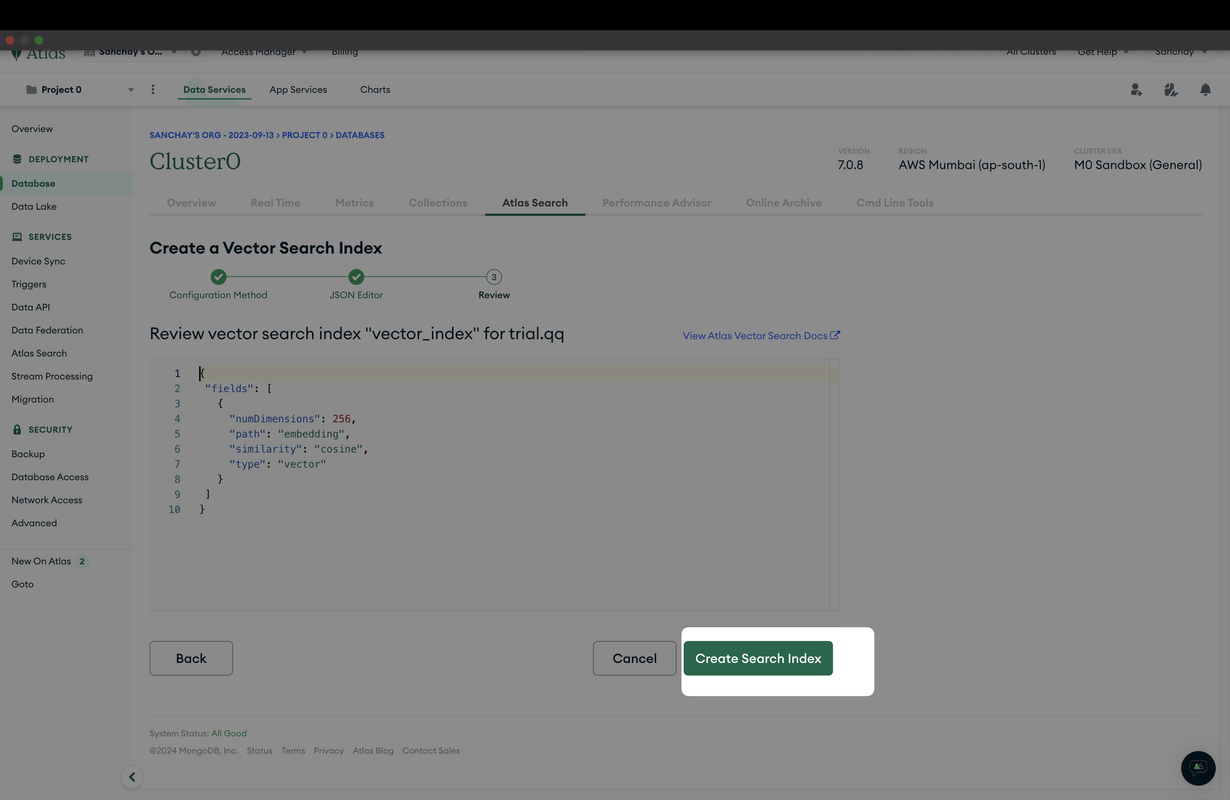
Step 4: Configure the Vector Search Index
In the JSON editor, enter the following JSON configuration to define your vector search index. This configuration specifies the properties of the index, such as the number of dimensions, the path of the indexed field, the similarity measure, and the index type:
{
 "fields": [
   {
     "numDimensions": 256,
     "path": "embedding",
     "similarity": "cosine",
     "type": "vector"
   }
 ]
}
Key Components:
- numDimensions: Specifies the dimensionality of the vector. In this case, it's 256, which should match the dimensionality of the embeddings you are using.
- path: Indicates the document field that contains the vector. Here, it is
embedding, assuming your documents have this field where the actual vector data is stored. - similarity: Defines the method used to compare vectors.
cosinesimilarity is common for comparing the angle between vectors, which is effective for many types of vector-based retrieval tasks. - type: Marks the field as a
vector, which is necessary for MongoDB to treat it appropriately for vector search operations.
Step 5: Save and Build the Index
After entering the JSON configuration, submit the form to create the index. MongoDB Atlas will begin building the index, which may take some time depending on the size of your data.
The FINAL piece , integrating everything in our app.py
Sure, let's delve deeper into the code and its components:
Importing Necessary Modules
import streamlit as st
from setup import setup  # This should only set up configurations, not load data.
from query_manager import QueryManager
from feedback_manager import FeedbackManager
from trulens_eval import Tru
The script begins by importing the necessary modules:
streamlit: This is a Python library used to create web applications quickly. It's being used here to create the user interface for the Query and Feedback System.setup: This is a module that contains thesetupfunction, which is responsible for setting up the system's configurations. It's important to note that this function should only set up configurations and not load data.QueryManager: This is a class imported from thequery_managermodule. It's responsible for handling all query-related operations.FeedbackManager: This is a class imported from thefeedback_managermodule. It's responsible for managing user feedback.Tru: This is a class imported from thetrulens_evalmodule. It's used for launching the TRU Dashboard.
Initializing TRU Dashboard
def initialize_tru():
    if 'tru' not in st.session_state:
        st.session_state.tru = Tru()
The initialize_tru function checks if the TRU Dashboard has been initialized. If it hasn't, it initializes it and stores it in the Streamlit session state. The session state allows data to persist across multiple user interactions with the application.
Main Function
def main():
    st.title('🔍 Query and Feedback System')
    st.markdown("""
    Welcome to the **Query and Feedback System**! 🌟 This tool is designed to process your queries with precision and provide real-time feedback.
    Use this system to harness powerful insights from your data, interactively and efficiently.
    """)

    initialize_tru()

    with st.sidebar:
        st.header('⚙️ Configuration')
        st.caption("Adjust system settings and initialize resources as needed.")
        if 'vector_index' not in st.session_state:
            if st.button('Initialize System', key='init_system'):
                with st.spinner('🔄 Setting up resources...'):
                    st.session_state.vector_index = setup()
                st.success('System initialized successfully! 🎉')

    st.header('📝 Submit Your Query')
    query = st.text_input('Enter your query here:', key='query_input')

    if st.button('Submit', key='submit_query'):
        if 'vector_index' not in st.session_state:
            with st.spinner('🔄 Initializing resources...'):
                st.session_state.vector_index = setup()

        query_manager = QueryManager(st.session_state.vector_index)
        st.session_state.response = query_manager.perform_query(query)

        feedback_manager = FeedbackManager(query_manager.query_engine)
        st.session_state.records = feedback_manager.record_query(query)

        # Custom HTML styling for response display
        st.markdown(f"**Response:** <div style='background-color:yellow;padding:10px;border-radius:5px;'>{st.session_state.response.response}</div>", unsafe_allow_html=True)
        st.write('Response:', st.session_state.response)
        st.write('Feedback Records:', st.session_state.records)

    manage_dashboard()
The main function is the entry point of the application. It's responsible for setting up the Streamlit interface and handling user interactions. It does this by calling other functions that handle specific tasks, such as initializing the TRU Dashboard, managing the sidebar, handling query submissions, and managing the dashboard.
Managing the Dashboard
def manage_dashboard():
    st.header('🎮 Dashboard Management')
    port = 7000
    ip_address = "192.0.0.2"

    if st.button('🚀 Launch TRU Dashboard', key='launch_dashboard'):
        try:
            st.session_state.dashboard_process = st.session_state.tru.run_dashboard(port=port, force=True)
            st.success(f"🌐 Dashboard is now running on [http://{ip_address}:{port}](http://{ip_address}:{port})")
        except Exception as e:
            st.error(f"🚨 Error launching dashboard: {str(e)}")

    if st.button('🛑 Stop TRU Dashboard', key='stop_dashboard'):
        if 'dashboard_process' in st.session_state and st.session_state.dashboard_process is not None:
            st.session_state.dashboard_process.terminate()
            st.success("Dashboard has been stopped. 🛑")
The manage_dashboard function provides controls for managing the TRU Dashboard. It includes buttons for launching and stopping the dashboard. It also handles any exceptions that might occur during these operations.
Main Execution
if __name__ == '__main__':
    main()
This is the entry point of the script. When the script is run directly (not imported as a module), it calls the main function to start the application.
In summary, the app.py script provides a user-friendly interface for interacting with the Query and Feedback System. It leverages Streamlit's capabilities to create an interactive web application, allowing users to submit queries, view responses, and manage the TRU Dashboard.
Run and view the app
To run your Streamlit application, you need to use the streamlit run command followed by the name of your script. In your case, the script is app.py. Here's how you can do it:
- Open your terminal or command prompt.
- Navigate to the directory where your
app.pyscript is located using thecdcommand. - Run the following command:
streamlit run app.py
This command will start the Streamlit server and your application should be accessible in your web browser at the local address provided in the terminal (usually http://localhost:8501).
System Walkthrough
Let's wrap up our walkthrough with a showcase of the system's capabilities and features through a sequence of user interface snapshots.
Step 1: System Initialization
Here's where we kick off our journey. The 'Initialize System' button brings our application to life, setting up all necessary services and resources.

Step 2: Submitting Queries
Users are welcomed by a straightforward prompt to enter their questions. This simplicity ensures clarity in user interactions right from the start.
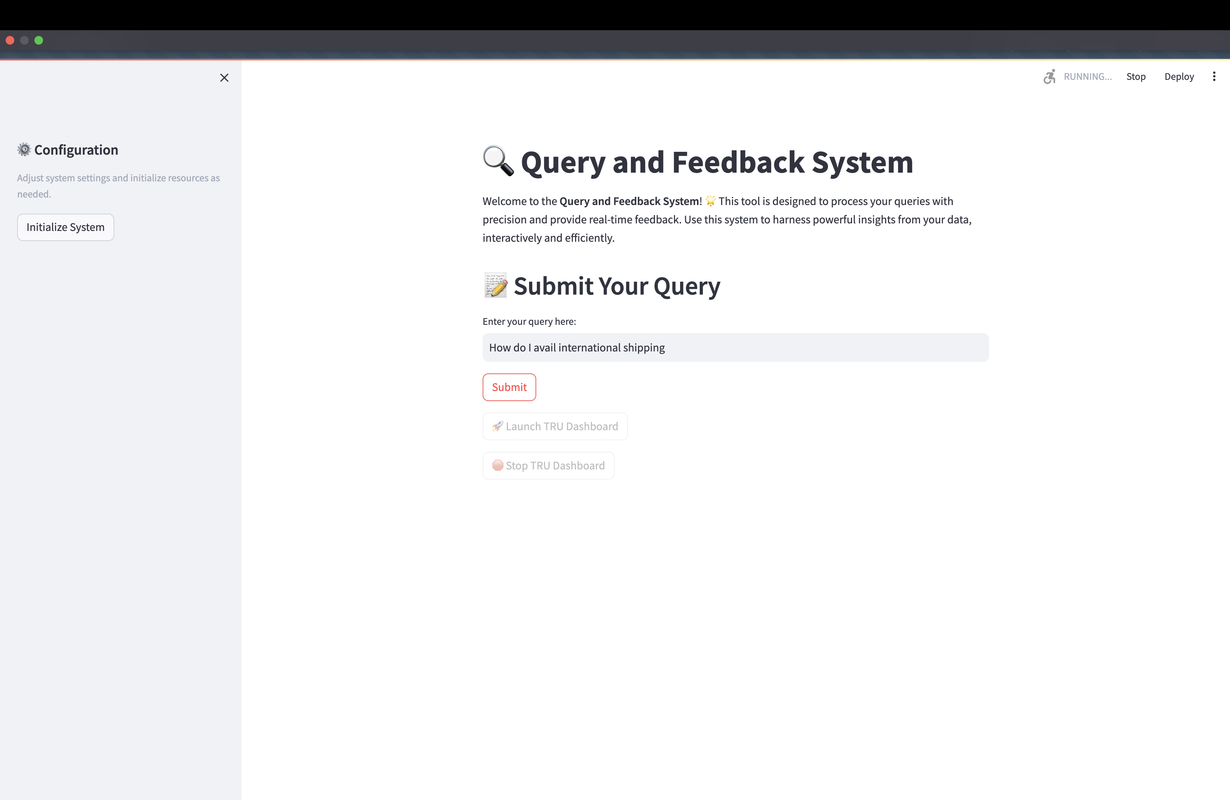
Step 3: Query Response
After a query is submitted, the system swiftly generates a response, showcasing the effectiveness of our backend processes in real-time.
View high resolution of this image here: https://drive.google.com/file/d/1DEBEIRuCRTmKVet4Vs5KPFbUPVYyf8kx/view?usp=sharing
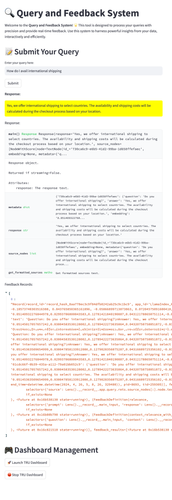
Step 4: Response Analysis
A deeper look into the given answer and the associated data reveals the system's decision-making process and the quality of feedback provided.
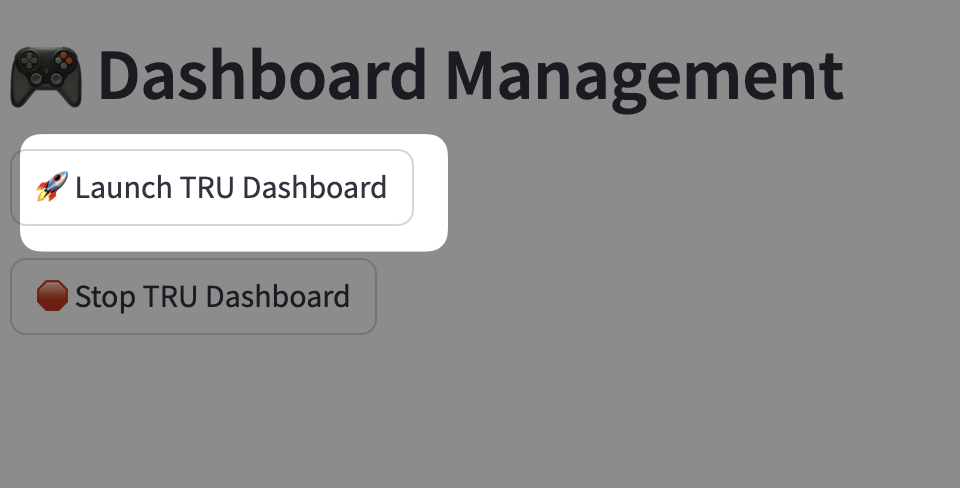
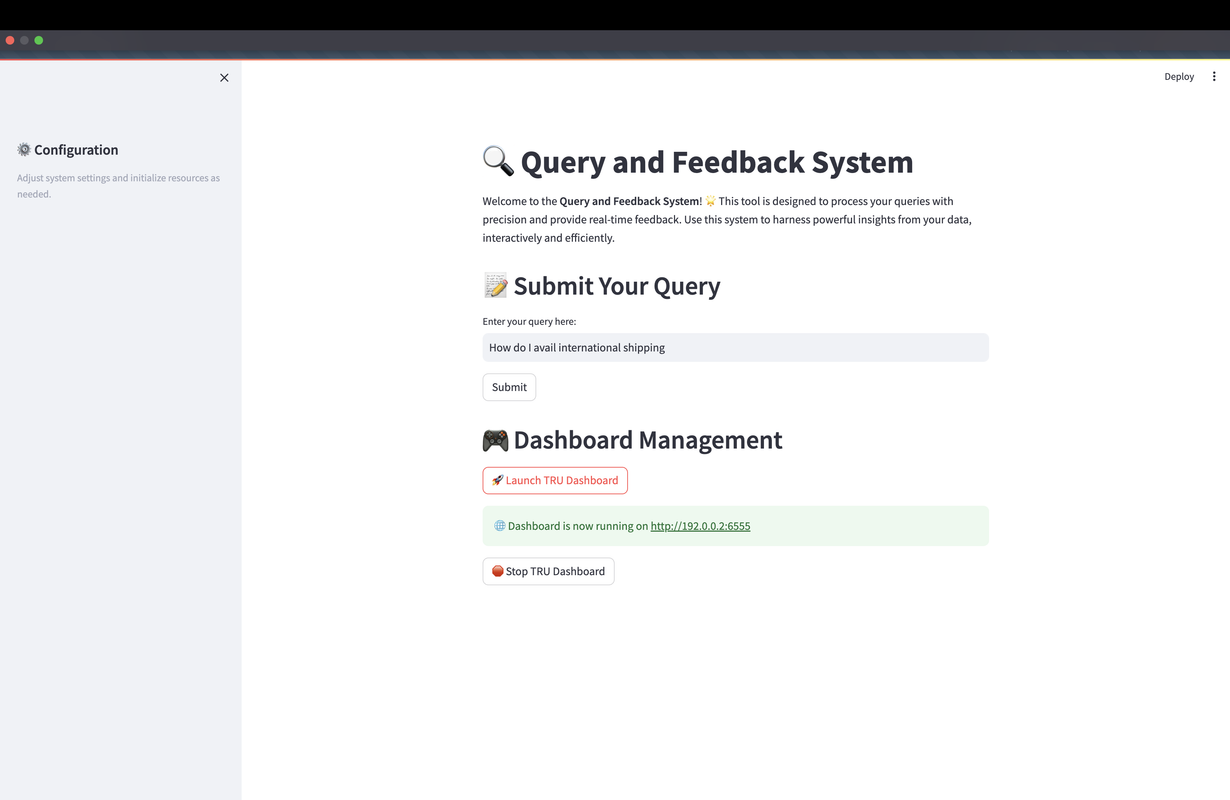
Step 5: Dashboard Management
Efficient management tools are in place, including features to launch or halt the TRU Dashboard, offering control over the system's operations.
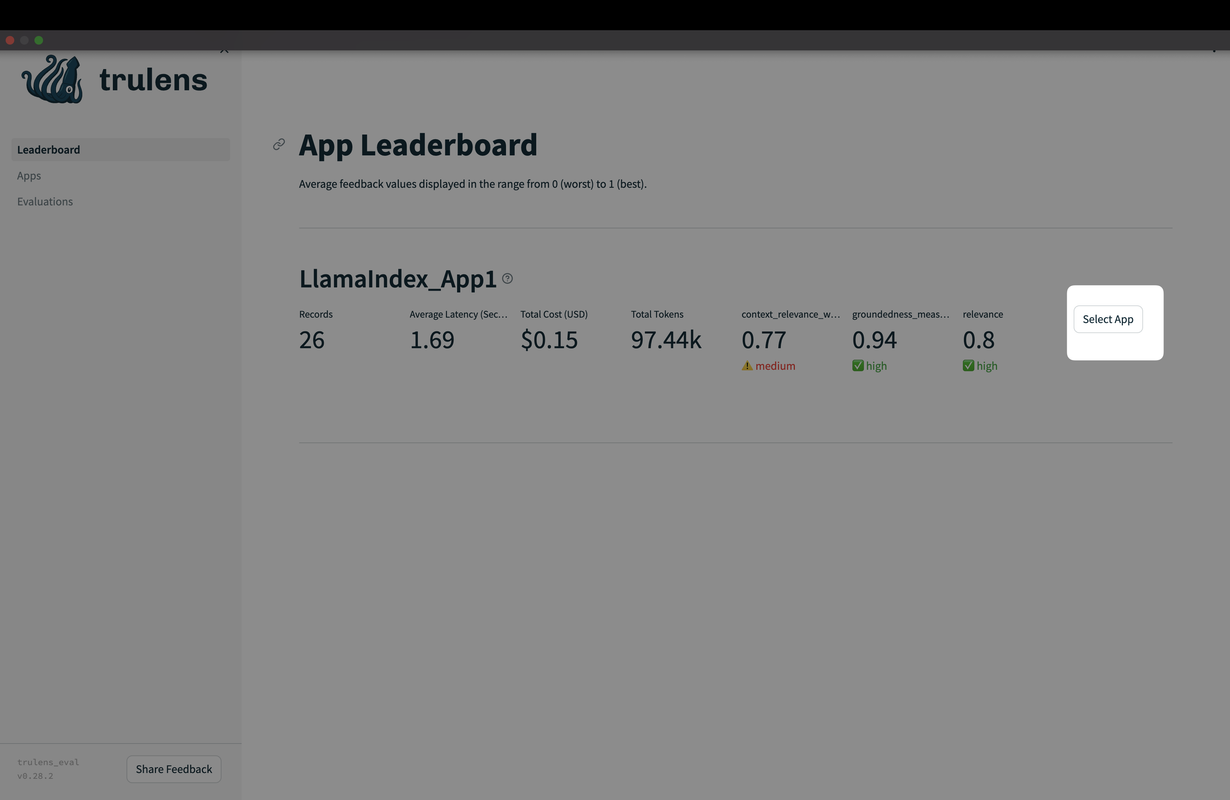
Step 6: App Leaderboard
The App Leaderboard displays key performance metrics, giving insights into the system’s efficiency and helping to pinpoint areas for improvement.
Step 7: Evaluation Records
Finally, detailed records from each interaction and feedback session are available for scrutiny, illustrating the system’s transparency and accountability.

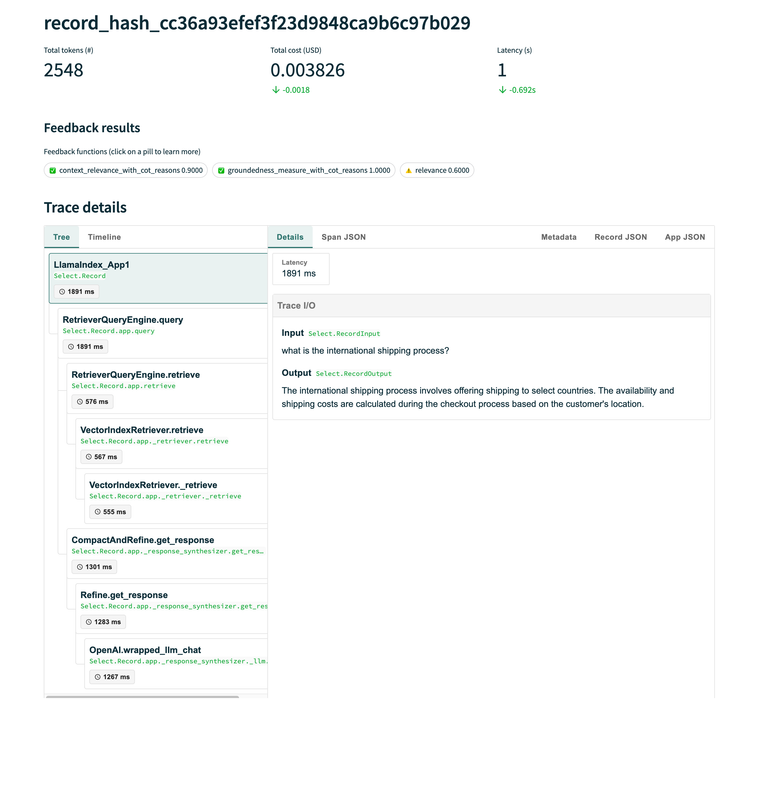
Step 8: Trace Details
The Trace Details offer a granular view of each step the system took in handling queries, invaluable for in-depth analysis and system tuning.
With each module, we’ve not only created a tool but also an ecosystem that thrives on user feedback and data-driven decisions. As you’ve seen through these steps, our system is built for adaptability and growth.
For a deep dive into the code and to explore the full capabilities of the Query and Feedback System, be sure to visit the GitHub repository. There, you'll find all the resources you need to customize and deploy a system that aligns perfectly with your operational needs.
Embark on this technological adventure, and watch as your customer care system transforms into a bastion of efficiency and user satisfaction. 🌟