Stable Diffusion tutorial: how to build a Text-to-Image Generator with Stable Diffusion, Next.js, and Vercel
In this tutorial, we will build a web application that generates images based on text prompts using Stable Diffusion, a deep learning text-to-image model. We'll utilize Next.js for the frontend/backend and deploy the application on Vercel.

Table of Contents
- Introduction
- Prerequisites
- Setting up the Next.js Project
- Installing Tailwind CSS
- Creating the Image Generation Form
- Creating the API Route for Stable Diffusion
- Deploying the Application on Vercel
- Conclusion
Introduction
Stable Diffusion is a powerful text-to-image model that can generate highly detailed images based on textual descriptions. In this tutorial, we will build a web application that allows users to input a text prompt and generate an image based on that prompt using Stable Diffusion.
This web application can serve as a great starting point for further experimentation and development of creative tools based on a variety of Stable Diffusion models.
Prerequisites
Before we begin, make sure you have the following installed on your machine:
- Node.js
- npm
Additionally, you should sign up for a Vercel account if you don't already have one.
Setting up the Next.js Project
First, let's create a new Next.js project with TypeScript and ESLint.
npx create-next-app@latest my-project --typescript --eslint
cd my-project
This command will create a new Next.js project with TypeScript and ESLint support in a directory called my-project.
Installing Tailwind CSS
Now, we'll install Tailwind CSS to style our application. Follow these steps:
- Install Tailwind CSS and its peer dependencies:
npm install -D tailwindcss postcss autoprefixer
npx tailwindcss init -p
- Configure your template paths in
tailwind.config.js:
/** @type {import('tailwindcss').Config} */
module.exports = {
  content: [
    "./pages/**/*.{js,ts,jsx,tsx}",
    "./components/**/*.{js,ts,jsx,tsx}",
  ],
  theme: {
    extend: {},
  },
  plugins: [],
};
- Add the Tailwind directives to your
globals.cssfile:
@tailwind base;
@tailwind components;
@tailwind utilities;
- Run the development server:
npm run dev
Your Next.js project is now set up with Tailwind CSS.
Creating the Image Generation Form
Next, let's create a form for users to input their text prompts. Update your pages/index.tsx file with the following code:
import { useState } from 'react';

function Home() {
  const [inputValue, setInputValue] = useState('');
  const [imageUrl, setImageUrl] = useState('');
  const [loading, setLoading] = useState(false);

  const handleSubmit = async (event) => {
    event.preventDefault();
    setLoading(true);

    const response = await fetch('/api/stablediffusion', {
      method: 'POST',
      headers: {
        'Content-Type': 'application/json',
      },
      body: JSON.stringify({ value: inputValue }),
    });

    if (response.ok) {
      const data = await response.json();
      setImageUrl(data[0]);
    } else {
      console.error('Error:', response.statusText);
    }
    setLoading(false);
  };

  return (
    <div className="min-h-screen bg-gray-100 py-6 flex flex-col justify-center sm:py-12">
      <div className="relative py-3 sm:max-w-xl sm:mx-auto">
        <div className="absolute inset-0 bg-gradient-to-r from-cyan-400 via-green-500 to-cyan-400 shadow-lg transform -skew-y-6 sm:skew-y-0 sm:-rotate-6 sm:rounded-3xl"></div>
        <div className="relative px-4 py-10 bg-white shadow-lg sm:rounded-3xl sm:p-20">
          <form onSubmit={handleSubmit} className="max-w-md mx-auto space-y-4">
            <input
              type="text"
              value={inputValue}
              onChange={(e) => setInputValue(e.target.value)}
              className="w-full px-5 py-3 text-gray-700 bg-gray-200 rounded"
              placeholder="Enter a prompt..."
            />
            <button type="submit" className="w-full px-3 py-4 text-white bg-gradient-to-r from-cyan-400 via-green-500 to-cyan-400 rounded-md focus:outline-none" disabled={loading}>
              Submit
            </button>
          </form>
        </div>
      </div>
      {loading && (
        <div className="mt-12 flex justify-center">
          <div className="loader ease-linear rounded-full border-4 border-t-4 border-gray-200 h-12 w-12"></div>
        </div>
      )}
      {imageUrl && !loading && (
        <div className="mt-12 flex justify-center">
          <img src={imageUrl} alt="Generated image" className="rounded-xl shadow-lg" />
        </div>
      )}
      <style jsx>{`
        .loader {
          animation: spin 1s linear infinite;
          border-top-color: #3498db;
        }

        @keyframes spin {
          0% {
            transform: rotate(0deg);
          }
          100% {
            transform: rotate(360deg);
          }
        }
      `}</style>
    </div>
  );
}

export default Home;
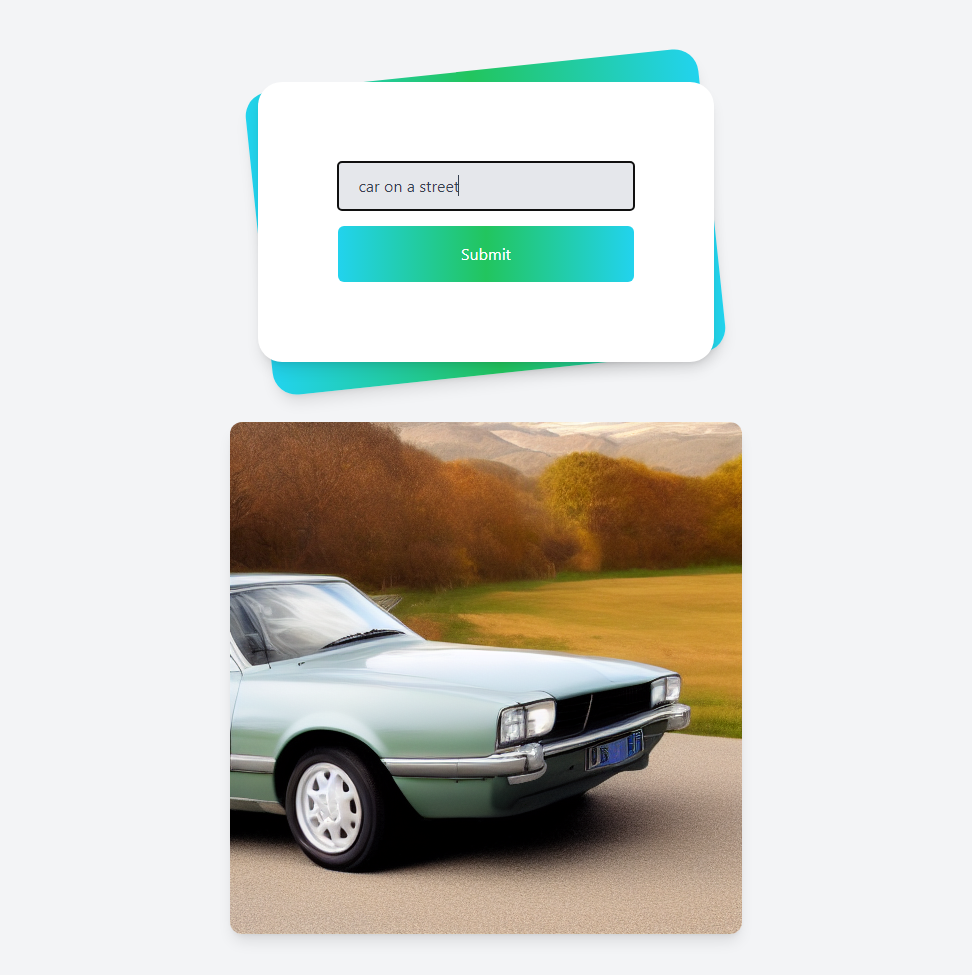
This code creates a form where users can input a text prompt and submit it to generate an image. It also displays a loading spinner while the image is being generated.
Creating the API Route for Stable Diffusion
Now, we'll create an API route to handle the Stable Diffusion image generation. Create a new file called pages/api/stablediffusion.ts and add the following code:
import Replicate from 'replicate';

const handler = async (req, res) => {
  if (req.method !== 'POST') {
    res.status(405).json({ message: 'Method not allowed' });
    return;
  }

  const { value } = req.body;

  try {
    const replicate = new Replicate({
      auth: process.env.REPLICATE_API_TOKEN,
    });

    const output = await replicate.run(
      "stability-ai/stable-diffusion:db21e45d3f7023abc2a46ee38a23973f6dce16bb082a930b0c49861f96d1e5bf",
      {
        input: {
          prompt: value,
          image_dimensions: "512x512",
          num_inference_steps: 12,
          num_outputs: 1,
          guideance_scale: 3.5,
          scheduler: "K_EULER",
        },
      },
    );

    res.status(200).json(output);
  } catch (error) {
    console.error(error);
    res.status(500).json({ message: 'Internal server error' });
  }
};

export default handler;
Make sure to add your Replicate API token in a .env file:
REPLICATE_API_TOKEN=your_replicate_api_token_here
This API route will handle requests from the frontend to generate images using the Stable Diffusion model.
Deploying the Application on Vercel
To deploy the application on Vercel, follow these steps:
- Install the Vercel CLI:
npm i -g vercel
- Log in to your Vercel account via the CLI:
vercel login
- Run the
vercelcommand in your project directory to deploy the application:
vercel
Follow the prompts to link your project to an existing Vercel project or to create a new one. Your application will be deployed on a unique URL, and you'll be able to access it in your web browser.
You can find the full code for this tutorial on GitHub.
Conclusion
In this tutorial, we have built a web application that generates images based on text prompts using Stable Diffusion. We used Next.js for the frontend, Tailwind CSS for styling, and deployed our application on Vercel. You can now use this application to generate images based on textual descriptions and explore the capabilities of the Stable Diffusion model.
And if you want to test the skills you have learnt in this tutorial, we would like to invite you to join our special Stable Diffusion AI Hackathon! During the 7 days event, you will have a unique opportunity to create a working prototype of an app using Vercel and Stable Diffusion with other like-minded people from all around the world!
Check our AI app page and learn more about AI apps projects created by our community members with Stable Diffusion, ChatGPT and many, many more AI based cutting edge technology! Maybe you will get inspired or maybe you will find a cool solution you would like to improve? Then don;t hesitate to reach out to the team and share with them your input and maybe join them on their journey of building AI based apps!
And we would love to invite you to join the community of creators, builders and innovators and shape the future with the power of AI!

Dev from Germany 🚀