GPT-3 and OCR tutorial: Text extraction and summarization with EasyOCR and GPT-3!
Acquiring Advanced Skills: YOLOv7 and GPT-3 at Your Fingertips
By the end of this AI tutorial, you'll know how to use EasyOCR for text extraction from various sources like photos, and harnessing the power of OpenAI's GPT-3 for text summarization!
Unraveling EasyCOR: A Software Powerhouse
EasyCOR, a private entity, is a powerhouse in the realm of software publishing, consultancy, and supply. They excel in creating ready-made software, operating systems software, business applications software, and computer games software for all platforms. They also offer custom software solutions after a thorough analysis of user needs and problems.
YOLOv7 Unveiled: The Future of Object Detection
YOLOv7, the latest addition to the YOLO family of single-stage object detectors, is a game-changer in the field of object detection. It processes image frames through a backbone to extract features, which are then mixed and combined in a "neck", and finally passed to the "head" of the network. Here, it predicts the locations and classes of objects, drawing bounding boxes around them. A post-processing step via non-maximum suppression (NMS) is conducted to arrive at its final prediction.
YOLOv7, the brainchild of WongKinYiu and Alexey Bochkovskiy (AlexeyAB), introduces several changes to the YOLO network and training routines to enhance bounding box accuracy and inference speed. It employs extended efficient layer aggregation, model scaling techniques, re-parameterization planning, and an auxiliary head for coarse-to-fine predictions. The YOLOv7 GitHub repository provides all the necessary code to start training YOLOv7 on custom data, defined in PyTorch and written in Python.
🚀 Getting started
📚 Installing dependencies
We will start by downloading the necessary libraries:
pip install easyocr openai matplotlib python-dotenv
🤖 Coding
For this tutorial I will use VSC, but you can use whatever environment you want, including notebooks or Google Colab.
Note: I will use single file for this tutorial, but feel free to split code into modules.
🧰 Import depedencies
import os
import cv2
import openai
import easyocr
import matplotlib.pyplot as plt
from torch.cuda import is_available
from dotenv import load_dotenv
📜 Text extraction from image
For this task we will use the EasyOCR. We will create a class that will be able to extract the text for us!
class Reader:
    def __init__(self, is_cuda=False):
        self.reader = easyocr.Reader(['en'], gpu=is_cuda, model_storage_directory=os.path.join('models'), download_enabled=True)

    def __call__(self, img):
        return self.extract_text(img)

    def extract_text(self, img, show_text=False, show_confidence=False):
        result = self.reader.readtext(img)

        extracted_text = []

        for text in filter(lambda x: x[-1] > .45, result):
            box, acc_text, confidence = text

            # box[0] and box[2] - upper left and lower right corners of the box
            img = cv2.rectangle(img, [int(i) for i in box[0]], [int(i) for i in box[2]], (0, 255, 0), 2) # each coordinate is a list has to be int

            if show_text and show_confidence:
                img_text = f'{acc_text} - ({"{:.3f}".format(confidence)}%)'

            elif show_text:
                img_text = acc_text

            elif show_confidence:
                img_text = f'CONF: ({"{:.3f}".format(confidence)}%)'

            if show_text or show_confidence:
                img = cv2.putText(
                    img,
                    img_text,
                    (int(box[0][0]), int(box[0][1] - 3)),
                    cv2.FONT_HERSHEY_SIMPLEX,
                    fontScale=.5,
                    color=(168, 90, 50),
                    thickness=2
                )

            extracted_text.append(acc_text)

        return extracted_text, img
In __init__ method we define the Reader for English, it will use GPU if it is available, and it will download the models to ./models directory if they are not downloaded yet.
__call__ method allows us to directly call extract_text method using only instance of the class like a function, for example:
reader = Reader()

result = reader(img) # executes `extract_text` method and returns result
Last method is extract_text method. It takes an image as an argument and returns a list of extracted text and the image with bounding boxes. It filters out texts with confidence less than 45%. Method returns tuple: list of extracted texts and image with bounding boxes, if we want it can also show the text and confidence for each bounding box.
Now we can try to use this class to extract text from an image. To make out lives easier I will create function for loading images:
def read_img(img_path):
    img = cv2.imread(img_path)
    img = cv2.cvtColor(img, cv2.COLOR_BGR2RGB)

    return img
I will use image from Adrian's previous tutorial:
if __name__ == '__main__':

    reader = Reader(is_cuda=is_available())

    img = read_img('./example_post.png')
    text, extracted_image = reader(img)

    text = ' '.join(text)

    print('Extracted_text')
    print(text)

    plt.imshow(extracted_image)
    plt.show()
Results:
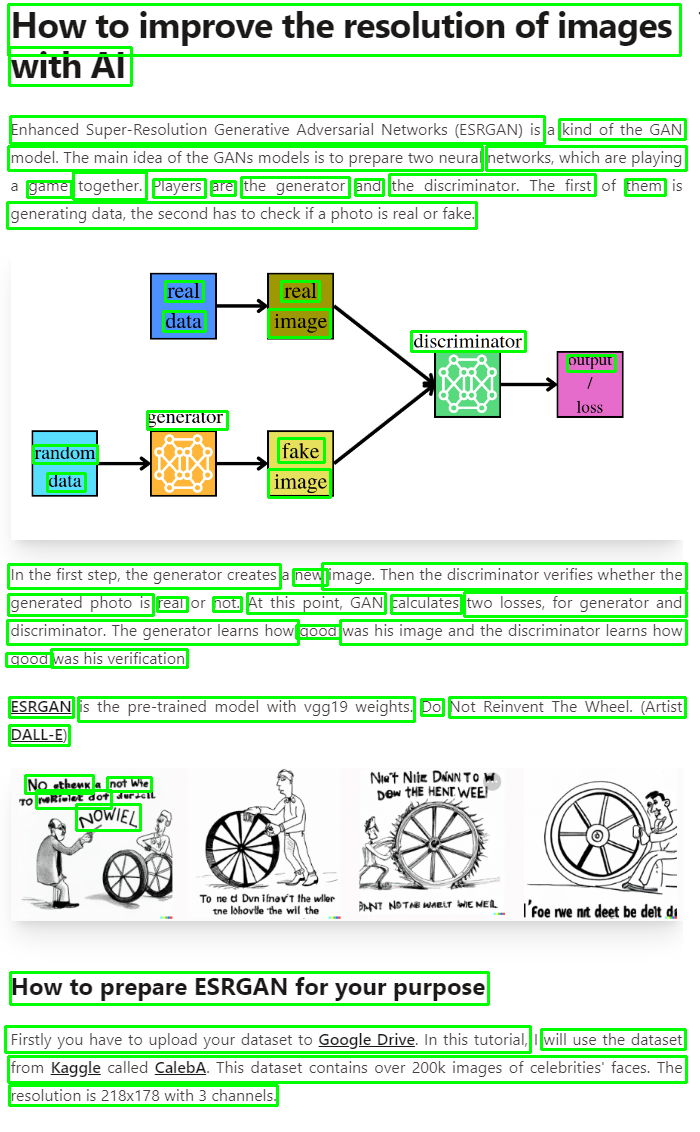
- Image with bounding boxes

- Extracted text
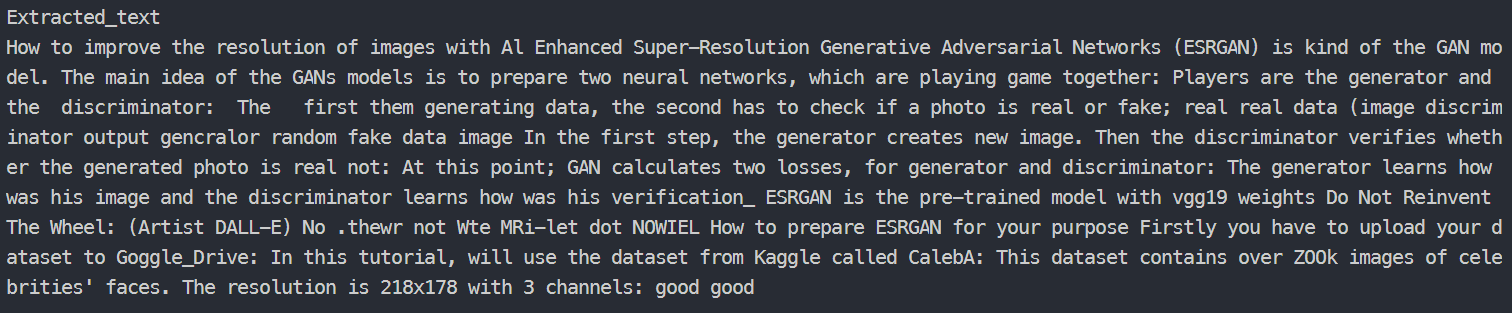
Not that bad!
📝 Text summarization!
We've already done a really good job! But it's not over yet. Now we move on to the text summary using GPT-3.
In this case we also create a class, that will handle our requests to GPT.
Firstly I will create .env file and I will put here my OpenAI API key.
OPENAI_API_KEY=<your_api_key>
Now I will define class for GPT-3.
class GPT_3:
    def __init__(self, api_key):
        openai.api_key = api_key

        self.completion = openai.Completion
        self.options = {
            'engine': 'text-davinci-002',
            'temperature': 0.25,
            'top_p': 1,
            'frequency_penalty': 0,
            'presence_penalty': 0,
            'max_tokens': 512
        }

    def __call__(self, prompt, options=None):
        return self.prediction(prompt, options)

    def prediction(self, prompt, options=None):
        if not options:
            options = self.options

        return self.completion.create(prompt=prompt, **options)['choices'][0]['text']

    def summarize(self, text):
        prompt = f'Try to summarize the following text as best you can!\n\n{text}'

        return self.prediction(prompt=prompt)
In __init__ method we define the GPT-3 model, options for it, and we set the API key. You can read about these GPT-3 options here.
__call__ - this method has the same purpose as the previous class.
Third method - prediction allow us to make a prediction for a given prompt.
And finally: summarize method will summarize the given text.
🧪 Test it!
After completing the work, our code looks like this:
import os
import cv2
import openai
import easyocr
import matplotlib.pyplot as plt
from torch.cuda import is_available
from dotenv import load_dotenv

class Reader:
    def __init__(self, is_cuda=False):
        self.reader = easyocr.Reader(['en'], gpu=is_cuda, model_storage_directory=os.path.join('models'), download_enabled=True)

    def __call__(self, img):
        return self.extract_text(img)

    def extract_text(self, img, show_text=False, show_confidence=False):
        result = self.reader.readtext(img)

        extracted_text = []

        for text in filter(lambda x: x[-1] > .45, result):
            box, acc_text, confidence = text

            # box[0] and box[2] - upper left and lower right corners of the box
            img = cv2.rectangle(img, [int(i) for i in box[0]], [int(i) for i in box[2]], (0, 255, 0), 2) # each coordinate is a list has to be int

            if show_text and show_confidence:
                img_text = f'{acc_text} - ({"{:.3f}".format(confidence)}%)'

            elif show_text:
                img_text = acc_text

            elif show_confidence:
                img_text = f'CONF: ({"{:.3f}".format(confidence)}%)'

            if show_text or show_confidence:
                img = cv2.putText(
                    img,
                    img_text,
                    (int(box[0][0]), int(box[0][1] - 3)),
                    cv2.FONT_HERSHEY_SIMPLEX,
                    fontScale=.5,
                    color=(168, 90, 50),
                    thickness=2
                )

            extracted_text.append(acc_text)

        return extracted_text, img

class GPT_3:
    def __init__(self, api_key):
        openai.api_key = api_key

        self.completion = openai.Completion
        self.options = {
            'engine': 'text-davinci-002',
            'temperature': 0.25,
            'top_p': 1,
            'frequency_penalty': 0,
            'presence_penalty': 0,
            'max_tokens': 512
        }

    def __call__(self, prompt, options=None):
        return self.prediction(prompt, options)

    def prediction(self, prompt, options=None):
        if not options:
            options = self.options

        return self.completion.create(prompt=prompt, **options)['choices'][0]['text']

    def summarize(self, text):
        prompt = f'Try to summarize the following text as best you can!\n\n{text}'

        return self.prediction(prompt=prompt)

def read_img(img_path):
    img = cv2.imread(img_path)
    img = cv2.cvtColor(img, cv2.COLOR_BGR2RGB)

    return img

if __name__ == '__main__':
    load_dotenv() # Load secrets

    reader = Reader(is_cuda=is_available())
    gpt_3 = GPT_3(os.getenv('OPENAI_API_KEY'))

    img = read_img('./example_post.png')
    text, extracted_image = reader(img)

    text = ' '.join(text)

    print('Extracted_text')
    print(text)

    summarization_result = gpt_3.summarize(text)

    print('Summarized text:')
    print(summarization_result)

    plt.imshow(extracted_image)
    plt.show()
I will run the code again and see what happens.
- Image with bounding boxes
- Extracted text and summarization result
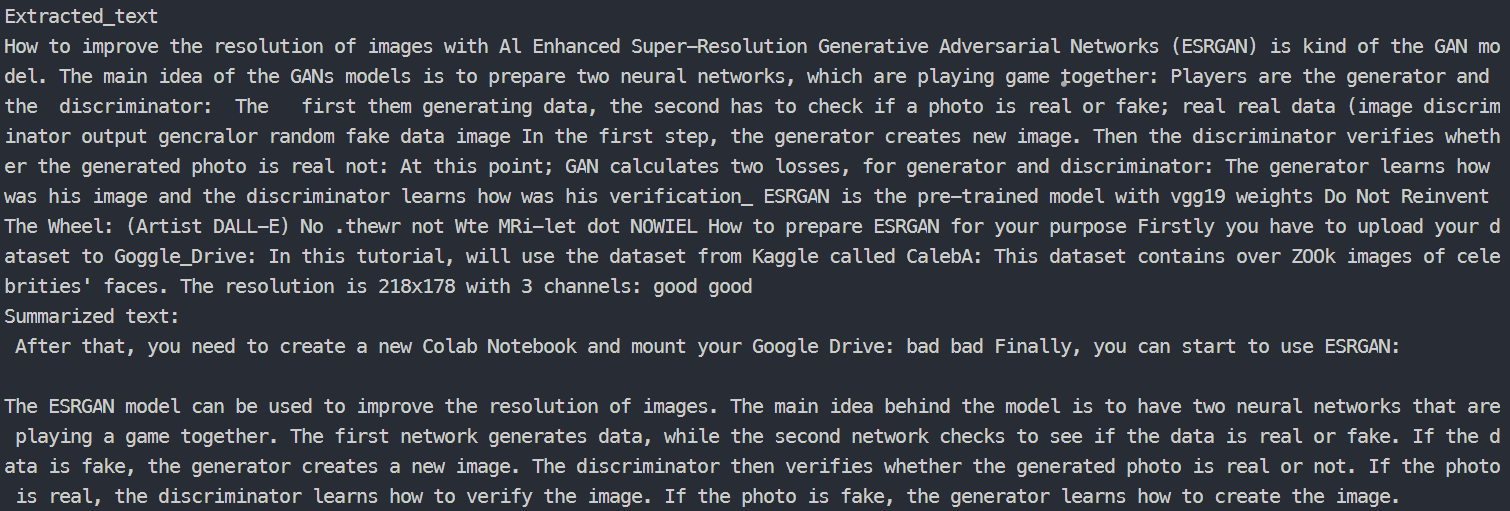
Wow! Look at this! We really are able to create simple app that will be able to summarize our text from a normal photo. Hope you can make good use of it.
➡️ Here I leave you a link to the entire repository. Have fun!
How many AI apps can I build?
That's a silly question because the only limitations are your resources. If you have a really good idea, which will fix a real-world's problem, you're halfway there. You also need to actually build it. And found it and market it out. But we can help you with all of those steps.
Just join our AI Hackathons and tell our amazing community of over 52 000 AI builders from all around the world about your idea. Then build it with them in 7 days and apply it to our AI Slingshot program. Really easy, right? Lablab.ai is a place for innovation and we welcome you to join!
Jakub Misiło, Data Science Intern in New Native
Co-Founder @ knm - https://knmstudio.com/