Esrgan tutoroial: how to improve the resolution of AI images
What is ESRGAN?
Enhanced Super-Resolution Generative Adversarial Networks (ESRGAN) is a kind of the GAN model. The main idea of the GANs models is to prepare two neural networks, which are playing a game together. Players are the generator and the discriminator. The first of them is generating data, the second has to check if a photo is real or fake.
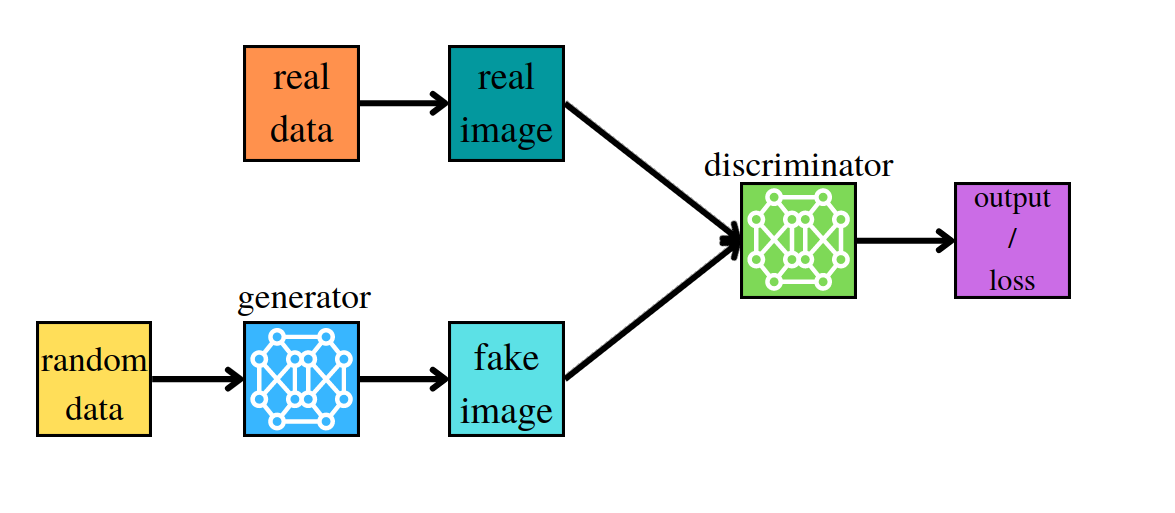
In the first step, the generator creates a new image. Then the discriminator verifies whether the generated photo is real or not. At this point, GAN calculates two losses, for generator and discriminator. The generator learns how good was his image and the discriminator learns how good was his verification.
ESRGAN is the pre-trained model with vgg19 weights. Do Not Reinvent The Wheel. (Artist DALL-E)
How to prepare ESRGAN for your purpose
Firstly you have to upload your dataset to Google Drive. In this tutorial, I will use the dataset from Kaggle called CalebA. This dataset contains over 200k images of celebrities' faces. The resolution is 218x178 with 3 channels.
If you want to use the same dataset, I recommend uploading only 10 000 images.
Nevertheless, you can use whatever you want!
Notebook
ESRGAN needs GPU with a large memory capacity, so in the tutorial, I use Google Colab. In which you can change Runtime type, click Runtime and choose GPU in Hardware accelerator.
Repository
Now we need to clone the repository with implemented ESRGAN
!git clone https://github.com/eriklindernoren/PyTorch-GAN
%cd PyTorch-GAN/
and install requirements.
!sudo pip3 install -r requirements.txt
%cd implementations/esrgan/
Loading data
Then, we can connect Google Drive with Google Colab by command:
from google.colab import drive
drive.mount('/content/drive')
I use the patool lib to extract files from my rar to Google Colab.
!pip install patool
import patoolib
patoolib.extract_archive("/content/drive/MyDrive/name_of_your_file.rar", outdir="/content/PyTorch-GAN/data")
Important outdirmust be "/content/PyTorch-GAN/data"
Testing dataset
A good practice is to have a testing dataset. The data was not used to train a model. To create testing set we can transfer some data from data/name_of_your_folder to data/test folder.
Firstly we have to create a new folder
!mkdir -p /content/PyTorch-GAN/data/test
After that, we move a few images to test folder.
import os
from glob import glob

paths = glob("/content/PyTorch-GAN/data/name_of_your_folder/*")
samples = 5 # count of photos to move

for no, path in enumerate(paths[:samples]):
    os.replace(path, f"/content/PyTorch-GAN/data/test/{no}.jpg")
If the uploaded count of images is too big. You can use:
import os
from glob import glob

paths = glob("/content/PyTorch-GAN/data/name_of_your_folder/*")
samples = 1000 # count of photos to left

for no, path in enumerate(paths):
  if no > samples:
    os.remove(path)
Training
Let's train the neural network!
To train the ESRGAN model we have to write a command with arguments:
!python3 esrgan.py --dataset_name 10k --n_epochs 20 --checkpoint_interval 250
Available arguments:
--dataset_name name of your folder in /content/PyTorch-GAN/data
--n_epochs number of epochs (default 200)
--hr_heightheight of output (default 256)
--hr_width width of output (default 256)
--channeslchannels of input (default 3)
--checkpoint_interval I recommend setting it as 250 if you have a small dataset. (default 5000)
The rest arguments you can find HERE.
Inside the folder '/content/PyTorch-GAN/implementations/esrgan/images/training you can find the saved images from the training process.
Testing
To test our model we need an image. We use the images which we have transferred before to test folder.
from glob import glob
paths = glob("/content/PyTorch-GAN/data/test/*")
print(path)
/content/PyTorch-GAN/data/test/0.jpg
/content/PyTorch-GAN/data/test/1.jpg
/content/PyTorch-GAN/data/test/2.jpg
/content/PyTorch-GAN/data/test/3.jpg
/content/PyTorch-GAN/data/test/4.jpg
We can run the model with the command:
!python3 test_on_image.py --image_path /content/PyTorch-GAN/data/test/0.jpg --checkpoint_model /content/PyTorch-GAN/implementations/esrgan/saved_models/generator_1.pth
Available arguments:
--image_path name of your image in /content/PyTorch-GAN/data/test/0.jpg
--checkpoint_model name of your trained generator /content/PyTorch-GAN/implementations/esrgan/saved_models/generator_X.pth
X replace with a number of the last trained epoch.
The generated image you can find in /content/PyTorch-GAN/implementations/esrgan/images/outputs/
If you want to copy the image to your google cloud write
!sudo cp -r /content/PyTorch-GAN/implementations/esrgan/images/outputs/sr-name_of_image.jpg /content/drive/MyDrive/
Wrapping Up
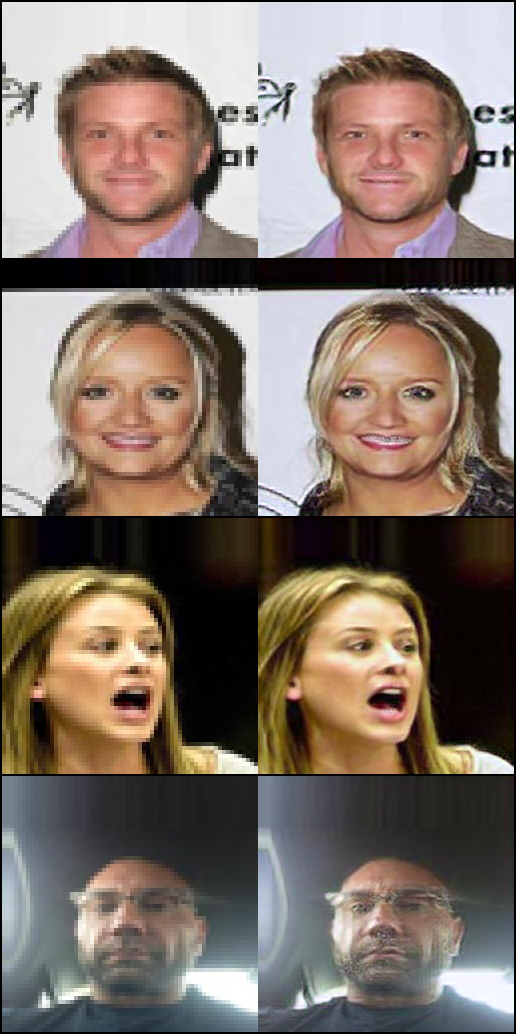
GAN models astoundingly employ neural networks to teach each other for continuous improvement. Among these, ESRGAN, showcased in this tutorial, focuses on image enhancement. Despite its power, it does require substantial computing resources. As demonstrated, the results after 5 epochs and 10,000 training data might not be perfect, but with more epochs, you'll witness incredible outcomes!
Explore the fascinating world of AI apps developed during AI hackathons for inspiration, and enjoy this captivating ESRGAN journey!
Stay tuned for more exciting AI tutorials!
Thank you! - Adrian Banachowicz, Data Science Intern in New Native
esrgan is released under a CC-BY-NC-ND-4.0 license.
ESRGAN - https://arxiv.org/abs/1809.00219
author - Xintao Wang, Ke Yu, Shixiang Wu, Jinjin Gu, Yihao Liu, Chao Dong, Chen Change Loy, Yu Qiao, and Xiaoou Tang.
.png&w=128&q=75)
Data Lover