OpenAI Assistants API Unleashed: Building Streamlit Applications for Next-Gen Financial Insights and PDF Analysis
Introduction to Assistants API Application:
I'm Poojan Vig, and in this guide, I'll walk you through utilizing OpenAI's Assistants API to craft advanced Streamlit applications tailored for financial analysis and document processing
Unveiled at the OpenAI Dev Day, the Assistants API represents a monumental advancement in AI, revolutionizing how we create and interact with AI-powered assistants. Its ability to simplify complex assistant-like experiences, combined with powerful built-in capabilities like Code Interpretation and Retrieval, makes it a game-changer. With the capacity to integrate more than 100 tools, each customizable for specific tasks, it opens a vast landscape for developers to build more dynamic, responsive, and intelligent applications.
This tutorial delves into harnessing this innovative API for developing a Streamlit application, focusing on creating a Financial Assistant for in-depth financial analysis and a PDF Analyzer adept at extracting and interpreting dense document information, aiming to provide practical understanding and hands-on experience with the Assistants API.
What Is OpenAI Assistants API?
The OpenAI Assistants API is a transformative feature introduced by OpenAI, designed to significantly enhance the way developers create and manage AI-powered assistants. This API is not just an incremental update to existing technologies; it represents a major leap forward in the realm of artificial intelligence.
Advanced Capabilities of OpenAI Assistants API
1. Code Interpreter
-
Functionality:
- This feature allows the assistant to interpret and execute code within a conversational context.
-
Applications:
- It's particularly useful in scenarios where real-time coding or computational tasks are involved. For instance, a user could ask the assistant to write a piece of code to solve a problem, or to modify existing code snippets.
-
Benefits:
- This capability enhances the utility of the assistant beyond standard conversational tasks, enabling it to act as a coding assistant or a live debugging tool.
2. Knowledge Retrieval
-
Functionality:
- Retrieval tools empower the assistant to access and incorporate information from various external sources into the conversation.
-
Applications:
- This is especially useful in situations where the assistant needs to pull in current data, reference materials, or specific information that is not pre-programmed into its knowledge base. For example, in financial analysis, it might retrieve current market data or historical financial records.
-
Benefits:
- The ability to integrate external knowledge makes the assistant more dynamic and informative, providing users with up-to-date and comprehensive responses.
3. Function calling
-
Functionality:
- The API allows the integration of up to 128 custom functions. These functions are defined by the developer and can be tailored to perform specific tasks as per user requests.
-
Applications:
- Custom functions can range from sending automated emails based on user prompts, to processing data, generating reports, or even interacting with other APIs and services.
-
Benefits:
- This feature significantly expands the versatility of the assistant, enabling it to cater to a wide array of specialized tasks. It can be customized to fit the specific needs and workflows of different industries or user requirements.
For an in-depth understanding of these tools and to explore additional functionalities offered by the OpenAI Assistants API, refer to the comprehensive Assistants API Tools Documentation. This resource provides detailed information on each tool's capabilities, potential applications, and guidelines for effective use, making it essential for those looking to fully leverage the API in their projects.
How Assistants API Works ?
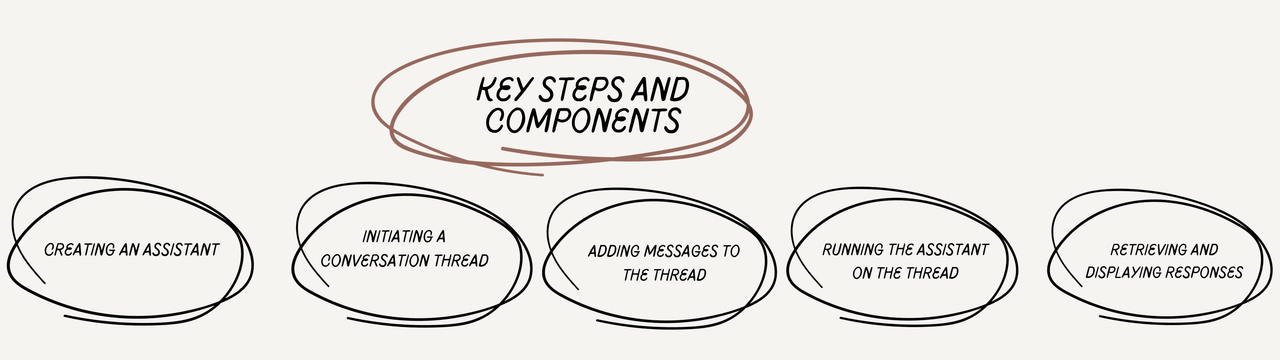
1. Creating an Assistant
Start by defining an Assistant in the API. This involves setting up custom instructions and choosing a suitable model.
2. Initiating a Conversation Thread
When a user starts a conversation, a Thread is created. Threads maintain the state of the conversation, allowing for context-aware interactions and continuity in dialogue.
3. Adding Messages to the Thread
As the conversation progresses, Messages are added to the Thread. These can be queries, commands, or responses.
4. Adding Messages to the Thread
To generate responses, the Assistant is 'run' on the Thread, where it processes the Messages and utilizes relevant tools.
5. Retrieving and Displaying Responses
Once the Assistant has processed the Messages, its responses are retrieved and displayed to the user.
For a more detailed explanation of each step and to explore the full capabilities of the Assistants API, including its intricate mechanics and advanced features, please refer to the OpenAI Assistants API - How It Works documentation. This resource provides comprehensive insights and guidance, making it an invaluable tool for both new and experienced users of the API.
Implementing AI Financial Analyst Using Assistance API
This demo app is created to demonstrate the abilities and usefulness of the assistance API.
Import Necessary Libraries
Before we dive into the implementation details, it's important to import all the necessary libraries that our application will require. This includes libraries for basic file and time handling, the OpenAI API, and Streamlit for building our application interface. Add the following import statements at the beginning of your Python script:
import os
import time
import openai
import streamlit as st
Step 1: Installing Dependencies and Setting Up OpenAI API Key
To get started, you'll need to install the latest version of the OpenAI package. Run the following command in your terminal or command prompt to ensure you have the most up-to-date package:
!pip install --upgrade openai
Obtain OpenAI API Key, If you don’t have an OpenAI API key, visit the OpenAI Developer Portal. Sign up and request an API key. Securely store your API key for future use.
OPENAI_KEY="sk-xxxx" #Your OpenAI API Key
Or can Create a function initialize_openai_client(api_key) that initializes the OpenAI client with the provided API key.
def initialize_openai_client(api_key):
    return openai.OpenAI(api_key=api_key)
The initialize_openai_client function initializes an OpenAI client using a provided API key, allowing the application to access OpenAI's services.
Step 2: Setting Up Your Assistant
The setup process for an Assistant is straightforward. You'll need to define several key aspects:
- Name :Assign a name to your assistant.
- Instructions : Provide specific instructions that your Assistant will follow.
- Tools : Choose the tools for your Assistant. For this example, we'll use the Retrieval and Code Interpreter tools.
- Model Name : Select the AI model you wish to use
Here's how you can do it in python:
from openai import OpenAI
client = OpenAI(api_key=OPENAI_KEY)

assistant = client.beta.assistants.create(
    name = "Finance Insight Analyst",
    instructions = "You are a helpful  financial analyst expert and, focusing on management discussions and financial results. help people learn about financial needs and guid them towards fincial literacy.",
    tools = [{"type":"code_interpreter"}, {"type": "retrieval"}],
    model = "gpt-4-1106-preview"
)
Once you’ve done this, your Assistant is created! Let’s have a look.
import json

def show_json(obj):
    print(json.dumps(json.loads(obj.model_dump_json()), indent=4))

show_json(assistant)
This will print all the information about the assistant but the most important information is the Assistant ID.
Creating a New Assistant via the OpenAI Dashboard
Another method to create a new assistant is by using the OpenAI Dashboard, which provides a user-friendly interface for this purpose.

In the OpenAI Dashboard, you can easily select the necessary tools and the AI model for your assistant. The process involves specifying clear instructions for your assistant’s operation and adding reference files as needed. This approach is particularly useful for those who prefer a more visual and interactive setup experience compared to coding.
Step 3: Creating a Thread for Conversation
In this step, we start a Thread which acts as a holder for the ongoing dialogue between a user and the Assistant. This approach is different from the earlier ChatCompletion API, as it doesn’t require resending the full conversation history for every interaction.
thread = client.beta.threads.create()
With the OpenAI Assistants API, it's feasible to create multiple threads for the same type of action, allowing simultaneous handling of various interactions or conversations, each in their unique context, thereby enhancing the capability to manage parallel dialogues or tasks efficiently within the same application
Step 4: Managing Messages and Running the Assistant
The following steps are consolidated to manage the conversation:
1. Adding Messages to the Thread:
- The conversation message is added to the thread
- This is done to ensure that the Assistant has all the necessary context for the conversation.
2. Running the Assistant on the Thread:
- This process automatically activates the relevant tools the Assistant might need.
- Triggering the Assistant on the Thread initiates its response
Creating a Run is an asynchronous operation. Initially, the Run’s metadata is returned with a status of “queued.” The status updates as the Assistant uses tools and adds messages. To effectively manage this asynchronous nature, we define several functions:
In building an application with the OpenAI Assistants API, it's crucial to have a structured approach to handle user interactions efficiently. To facilitate this, we define key functions: submit_message, wait_on_run, and get_response. Each of these functions plays a vital role in streamlining the interaction flow.
The submit_message function is designed to add a new user message to a specific thread and subsequently initiate the Assistant on that thread for processing the message.
def submit_message(assistant_id, thread, user_message):
    client.beta.threads.messages.create(
        thread_id=thread.id, role="user", content=user_message
    )
    return client.beta.threads.runs.create(
        thread_id=thread.id,
        assistant_id=assistant_id,
    )
The wait_on_run function continuously tracks the status of a Run to determine when the Assistant has completed processing the request.
import time

def wait_on_run(run, thread):
    while run.status == "queued" or run.status == "in_progress":
        run = client.beta.threads.runs.retrieve(
            thread_id=thread.id,
            run_id=run.id,
        )
        time.sleep(0.5)
    return run
The get_response function is tasked with fetching the response from a thread after the completion of a Run.
def get_response(thread):
    return client.beta.threads.messages.list(thread_id=thread.id, order="asc")
These functions streamline the process of managing the conversation, submitting queries, and retrieving responses from the OpenAI Assistant.
Step 5 : Enhanced Response Clarity
The pretty function is an integral component of our application, specifically tailored to enhance the readability and presentation of the responses generated by the OpenAI Assistant.
def pretty_print(messages):
    responses = []
    for m in messages:
        if m.role == "assistant":
            responses.append(m.content[0].text.value)
    return "\n".join(responses)
Step 6: Configuring the Streamlit User Interface
In this step, we'll set up the Streamlit User Interface (UI) for our application, which includes configuring the sidebar for API key input and creating options to select between different assistants.
# Streamlit UI for sidebar configuration
st.sidebar.title("Configuration")
entered_api_key = st.sidebar.text_input("Enter your OpenAI API key", type="password")

# Check if an API key is entered, then initialize the OpenAI client
client = None
if entered_api_key:
    with st.spinner('Initializing OpenAI Client...'):
        client = initialize_openai_client(entered_api_key)

# Sidebar for selecting the assistant
assistant_option = st.sidebar.selectbox(
    "Select an Assistant",
    ("Financial Assistant", "PDF Analyzer")
)
Sidebar Configuration for API Key Entry
- Title Setup:
- Use
st.sidebar.title("Configuration")to add a title to the sidebar, guiding users to the configuration section.
- API Key Input:
Implement entered_api_key = st.sidebar.text_input("Enter your OpenAI API key", type="password") to create a password-type input field where users can securely enter their OpenAI API key.
Initializing the OpenAI Client
- Client Setup:
- Check if an API key has been entered. If so, use
initialize_openai_client(entered_api_key)within a loading spinner context to initialize the OpenAI client.
Assistant Selection via Sidebar
- Assistant Options:
Create a selection box with
assistant_option = st.sidebar.selectbox("Select an Assistant", ("Financial Assistant", "PDF Analyzer"))for users to choose the type of assistant they want to interact with.
Step 7: Implementing Financial Assistant Functionality
This step involves integrating the Financial Assistant feature into our Streamlit application. We'll set up a user-friendly interface and process user queries to provide financial insights using the OpenAI Assistants API.
if assistant_option == "Financial Assistant":
    st.title("Financial Assistants :bar_chart:")

    # Description
    st.markdown("""
        This assistant is your go-to resource for financial insights and advice. Here's what you can do:
        - :page_facing_up: **Analyze financial statements** to understand your company's health.
        - :chart_with_upwards_trend: **Track market trends** and make informed investment decisions.
        - :moneybag: Receive tailored **investment advice** to maximize your portfolio's performance.
        - :bulb: **Explore various financial scenarios** and plan strategically for future ventures.

        Simply enter your financial query below and let the assistant guide you with actionable insights.
    """)
    user_query = st.text_input("Enter your financial query:")

    if st.button('Get Financial Insight') and client:
        with st.spinner('Fetching your financial insights...'):
            thread = client.beta.threads.create()
            run = submit_message("asst_PWxRJ5oOqEHx0CisVEBpFgKI", thread, user_query)
            run = wait_on_run(run, thread)
            response_messages = get_response(thread)
            response = pretty_print(response_messages)
            st.text_area("Response:", value=response, height=300)
UI Setup for Financial Assistant
- Display Interface:
- When the user selects
"Financial Assistant"from the sidebar, the application will dynamically update to show the relevant interface for this functionality. - We'll use
st.titleto display a prominent title for this section of the app, such as "Financial Assistants :bar_chart:". - A descriptive section will be added using st.markdown, explaining the capabilities of the Financial Assistant.
Query Input and Processing
- Input Field for Queries:
- We provide an input field using
st.text_inputwhere users can type in their financial queries. This could be anything from specific questions about financial data to requests for market analysis.
- Processing Queries:
- Upon user input, the application uses the
submit_messagefunction to send the query to the OpenAI Assistant within a created thread. - The
wait_on_runfunction is then used to monitor the processing of the query, ensuring that the application waits until the Assistant has fully processed the request. - Once processing is complete,
get_responsefetches the responses from the thread. - Finally, the
pretty_printfunction formats these responses for clear and readable output to the user.
- Displaying Responses:
- The processed and formatted responses from the Financial Assistant are displayed on the Streamlit app interface, providing users with the requested financial insights.
Step 8: Implementing PDF Analyzer Functionality
In this step, we integrate the PDF Analyzer into our Streamlit application. This functionality allows users to upload PDF documents and receive insights or specific information extracted by the OpenAI Assistant.
elif assistant_option == "PDF Analyzer":
    st.title("PDF Analyzer  :mag:")

    # Description for PDF Analyzer
    st.markdown("""
        Use this tool to extract valuable information from PDF documents. Ideal for:
        - :page_facing_up: **Analyzing text and data** within PDFs for research or business insights.
        - :mag_right: **Extracting specific information** from large documents quickly.
        - :clipboard: Converting **PDF content into actionable data** to inform decision-making.
        - :bookmark_tabs: Gaining insights from **financial reports, research papers, or legal documents** in PDF format.

        Upload a PDF file and enter your specific query related to the document.
    """)

    uploaded_file = st.file_uploader("Upload a PDF file", type=["pdf"])
    user_query = st.text_input("Enter your query about the PDF:")

    if uploaded_file is not None and user_query:
        with st.spinner('Analyzing PDF...'):
            temp_dir = "temp"
            if not os.path.exists(temp_dir):
                os.makedirs(temp_dir)

            temp_file_path = os.path.join(temp_dir, uploaded_file.name)
            with open(temp_file_path, "wb") as f:
                f.write(uploaded_file.getbuffer())

            try:
                file_response = client.files.create(
                    file=open(temp_file_path, "rb"),
                    purpose="assistants",
                )
                assistant = client.beta.assistants.update(
                    'asst_PWxRJ5oOqEHx0CisVEBpFgKI',
                    file_ids=[file_response.id],
                )
                thread = client.beta.threads.create()
                run = submit_message('asst_PWxRJ5oOqEHx0CisVEBpFgKI', thread, user_query)
                run = wait_on_run(run, thread)
                response_messages = get_response(thread)
                response = pretty_print(response_messages)
                st.text_area("Response:", value=response, height=300)
            except Exception as e:
                st.error(f"An error occurred: {e}")

# Show a message if the API key is not entered
if not client:
    st.warning("Please enter your OpenAI API key in the sidebar to use the app.")
UI Setup for PDF Analyzer
- Interface Activation : Selecting "PDF Analyzer" in the sidebar updates the app with necessary tools for PDF analysis.
- Title and Description : We add a title "PDF Analyzer :mag:" and describe its features, like text analysis and data extraction from PDFs, using st.markdown.
File Upload and Analysis
- PDF Uploads : Users can upload PDF files via
st.file_uploader. - Query Processing : After uploading, users submit queries for analyzing the PDF content.
- Content Analysis : The app temporarily saves the file, and functions like
submit_message,wait_on_run, andget_responseare used to analyze the content and provide insights.
Error Handling
- Robust Management : Error handling is incorporated to tackle issues like file upload errors or processing hiccups.
- User Guidance : In case of errors, the app displays clear messages to help users rectify the issue or understand what went wrong.
This streamlined implementation of the PDF Analyzer enhances the app's utility by providing a feature for extracting insights from PDF files through AI analysis, thereby catering to users' needs for quick and efficient data extraction.
Let's run the chatbot by entering the following command on the terminal:
streamlit run finalapp.py
Financial Assistant Interface Overview
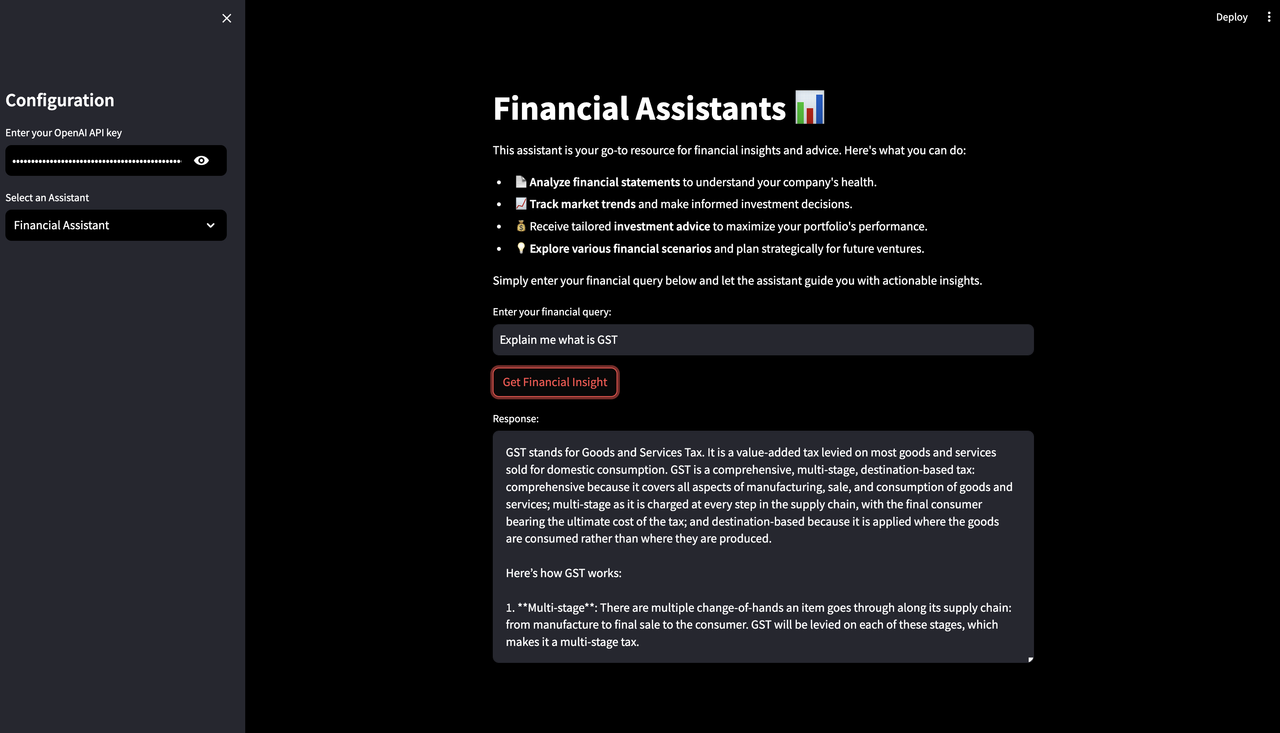
An inside look at the Financial Assistant feature, where users can effortlessly seek financial advice and insights with just a query. This snapshot shows the seamless interaction and the AI-powered response in action.
PDF Analyzer: Streamlined Document Insights
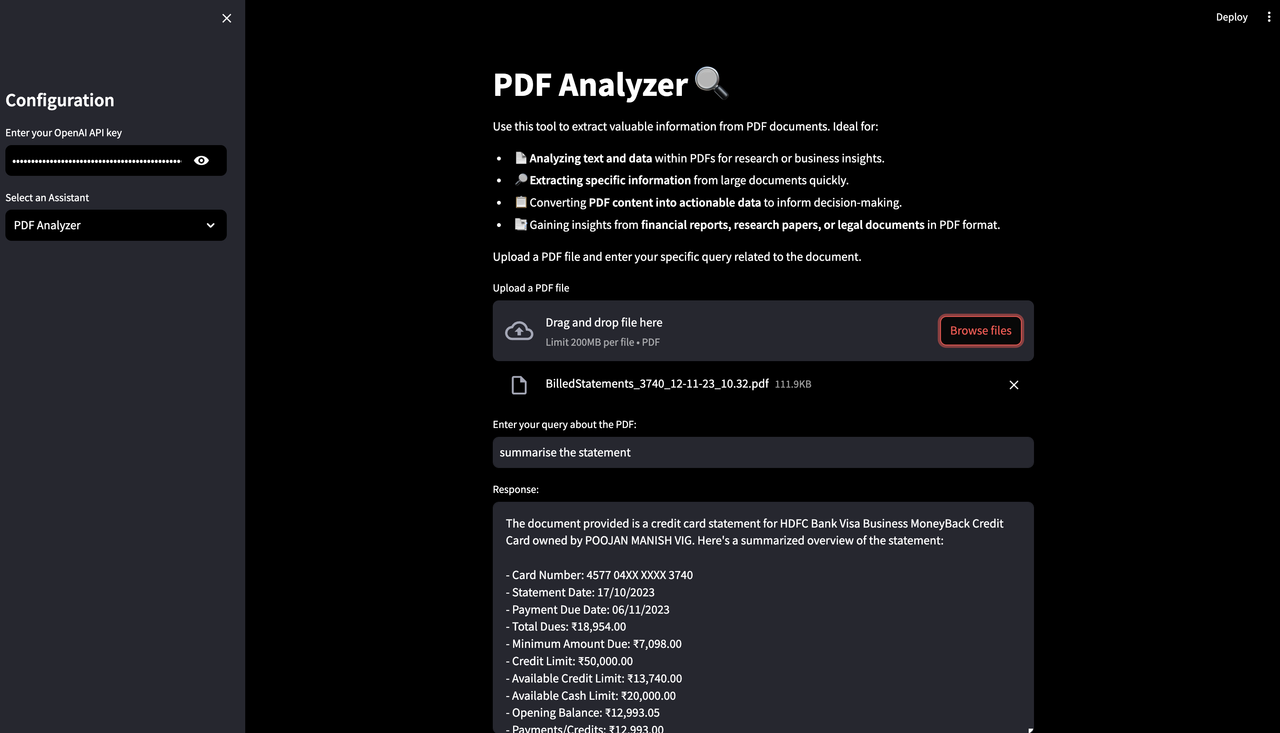
A quick glance at the PDF Analyzer feature, showcasing the ease of uploading documents and obtaining concise summaries directly within the app.
Conclusion and Hackathon Tips for Using OpenAI Models
As we wrap up this tutorial on integrating the OpenAI Assistants API with Streamlit, here are some concise tips for hackathon participants:
- Innovate Broadly : Explore diverse and creative applications of the Assistants API. Its versatility in handling different tasks can be a game-changer in your projects.
- User-Friendly Design : Focus on creating intuitive and engaging user interfaces with Streamlit. A smooth user experience can make your application stand out.
- Customize for Impact : Utilize the API's custom functions to tailor your solution to specific user needs or challenges, enhancing its relevance and effectiveness.
- Resource Efficiency : Be mindful of the API's usage costs and optimize for efficiency. Efficient resource management can be crucial in a hackathon environment.
- Iterate and Improve : Continuously test and refine your application based on feedback. Agile iteration can significantly improve your project’s quality.
- Collaborate and Learn : Embrace the collaborative spirit of hackathons. Sharing insights and learning from others can enrich your experience and enhance your project.
Remember, hackathons are about innovation and problem-solving. Use these tips to leverage the OpenAI Assistants API creatively and effectively in your hackathon projects.