monday.com Tutorial: Your first API call
Introduction
In this tutorial you will learn how to use monday.com to retrieve and mutate your workplace and improve your team's experience!
So… without any further ado, let’s dive in!
monday.com
monday.com is a work operating system (Work OS) that enables organizations to build custom workflow apps in a code-free environment - to run projects, processes and everyday work. Teams shape workflows and projects, code-free, with an adaptive platform that automates manual work and connects teams in a digital workspace. The platform offers a variety of features, including customizable workflow templates, time tracking, automations, data dashboards, integrations with popular tools and apps.
Recently the monday.com team released a beta version of AI assistant for their software! This is great news for all users. It will empower the productivity of their users and on top of that, it will encourage new users to try this great platform.
monday API & API Key
[monday.com](https://www.monday.com allows you to build your own apps and insert them into their marketplace. This is great because it allows users to build applications tailored to their needs and also share them with others.
Building such applications requires the use of monday API. It allows you to integrate external applications into your monday workspace. To access this API you need to retrieve the API Key, this process is outlined in the monday documentation and I will not cover it here.
Coding
Depedencies
Let's start with design preparation. I will create a directory.
mkdir monday-first-api-call

cd monday-first-api-call
Now it is time for the virtual environment.
python3 -m venv venv

# Linux/MacOS
source venv/bin/activate

# Windows
venv\Scripts\activate.bat
And necessary libraries.
pip install requests python-dotenv
Let's now import the libraries into the file.
import os
from datetime import datetime

import requests
from dotenv import load_dotenv

load_dotenv()
Prepare our workplace
For the purposes of our project, I will prepare a simple workspace that will contain the boards we will use for our integrations. For more information check out monday.com.

Monday API Integrations
OK, now we can start building our integrations. Our aim will be to extract the necessary data and then insert the item into our board.. I'll start by defining a couple of constants - API_KEY, API_URL. Also, I'll define the header that we'll use for request authorization.
API_KEY = os.getenv("MONDAY_API_KEY") # I will use .env file to store my API key
API_URL = "https://api.monday.com/v2"

authorization_header = {"Authorization": API_KEY}
When working with the monday API, we need to bear in mind that it is a GraphQL API. It is a lot of fun to work with and thanks to a good job from the Monday team - the documentation is very clear.
I will now execute the query to get our board.
query_all_boards = "query { boards (limit:1) {id name} }"
data = {"query": query_all_boards}

r = requests.post(url=API_URL, json=data, headers=authorization_header)
result = r.json()
Response:
{'data': {'boards': [{'id': '1206985347', 'name': 'TEST BOARD'}]}}
Now I have to extract the group. I will use the following query for this.
query_board = f"""query {{
                    boards (ids: {BOARD_ID}) {{
                        id
                        name
                        groups {{
                            id
                            title
                        }}
                    }}
                }}"""

data = {"query": query_board}

r = requests.post(url=API_URL, json=data, headers=authorization_header)
result = r.json()
Response:
{'data': {'boards': [{'id': '1206985347', 'name': 'TEST BOARD', 'groups': [{'id': 'nowa_grupa', 'title': 'TEST GROUP'}]}]}, 'account_id': 17276871}
The last missing element is the columns, which we also need to extract.
columns_query = f"""query {{
                        boards (ids: {BOARD_ID}) {{
                            columns {{
                                id
                                title
                            }}
                        }}
                    }}"""

data = {"query": columns_query}

r = requests.post(url=API_URL, json=data, headers=authorization_header)
result = r.json()
Response:
{'data': {'boards': [{'columns': [{'id': 'name', 'title': 'Name'}, {'id': 'liczby', 'title': 'Numbers'}, {'id': 'tekst', 'title': 'Text'}]}]}, 'account_id': 17276871}
Great, now it is time to insert the new data into the board. Take a close look at the query, as it differs significantly.
add_item_query = f"""
            mutation {{
                create_item (
                    board_id: {BOARD_ID},
                    item_name: "TEST VALUE",
                    column_values: "{{
                        \\"tekst\\": \\"TEST TEXT\\",
                        \\"liczby\\": 13
                    }}"
                ) {{
                    id
                }}
            }}
        """
data = {"query": add_item_query}

r = requests.post(url=API_URL, json=data, headers=authorization_header)
result = r.json()
Response:
{'data': {'create_item': {'id': '1207322707'}}, 'account_id': 17276871}
Well, let's check out our result!
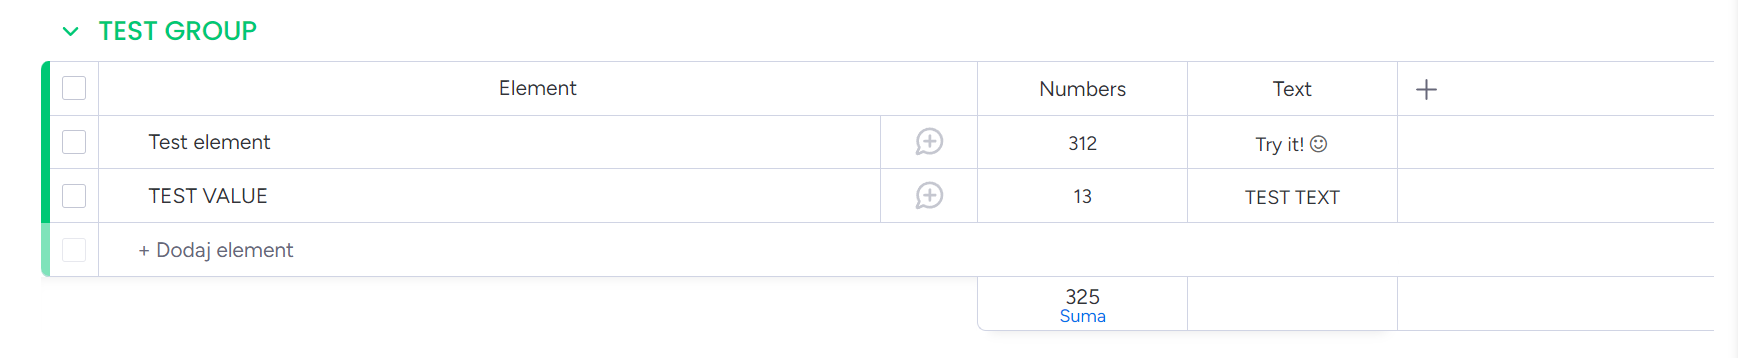
Well done! We managed to put the data to the monday board together!!!
Conclusion
As you can see, working with the monday.com API is not difficult. It is a bit different from working with the REST API, but everything is well described here. If you want to use the monday.com API in practice I invite you to our monday.com AI app hackathon! You certainly won't regret it!
Thank you for your time! - Jakub Misiło @newnative
Co-Founder @ knm - https://knmstudio.com/