Getting Started with Arc Testnet: Send USDC with ethers.js for AI Hackathons
Getting Started with Arc Testnet: Send USDC with ethers.js
Introduction
Arc is Circle's new L1 blockchain where USDC is the native gas token. No need for ETH. No need to manage two tokens. Just USDC for everything.
This guide shows you how to:
- Connect to Arc testnet with ethers.js
- Read USDC balances
- Send USDC transactions programmatically
This makes Arc an excellent platform for AI hackathons, especially those focusing on FinTech, blockchain, or decentralized applications. Understanding how to interact with Arc programmatically can be a valuable skill for your AI hackathon projects, enabling efficient and cost-effective transactions. Whether you're participating in online AI hackathons or virtual AI hackathons, this knowledge can give you a competitive edge. If you're looking for upcoming AI hackathons to apply these skills, explore LabLab.ai's global AI hackathons.
Why Arc Is Different
On Ethereum, you need ETH for gas and USDC for payments. Two tokens. Two balances to watch.
Arc uses USDC for everything. Gas costs ~$0.009 per transaction. Not $0.009 plus ETH at $3000. Just $0.009. Period.
Quick comparison:
- Ethereum: $1-50 gas fees. ETH for gas. Slow finality.
- Polygon: $0.01-1 gas fees. MATIC for gas. Decent speed.
- Arc: $0.009 gas fees. USDC for gas. Sub-second finality.
Want to learn more about Arc's architecture? Check out the Arc blockchain documentation on lablab.ai.
What You Need
Before starting, make sure you have Node.js version 16 or higher installed. npm comes with Node, so you don't need to install that separately.
You'll need an Arc testnet wallet (we'll generate one) and some testnet USDC (free from Circle's faucet).
Knowledge-wise: basic JavaScript and command line comfort. If you've used ethers.js or web3.js before, you're already set.
Setup
Create the project:
mkdir arc-tutorial
cd arc-tutorial
npm init -y
npm install ethers dotenv
Two packages:
ethers: Everything blockchain. Wallet management, contract calls, transaction signing.dotenv: Keeps your private keys out of code. Security 101.
Generate a Wallet
Install Foundry for wallet generation:
curl -L https://foundry.paradigm.xyz | bash
foundryup
Generate a wallet:
cast wallet new
Expected output:
Successfully created new keypair.
Address:     0xYOUR_WALLET_ADDRESS_HERE
Private key: 0xYOUR_PRIVATE_KEY_HERE
Important: Save both values. You'll need them next.
Environment Variables
Create .env:
touch .env
Add your configuration:
ARC_TESTNET_RPC_URL=https://rpc.testnet.arc.network
PRIVATE_KEY=0xYOUR_PRIVATE_KEY_HERE
Replace 0xYOUR_PRIVATE_KEY_HERE with the private key from cast wallet new.
Create .gitignore:
node_modules/
.env
.DS_Store
Never commit your private key.
Get Testnet USDC
Navigate to faucet.circle.com:

Steps:
- Select "Arc Testnet" from the Network dropdown
- Click the USDC card
- Paste your wallet address
- Click "Send 10 USDC"
Success screen:
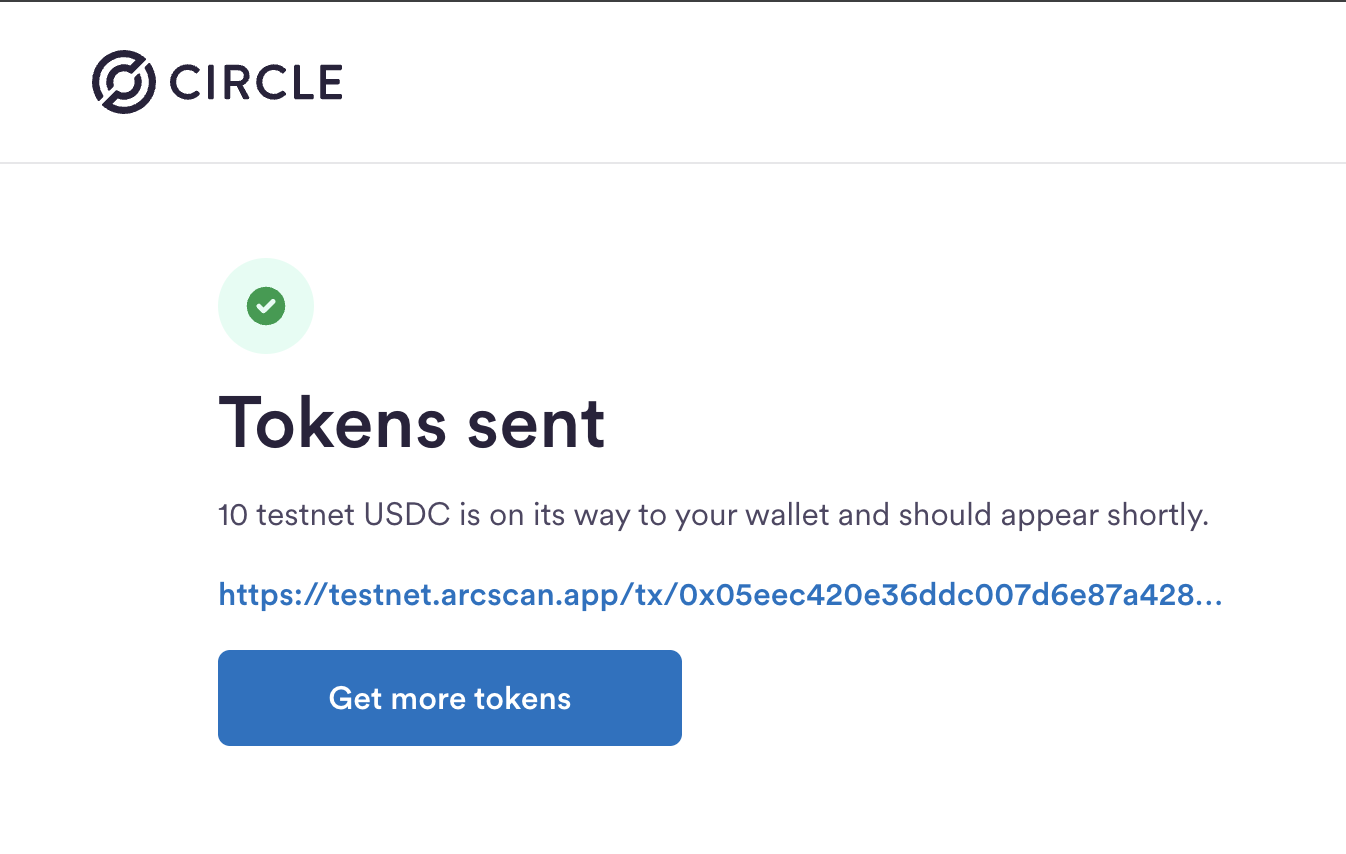
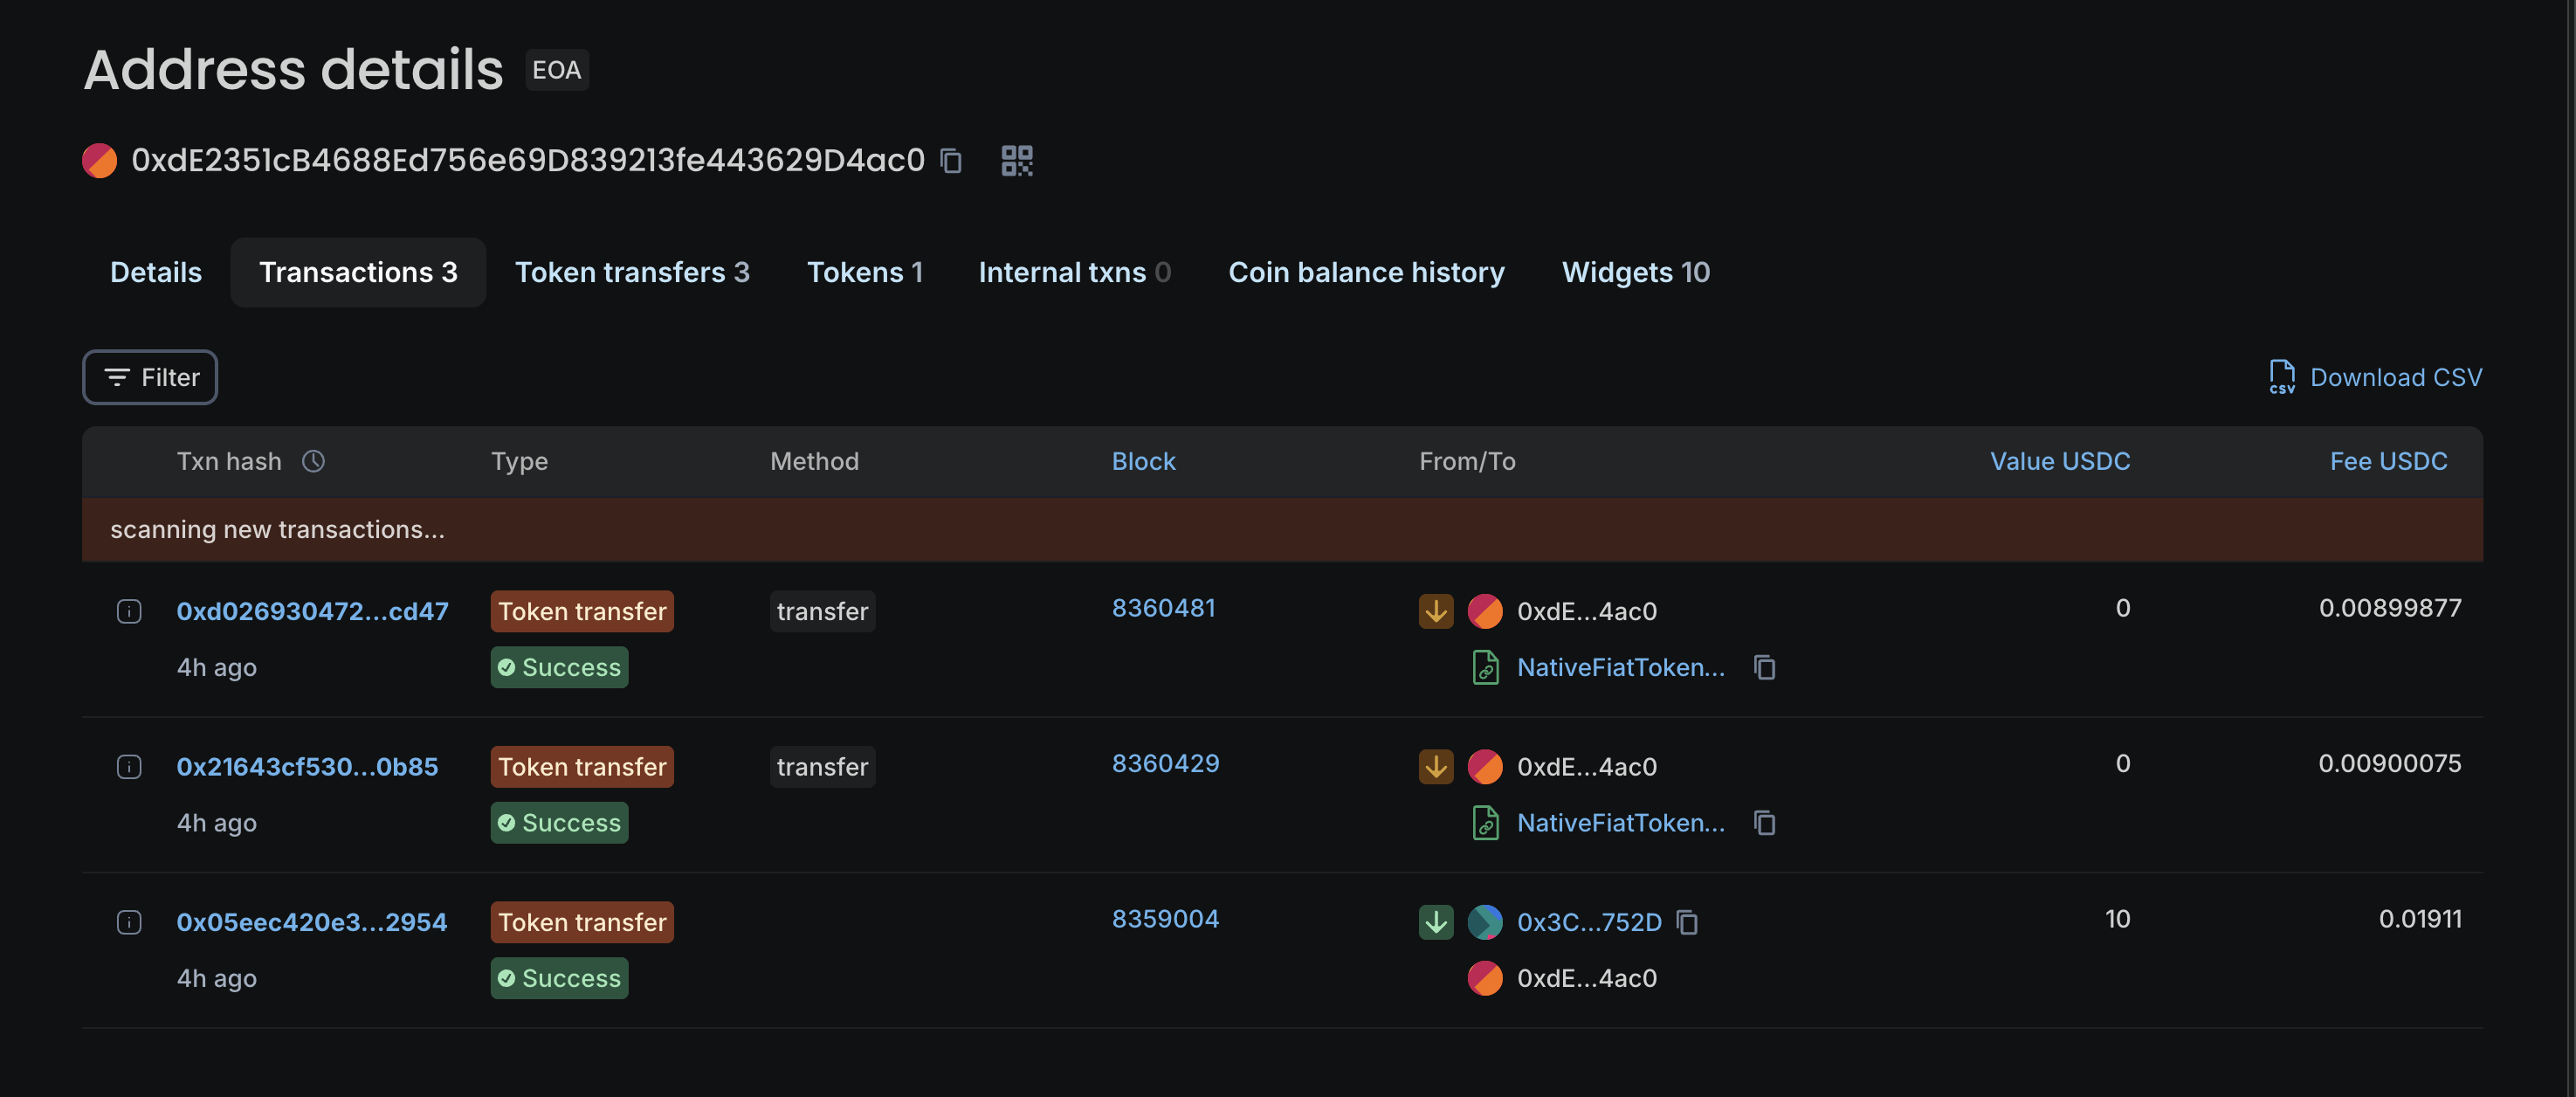
The faucet sends 10 USDC to your wallet. You can view your transaction history on the Arc testnet block explorer:
Understanding Arc's Design
Arc makes USDC the native token. It's at address 0x3600000000000000000000000000000000000000. That's not a standard ERC-20 address. It's a system contract.
What this means:
- Pay gas in USDC
- Transfer USDC
- One token to think about
- Costs in dollars, always
Arc specs:
- Chain ID: 5042002
- RPC: https://rpc.testnet.arc.network
- Block time: ~1 second
- Finality: Sub-second
Learn more about Arc's technical specifications.
Script 1: Check Connection and Balance
Create connect.js:
require('dotenv').config();
const { ethers } = require('ethers');

// USDC contract address on Arc testnet
const USDC_ADDRESS = '0x3600000000000000000000000000000000000000';

// ERC20 ABI - just the functions we need
const ERC20_ABI = [
  'function balanceOf(address owner) view returns (uint256)',
  'function decimals() view returns (uint8)',
  'function symbol() view returns (string)',
  'function name() view returns (string)'
];

async function checkConnection() {
  try {
    console.log('🔌 Connecting to Arc testnet...\\n');

    // Connect to Arc testnet
    const provider = new ethers.JsonRpcProvider(process.env.ARC_TESTNET_RPC_URL);
    const wallet = new ethers.Wallet(process.env.PRIVATE_KEY, provider);

    console.log('📍 Wallet Address:', wallet.address);

    // Get network info
    const network = await provider.getNetwork();
    console.log('🌐 Connected to Network:', network.name || 'unknown');
    console.log('⛓️  Chain ID:', network.chainId.toString());

    // Connect to USDC contract
    const usdcContract = new ethers.Contract(USDC_ADDRESS, ERC20_ABI, provider);

    // Get token info
    const [symbol, decimals] = await Promise.all([
      usdcContract.symbol(),
      usdcContract.decimals()
    ]);

    // Get balance
    const balance = await usdcContract.balanceOf(wallet.address);
    const formatted = ethers.formatUnits(balance, decimals);

    console.log('\\n💵 Checking USDC balance...');
    console.log('Token Name: USDC');
    console.log('Token Symbol:', symbol);
    console.log('USDC Balance:', formatted, symbol);

    console.log('\\n✅ Connection successful! Ready to send transactions.');

  } catch (error) {
    console.error('\\n❌ Connection failed:', error.message);
    process.exit(1);
  }
}

checkConnection();
Understanding the code
This script connects to Arc testnet and reads your USDC balance. Here's what happens:
First, we load environment variables using dotenv. This pulls your RPC URL and private key from .env without hardcoding them in your source code.
The USDC contract address is special on Arc. Unlike other chains where USDC is a regular ERC-20 token, Arc makes USDC native at a system contract address. This is why you can use it to pay gas fees.
We define a minimal ERC20 ABI with just the functions we need. No need to import a full contract ABI when we only call balanceOf, decimals, symbol, and name.
The provider is your connection to the blockchain. We use JsonRpcProvider from ethers.js pointing to Arc's testnet RPC endpoint. Then we create a wallet by combining your private key with that provider.
Reading the balance involves connecting to the USDC contract and calling balanceOf with your wallet address. The result comes back in the smallest units (like wei for ETH), so we use formatUnits with the token's decimals to convert it to a human-readable number.
Run it
node connect.js
What you'll see
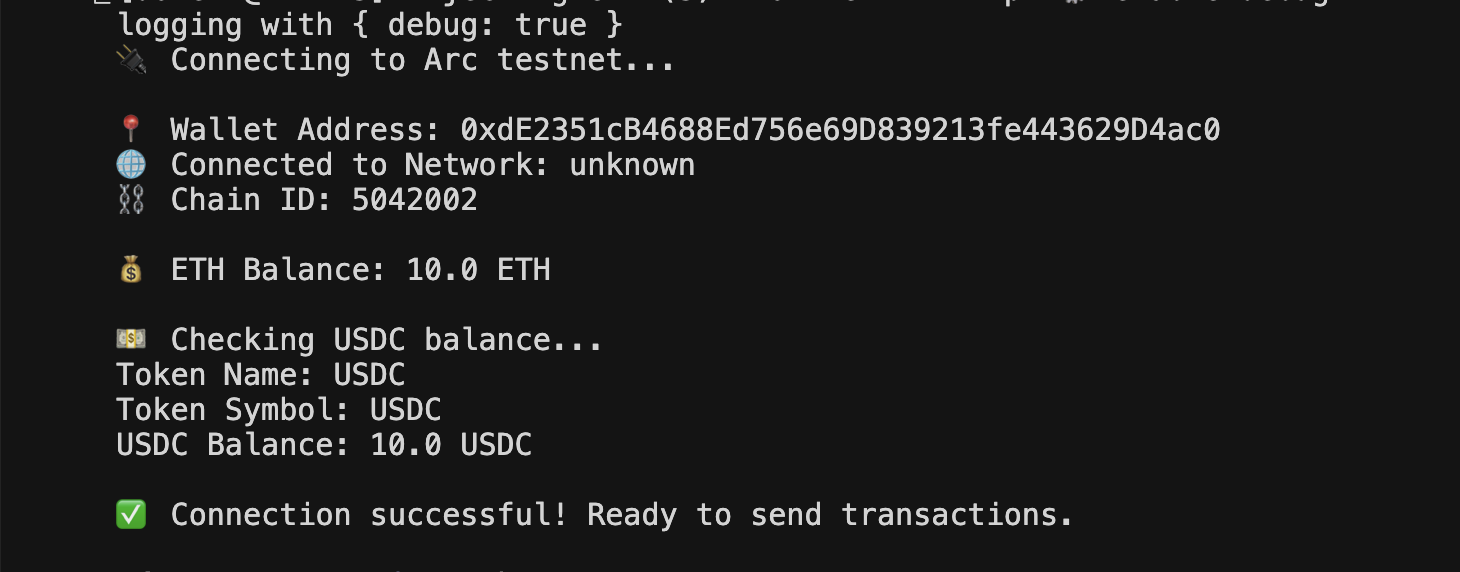
The output shows:
- Your wallet address
- Chain ID 5042002 (Arc testnet)
- Your USDC balance (should be 10.0 if the faucet worked)
If it fails
"Cannot find module 'dotenv'" - Run npm install ethers dotenv
"Invalid private key" - Check your .env file. Private key should start with 0x and have 64 hex characters after it.
"Balance: 0 USDC" - Wait 30 seconds for the faucet transaction to confirm, or request tokens from the faucet again.
Script 2: Send USDC
Create send.js:
require('dotenv').config();
const { ethers } = require('ethers');

// USDC contract address on Arc testnet
const USDC_ADDRESS = '0x3600000000000000000000000000000000000000';

// ERC20 ABI
const ERC20_ABI = [
  'function transfer(address to, uint256 amount) returns (bool)',
  'function balanceOf(address owner) view returns (uint256)',
  'function decimals() view returns (uint8)',
  'function symbol() view returns (string)'
];

async function sendUSDC(recipientAddress, amount) {
  try {
    console.log('🚀 Initiating USDC transfer...\\n');

    // Validate inputs
    if (!recipientAddress || !amount) {
      throw new Error('Usage: node send.js <address> <amount>');
    }

    if (!ethers.isAddress(recipientAddress)) {
      throw new Error(`Invalid address: ${recipientAddress}`);
    }

    const amountNum = parseFloat(amount);
    if (isNaN(amountNum) || amountNum <= 0) {
      throw new Error(`Invalid amount: ${amount}`);
    }

    // Connect to Arc
    const provider = new ethers.JsonRpcProvider(process.env.ARC_TESTNET_RPC_URL);
    const wallet = new ethers.Wallet(process.env.PRIVATE_KEY, provider);

    console.log('📤 From:', wallet.address);
    console.log('📥 To:', recipientAddress);

    // Connect to USDC contract
    const contract = new ethers.Contract(USDC_ADDRESS, ERC20_ABI, wallet);

    // Get token info
    const [decimals, symbol] = await Promise.all([
      contract.decimals(),
      contract.symbol()
    ]);

    // Convert amount to token units
    const amountInUnits = ethers.parseUnits(amount.toString(), decimals);

    console.log('💵 Amount:', amount, symbol);

    // Check balance
    const balance = await contract.balanceOf(wallet.address);
    const balanceFormatted = ethers.formatUnits(balance, decimals);
    console.log('💰 Your balance:', balanceFormatted, symbol);

    if (balance < amountInUnits) {
      throw new Error(`Insufficient balance. You have ${balanceFormatted} ${symbol}`);
    }

    // Estimate gas
    console.log('\\n⛽ Estimating gas...');
    const gasEstimate = await contract.transfer.estimateGas(recipientAddress, amountInUnits);
    console.log('Gas estimate:', gasEstimate.toString());

    // Send transaction
    console.log('\\n📡 Sending transaction...');
    const tx = await contract.transfer(recipientAddress, amountInUnits);

    console.log('✅ Transaction sent!');
    console.log('📝 Transaction hash:', tx.hash);

    // Wait for confirmation
    console.log('\\n⏳ Waiting for confirmation...');
    const receipt = await tx.wait();

    if (receipt.status === 1) {
      console.log('✅ Transaction confirmed!');
      console.log('⛽ Gas used:', receipt.gasUsed.toString());
      console.log('📦 Block number:', receipt.blockNumber);

      // Show new balance
      const newBalance = await contract.balanceOf(wallet.address);
      const newBalanceFormatted = ethers.formatUnits(newBalance, decimals);
      console.log('\\n💰 New balance:', newBalanceFormatted, symbol);
    } else {
      console.log('❌ Transaction failed');
    }

  } catch (error) {
    console.error('\\n❌ Transfer failed:', error.message);
    process.exit(1);
  }
}

// Parse command line arguments
const recipientAddress = process.argv[2];
const amount = process.argv[3];

sendUSDC(recipientAddress, amount);
Understanding the code
This script sends USDC to any address you specify. It takes two command-line arguments: recipient address and amount.
The validation section checks that both arguments exist, the address is valid Ethereum format, and the amount is a positive number. Better to catch errors early than after submitting a transaction.
We connect to Arc and create a contract instance with the wallet as signer. This gives us the ability to execute transactions, not just read data.
Amount conversion is important. When you type "0.1" you mean 0.1 USDC, but the contract expects the amount in the smallest units. USDC has 6 decimals, so 0.1 becomes 100000. The parseUnits function handles this conversion.
Before sending, we check your balance. No point trying to send more than you have. Gas estimation simulates the transaction without executing it, telling you how much it'll cost. On Arc, you'll see around 54,550 units consistently, which is about 0.009 USDC.
When you call contract.transfer(), the transaction gets broadcast to the network but isn't confirmed yet. That's why we call tx.wait() to pause execution until it's included in a block. The receipt tells you if it succeeded (status 1) and how much gas was actually used.
Run it
Generate a test recipient:
cast wallet new
Copy the address, then send USDC:
node send.js <RECIPIENT_ADDRESS> <AMOUNT>
Example:
node send.js 0x411c60F8e61B5Cbe32F9a873b16D21CA85e9A634 0.1
What you'll see
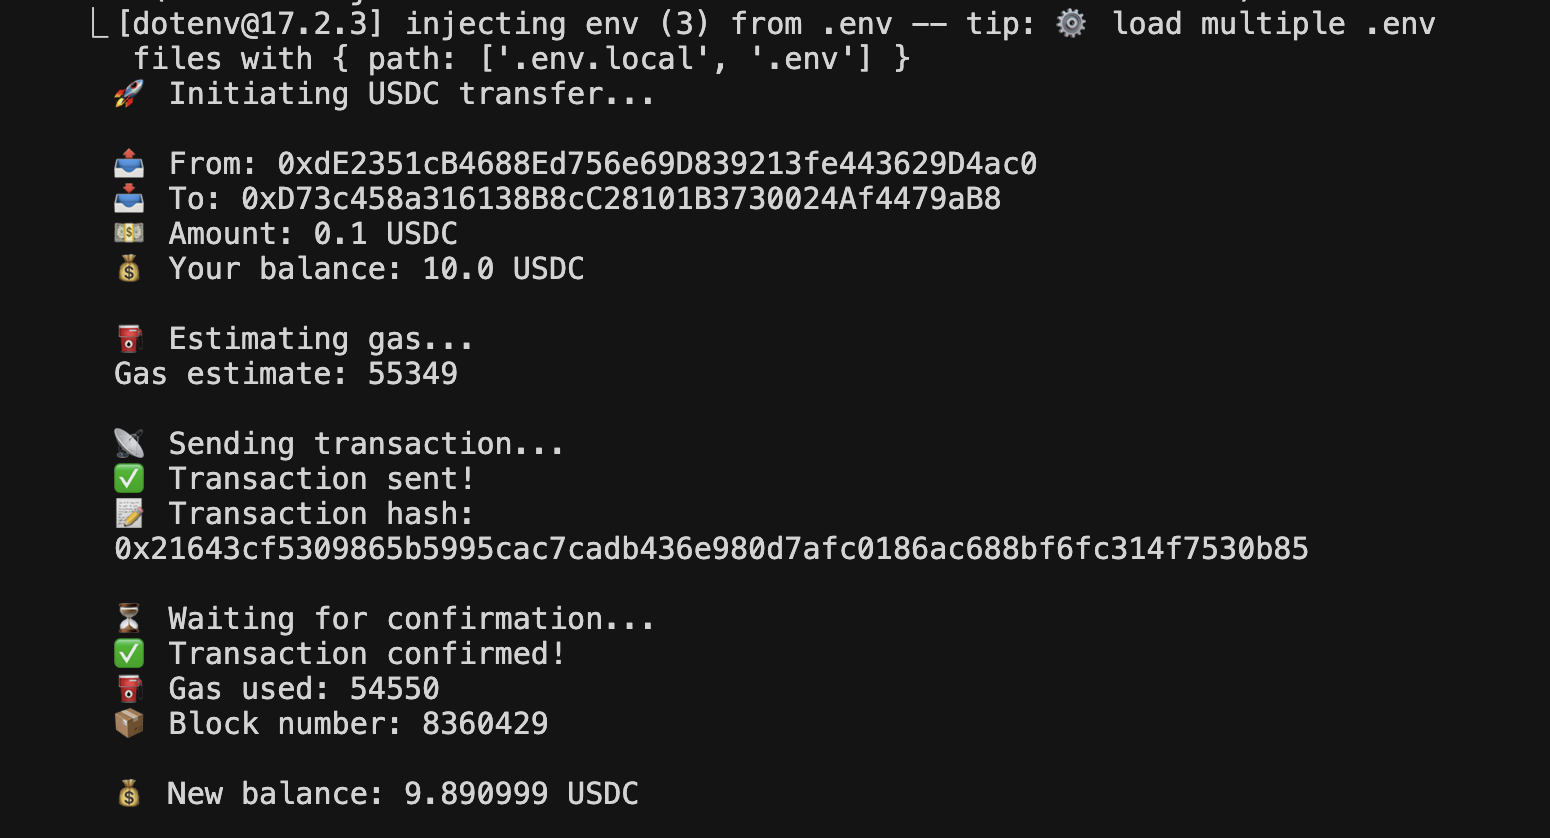
The output walks through:
- Transaction details (from, to, amount)
- Balance check (10.0 USDC before sending)
- Gas estimation (~55,000 units)
- Transaction hash
- Confirmation
- Gas used (~54,550 units, which costs ~0.009 USDC)
- New balance (9.89 USDC after sending 0.1 + gas)
Notice the balance dropped by 0.109 total - that's 0.1 sent plus 0.009 in gas fees.
If it fails
"Invalid address" - Check the recipient address. Must start with 0x and be exactly 42 characters.
"Insufficient balance" - You need enough USDC for both the transfer and gas. Check your balance with node connect.js.
"Invalid amount" - Use a period as decimal separator (0.1) not a comma. Amount must be positive.
Testing Everything
Run through both scripts to verify your setup:
Test 1: Connection
node connect.js
You should see your wallet address, Chain ID 5042002, and your USDC balance.
Test 2: Transfer
Generate a test address:
cast wallet new
Send a small amount:
node send.js 0xTEST_ADDRESS 0.01
Watch for the gas estimate, transaction hash, confirmation, and updated balance.
If both tests pass, you're ready to build on Arc.
Cost Breakdown
Per transaction on Arc:
- Gas: ~$0.009 (paid in USDC)
- No ETH needed
- No token swaps
Compare to Ethereum: $1-50 per transaction. Compare to Polygon: $0.01-1 per transaction.
Arc wins on predictable, low costs.
What to Build Next
Now that you can connect and send USDC on Arc, here are some ideas:
Payment API: Build an Express API that accepts payment requests and executes them on Arc.
Automated transfers: Set up scheduled payments or conditional transfers based on external events.
Multi-recipient payments: Extend send.js to handle batch transfers to multiple addresses.
Balance tracking: Create a dashboard that monitors USDC balances and transaction history.
Webhook integration: Trigger USDC transfers when you receive payments on other platforms (Stripe, PayPal, etc).
Resources
- Arc blockchain: lablab.ai/tech/circle/arc - Technical docs and use cases
- Arc docs: docs.arc.network - Official developer documentation
- Circle faucet: faucet.circle.com - Get testnet USDC
- ethers.js: docs.ethers.org - Web3 library documentation
- Foundry: book.getfoundry.sh - Smart contract development toolkit
What's Next
Now that you've built a working Arc integration, explore more Circle technologies and Arc blockchain documentation on lablab.ai to build sophisticated financial applications.
That's it. You're connected to Arc testnet. Now go build.
Frequently Asked Questions
How can I use Arc Testnet and ethers.js in an AI hackathon?
Arc Testnet is perfect for AI hackathons focused on FinTech, Web3, or decentralized applications. You can use ethers.js to build payment systems, automated transaction workflows, or DeFi integrations that leverage Arc's low-cost, USDC-native architecture. This is ideal for creating innovative financial solutions in your AI hackathon project.
Is Arc Testnet and ethers.js suitable for beginners in AI hackathons?
Yes, this tutorial is designed to be accessible for beginners. It provides step-by-step instructions for setting up wallets, connecting to the network, and executing transactions. Basic JavaScript knowledge is helpful, but the tutorial guides you through each step, making it a great starting point for blockchain-focused AI hackathon projects.
What are some AI hackathon project ideas using Arc Testnet and ethers.js?
Project ideas include: building a payment API that processes USDC transactions, creating an automated micro-payment system for AI services, developing a DeFi dashboard that tracks balances and transactions, or building a smart contract integration that executes conditional payments. These projects can showcase innovative blockchain applications in global AI hackathons.
How long does it take to learn Arc Testnet and ethers.js for an AI hackathon?
The core concepts and initial setup can be learned within a few hours. Understanding the transaction flow, gas estimation, and error handling might take a bit longer, but this tutorial provides enough to get a functional integration ready for an AI hackathon. Rapid prototyping is key in online AI hackathons, and this guide facilitates that.
Are there any limitations when using Arc Testnet in time-limited hackathons?
The main limitation might be the time required to set up testnet wallets and obtain faucet funds, though this is minimal. Additionally, debugging transaction issues or handling edge cases can consume time. However, Arc's straightforward architecture and low gas costs make it an excellent choice for rapid development in virtual AI hackathons.