Vectara Chat Essentials: Harness AI for Next-Gen Hackathon Chatbots
Hey there, future chatbot champs! 🚀 I'm Sanchay Thalnerkar, and we're about to dive into the amazing world of Vectara Chat. If you're gearing up for a hackathon and want to create something truly special, you're in the right place. Let's get started on this awesome journey with Vectara Chat! 🌟
Welcome to Vectara Chat! 🤖
Vectara Chat isn't just any chatbot platform; it's a game-changer in the world of conversational AI. With its focus on Retrieval Augmented Generation (RAG), it's like having a superpower for chatbot development. Imagine creating bots that are not just smart, but also understand context like a pro! 🧠💬
Key Features of Vectara Chat 🔑
- Super Interactive: Vectara Chat is like having a chat buddy who remembers everything you said before. It's all about making conversations flow naturally and smartly. Think of it as your bot having a "memory" that makes every chat smoother and more helpful. 🤔🔮
- Easy-Peasy Development: Even if you're not a coding ninja, Vectara Chat has got your back. With tools like a white-label UI chat widget, you can set up a cool chatbot without getting lost in code. It's like building a Lego masterpiece, but with chatbots! 🛠️🎨
- Privacy Matters: In today's world, keeping chats private is super important. Vectara Chat respects this big time, giving you full control over chat histories and making sure your data stays your data. 🛡️🔒
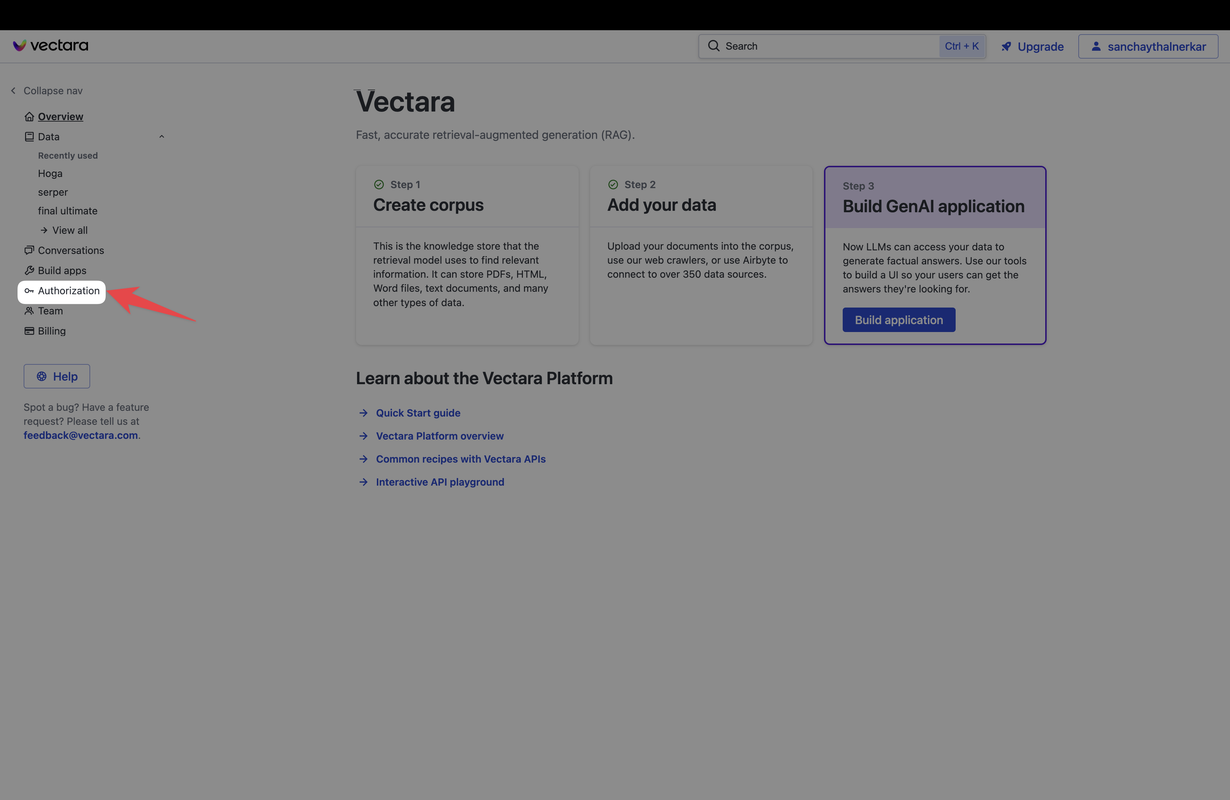
Starting with Vectara Chat 🚦
- Console Magic: Head over to the Vectara console, pick your data corpus, and switch on the chat feature. It's like turning on the engine of your chatbot car. 🖥️🚗
- API Power: Get into the driver’s seat with Vectara's APIs – the Query API and Chat Management API. They're the tools you need to make your chatbot run smoothly and smartly. 🧰🌐
UI Tools for Everyone 🧩
Vectara offers two nifty tools for UI development - Create-UI and React-Chatbot. Whether you're a front-end newbie or a pro, these tools are like magic wands that help you create cool, user-friendly chatbot interfaces. 🪄✨
Getting Your API Keys
Ready to unlock the power of Vectara Chat? Follow these steps to obtain your API keys and gain access to the incredible features of Vectara:
-
Sign Up for Vectara: Visit the Vectara website and sign up for an account. It's quick and easy, just like signing up for any other online service. 🌐📝
-
Log into the Dashboard: Once your account is verified, log in to your Vectara account. The dashboard is your command center, where you'll control your chatbot's destiny. 🚪🔍
-
Generate Your API Keys: In the dashboard, locate the API section and generate your API keys. These keys are like the secret codes that unlock the full potential of Vectara Chat. 🔑💻
-
Keep Your Keys Safe: Store your API keys securely and treat them like precious treasures. They grant you access to the advanced capabilities of Vectara. 🔐🛡️
With your API keys in hand, you're now equipped to create amazing chatbot experiences using Vectara Chat. Let's dive in and bring your chatbot ideas to life! 🚀🤖
Note: This guide is based on the standard process described on platforms like Vectara, combined with best practices for account creation and API key management. For more detailed instructions specific to Vectara, consult their official documentation and support resources.
Step 1: Sign Up for Vectara 🌐📝
- Head to Vectara: Start by visiting the Vectara website. Look for a sign-up button – it’s usually front and center, hard to miss! 🖥️👀
- Fill Out the Details: You'll be asked to enter some basic information like your email, name, etc. It's just like signing up for any other online service – quick and easy! 📄✍️
- Verify Your Account: After signing up, check your email for a verification link from Vectara. Click on it to confirm your account. This step is like the secret handshake that gets you into the club. 🤝📧
Step 2: Logging into the Dashboard 🚪🔍
- Access the Dashboard: Once your account is verified, log in to your Vectara account. The dashboard is your mission control, where all the magic happens! 🎛️🌟
- Familiarize Yourself: Take a moment to look around and get comfortable with the dashboard layout. It's where you'll be doing a lot of your work. 🕵️♂️🗺️
Step 3: Generating Your API Keys 🔑💻
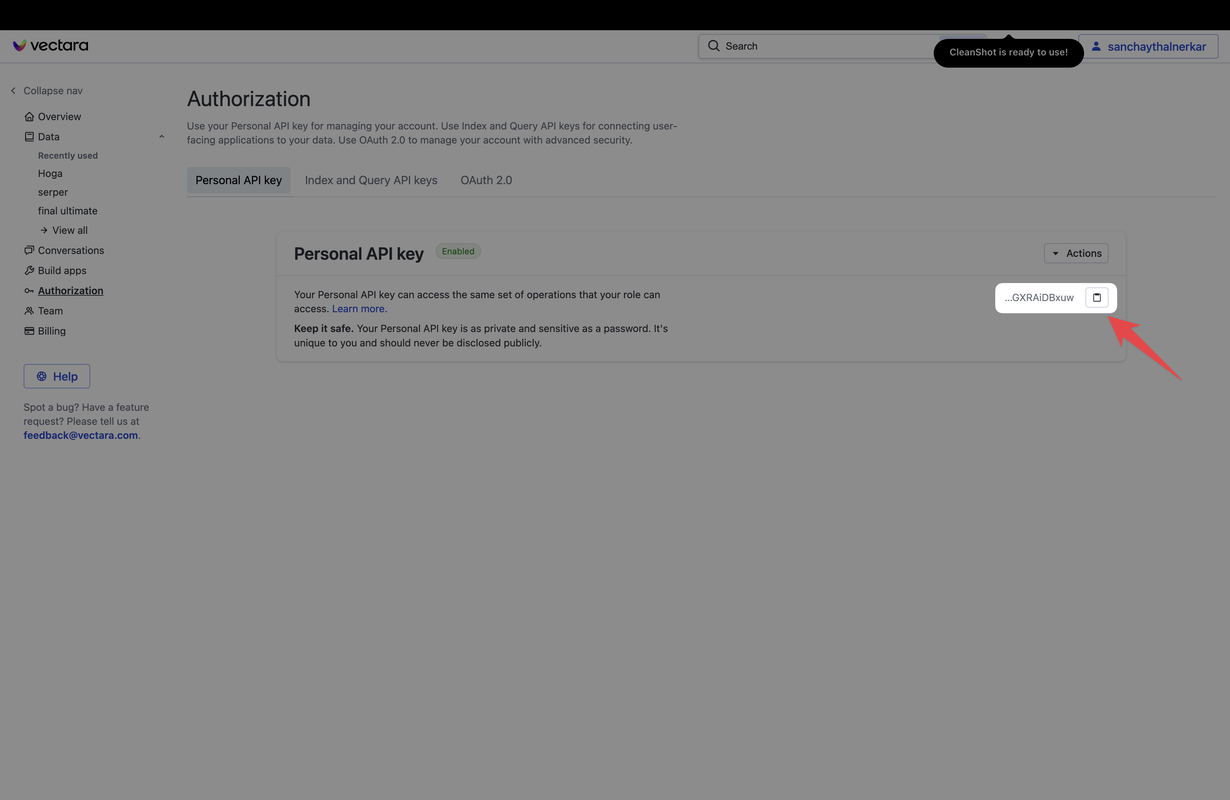
- Find the API Section: In your dashboard, look for the section or tab labeled 'Personal API Key'. This is where Vectara keeps the digital keys to your chatbot kingdom. 🔍🚪
- Generate the Keys: There should be an option to generate new API keys. Go ahead and click that. It's like asking Vectara, "Hey, can I have the keys, please?" 🙏🔐
- Copy Your Keys: Once your keys are generated, make sure to copy them and keep them safe. Treat them like the secret codes to a treasure – because they pretty much are!🗝️📋
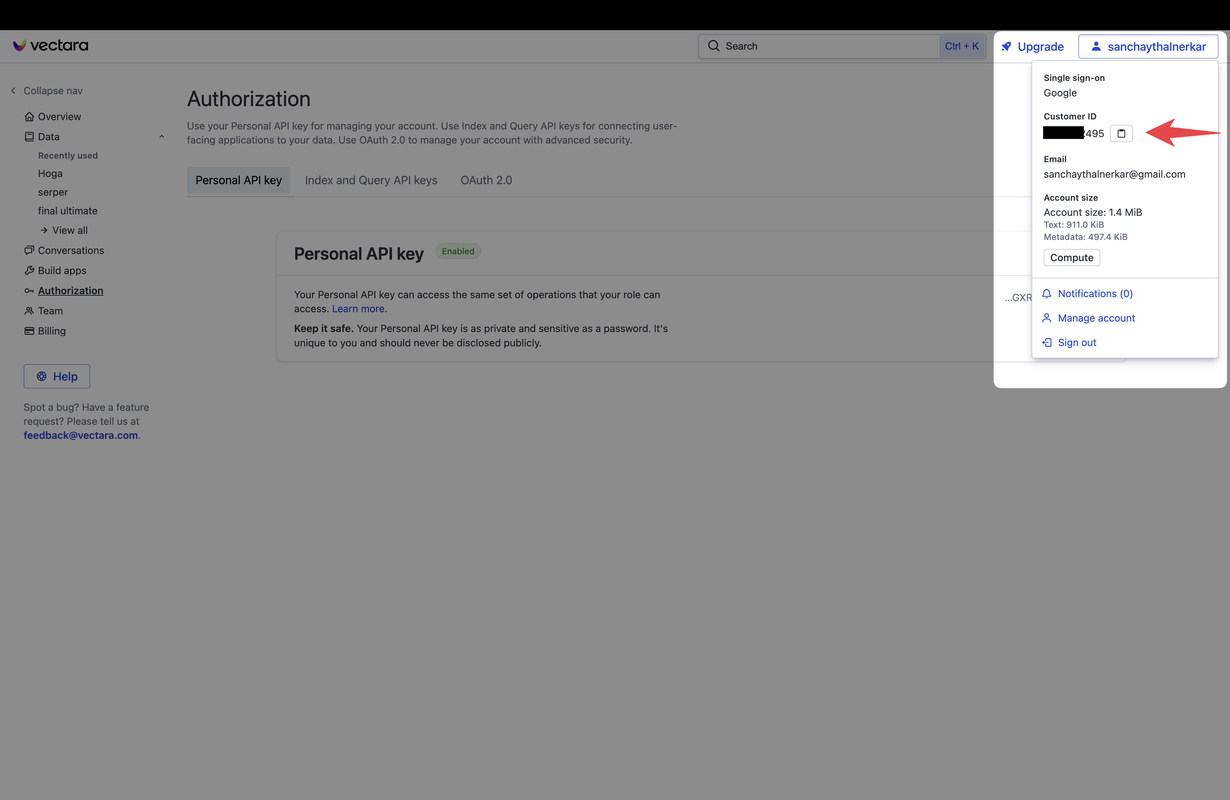
- Getting Your Customer ID: Click on your name on top right and copy the customer id.
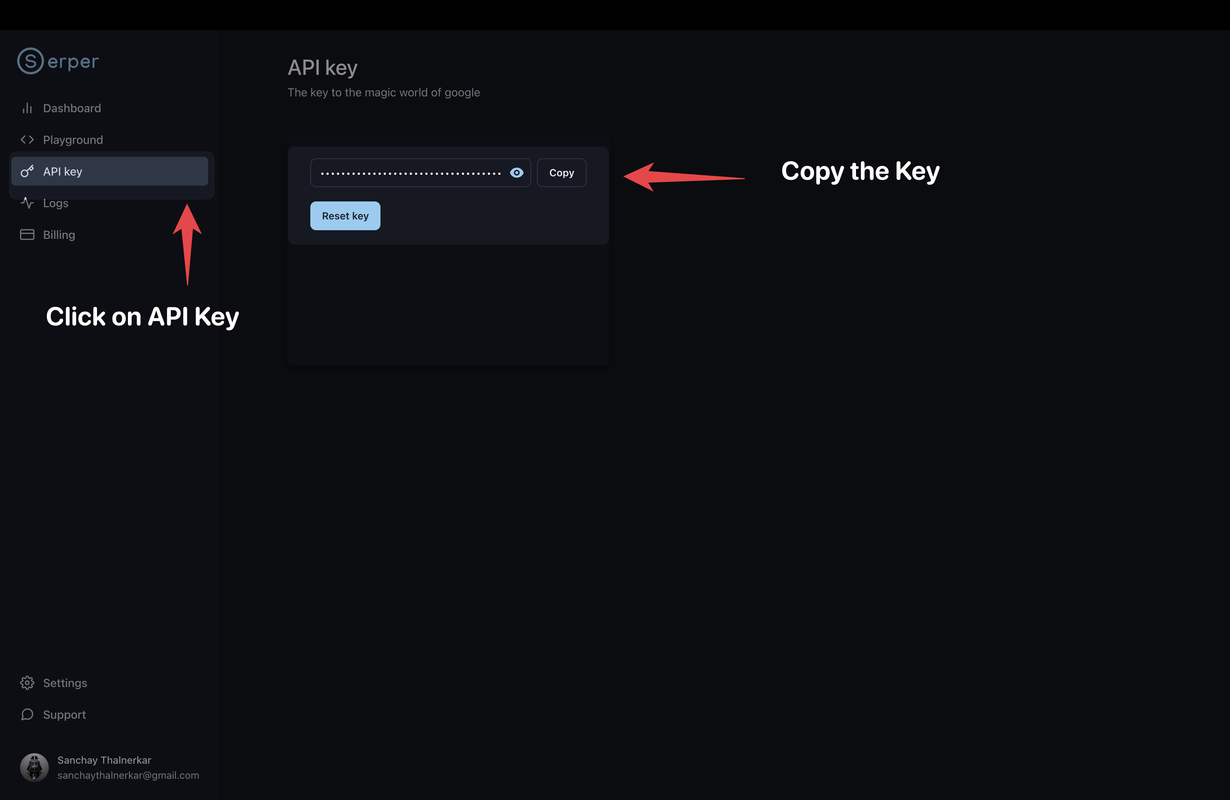
- Getting Serper API Keys: Navigate to API Key and copy the serper api key.
Step 4: Keeping Your Keys Safe 🔐🛡️
- Store Them Securely: Save your API keys in a secure place. Don't share them with others unless absolutely necessary – they’re your access pass to Vectara’s capabilities. 🤫💼
And voilà! You're all set with your Vectara account and API keys. 🎉💫 With these keys in hand, you're ready to unlock the potential of Vectara Chat and create something truly awesome. In the next section, we'll dive into how to use these keys and start building your chatbot. Stay tuned, and get ready to bring your chatbot ideas to life! 🚀🤖
Setting Up a Virtual Environment in Python 🐍
-
Create a Virtual Environment: First, open your terminal (Command Prompt, PowerShell, or Terminal app). Navigate to your project's directory. Then, create a virtual environment by running:
python -m venv myenvReplace
myenvwith your preferred name for the virtual environment. -
Activate the Virtual Environment:
- On Windows, run:
.\myenv\Scripts\activate - On macOS or Linux, run:
source myenv/bin/activate
You should see the name of your virtual environment in the terminal prompt, indicating that it’s active.
- On Windows, run:
-
Install Required Libraries: With the virtual environment active, you can now install the required libraries. Based on your imports, it seems you’ll need
requests,beautifulsoup4, andstreamlit.-
Install them via pip:
pip install requests beautifulsoup4 streamlit streamlit-chat
-
Tips and Best Practices 🌟
-
Manage Dependencies: Keep track of your dependencies in a
requirements.txtfile for easier setup in different environments. -
Code Structure: Organize your code into modules or classes for better maintainability, especially if your project grows in complexity.
-
Error Handling: Implement error handling, particularly for network requests to manage API call failures gracefully.
-
Security: Be mindful of securing your API keys and customer IDs. Avoid hardcoding them into your source code. Consider using environment variables for storing sensitive information.
-
Testing: Write unit tests for your functions to ensure they work as expected and to catch any issues early in the development process.
Creating the injest.py Script:
- File Creation: Within your Streamlit project directory, create a new Python file named
injest.py. - Adding Imports: Paste the following lines at the beginning of your
injest.pyfile. These lines import necessary libraries for making API calls and working with files:
import os
import requests
import http.client
import json
Explanation of Functions in injest.py:
-
create_corpus(api_key, customer_id, corpus_name, corpus_description):def create_corpus(api_key , customer_id ,corpus_name,corpus_description): conn = http.client.HTTPSConnection("api.vectara.io") payload = json.dumps({ "corpus": { "name": corpus_name, # Replace with your actual corpus name "description": corpus_description, # Optional "enabled": True, # Optional "swapQenc": False, # Optional "swapIenc": False, # Optional "textless": False, # Optional "encrypted": True, # Optional "encoderId": 1, # Optional, use integer "metadataMaxBytes": 0, # Optional, use integer "customDimensions": [], # Optional "filterAttributes": [] # Optional } }) headers = { 'Content-Type': 'application/json', 'Accept': 'application/json', 'customer-id': customer_id, # Your customer ID 'x-api-key': api_key # Your API Key } conn.request("POST", "/v1/create-corpus", payload, headers) res = conn.getresponse() data = res.read() print(data.decode("utf-8")) data_dict = json.loads(data.decode("utf-8")) corpus_number = data_dict["corpusId"] success_message = data_dict["status"]["statusDetail"] return corpus_number, success_message- This function is responsible for creating a new corpus in your Vectara account.
- It accepts four arguments:
api_key: Your unique Vectara API Key.customer_id: Your Vectara customer ID.corpus_name: The desired name you want to give to your new corpus.corpus_description(optional): A brief description of your corpus (e.g., "Customer feedback data").
- The function interacts with Vectara's API using the
http.clientlibrary. It builds a request containing details about the new corpus and sends it to Vectara. - Upon successful creation, the function retrieves the newly assigned corpus number and a confirmation message. These are then returned by the function for further use in your Streamlit app.
-
save_to_dir(uploaded_file):def save_to_dir(uploaded_file): if uploaded_file is not None: temp_dir = "temp" os.makedirs(temp_dir, exist_ok=True) file_path = os.path.join(temp_dir, uploaded_file.name) with open(file_path, "wb") as f: f.write(uploaded_file.getbuffer()) return file_path- This function serves as a helper to temporarily store uploaded data files on your machine.
- It takes a single argument,
uploaded_file, which likely represents an object containing information about the uploaded file from your Streamlit app. - The function creates a temporary directory (if it doesn't exist) and then saves the uploaded file to that directory with its original filename.
- This function might be useful if your Streamlit app allows users to upload data files before creating the corpus.
- Note that if you're working with data directly in memory within your Streamlit app, you might not need this function.
-
upload_file(api_key, customer_id, corpus_number, file_path):def upload_file(api_key, customer_id, corpus_number, file_path): url = f"https://api.vectara.io/v1/upload?c={customer_id}&o={corpus_number}" with open(file_path, "rb") as f: files = { "file": (os.path.basename(file_path), f), } headers = {"Accept": "application/json", "x-api-key": api_key} response = requests.post(url, headers=headers, files=files) return response.text- This function takes care of uploading your data to the newly created corpus in Vectara.
- It requires four arguments:
api_key: Your Vectara API Key.customer_id: Your Vectara customer ID.corpus_number: The unique identifier for the corpus you created earlier.file_path: The path to the data file you want to upload (obtained fromsave_to_diror directly from your Streamlit app).
- The function constructs a URL specific to uploading data to your corpus and uses the
requestslibrary to send a POST request with the data file. - The response from Vectara is returned by the function, potentially containing success or error messages.
How these functions work together in a Streamlit App:
Within your Streamlit app, you'll likely have components to:
- Collect user input: This could involve text fields for the corpus name and description, or potentially an upload component for data files.
- Call
create_corpus: Once you have the necessary information, your Streamlit app will call thecreate_corpusfunction, passing your API key, customer ID, corpus details, and potentially handling the returned corpus number. - (Optional) Call
save_to_dir: If your app involves user-uploaded files, you might usesave_to_dirto temporarily store the file before uploading. - Call
upload_file: With the corpus number and data file path (or data directly in memory), your app will callupload_fileto send the data to your Vectara corpus.
By combining these functions with Streamlit's capabilities, you can create a user-friendly interface for corpus creation and data ingestion within your Vectara workflow.
Creating the app.py Script:
Building a Chatbot with Streamlit and Vectara
This code creates a Streamlit application that allows you to:
- Set Up Your Vectara Connection: Provide your Vectara API Key, Customer ID, and optionally upload additional training data for your chatbot.
- Interact with Your Chatbot: Ask questions and receive responses powered by Vectara's AI capabilities.
- Automatic Corpus Update: If the chatbot struggles to answer your question, the app automatically gathers relevant information and updates the corpus to improve future responses.
Let's break down the code:
1. Setting Up the App (Imports and Configuration):
import os
import time
import json
import logging
import requests
from bs4 import BeautifulSoup
from datetime import datetime
import streamlit as st
from streamlit_chat import message
from injest import create_corpus, upload_file, save_to_dir

# Configure logging for better tracking
logging.basicConfig(format="\n%(asctime)s\n%(message)s", level=logging.INFO, force=True)

# Streamlit page configuration
st.set_page_config(page_title="Vectara Chat Essentials", page_icon="💬")
This section imports the necessary libraries and configures Streamlit for your app. Here's what each line does:
- Imports: These libraries handle various tasks like file handling, time tracking, data processing (JSON), logging errors, making API requests, web scraping, handling dates, building the Streamlit app interface, managing chat messages, and interacting with your custom
injest.pymodule for corpus creation and data upload. - Logging: This configures the app to log messages for easier debugging if any issues arise.
- Streamlit Configuration: Sets a title and icon for your app.
2. Welcome Message and Introduction:
# Displaying the title with an emoji
st.title("Vectara Chat Essentials 🤖")

# Using markdown for a welcoming message with emojis for visual appeal
st.markdown("""
    Welcome to 'Vectara Chat Essentials: A Developer's Guide to Next-Gen Chatbots' 🌟.
    This tutorial offers a deep dive into building and enhancing chatbots using the innovative Vectara platform,
    equipped with the latest in AI and conversational intelligence. 🧠💬
    Whether you are a beginner or an advanced developer, this guide will take you through all the steps
    from creating your first chatbot to deploying sophisticated AI-driven conversational agents.
    Let's embark on this exciting journey! 🚀
    """)

# Adding an interactive element

if st.button("Start Using Now!"):
    st.snow()
    st.write(
        "Great! Let's dive into the world of conversational AI with Vectara Chat. 🎉"
    )
This section creates an engaging introduction using Streamlit's features:
- Title: Sets the title of your app with an emoji.
- Markdown: Creates a formatted welcome message with emojis to make it visually appealing. You can customize this message to provide a more detailed introduction to your app and its functionalities.
3. Connecting to Vectara (Sidebar):
# Ensure corpus_number is stored across sessions
if "corpus_number" not in st.session_state:
    st.session_state["corpus_number"] = None

# Sidebar setup for user inputs

with st.sidebar:
    st.session_state["vectara_api_key"] = st.text_input("Vectara API Key")
    st.session_state["serper_api_key"] = st.text_input("Serper API Key (for research)") # Optional
    vectara_customer_id = st.text_input("Vectara Customer ID")
    corpus_name = st.text_input("Corpus Name (optional)")
    corpus_description = st.text_input("Corpus Description (optional)")
    file = st.file_uploader("Upload a file (optional)", type=["text", "pdf"])

    if st.button("Submit") and file:
        corpus_number, _ = create_corpus(
            st.session_state["vectara_api_key"],
            vectara_customer_id,
            corpus_name,
            corpus_description,
        )

        if corpus_number is not None:
            st.session_state["corpus_number"] = corpus_number
            file_path = save_to_dir(file)
            upload_file(
                st.session_state["vectara_api_key"],
                vectara_customer_id,
                corpus_number,
                file_path,
            )
            st.success("File uploaded successfully!")
        else:
            st.error("Failed to create corpus. Please check your inputs.")
This section creates a sidebar where users can input their sensitive credentials
4. Chat Functionality
# Chat message handling
if "messages" not in st.session_state:
    st.session_state["messages"] = []

with st.form("chat_input", clear_on_submit=True):
    user_prompt = st.text_input("Your message:", label_visibility="collapsed")

    if st.form_submit_button("Send"):
        st.session_state.messages.append({"role": "user", "content": user_prompt})
This section handles the core chat functionality of your app:
- Message Storage: The app uses Streamlit's session state to track chat history in the
st.session_state["messages"]list. This ensures that the conversation is remembered across interactions. - Chat Input: A form is created using
st.formwith a text input area (st.text_input) where users can type their messages. The "Send" button triggers the chat interaction. - Message Logic: When the "Send" button is clicked, the user's message is added to the chat history with the role "user."
5.Getting the conversation ID
def get_latest_conversation_id(api_key, customer_id):
    """Retrieves the latest conversation ID from Vectara."""
    response = requests.post(
        "https://api.vectara.io/v1/list-conversations",
        headers={
            "Content-Type": "application/json",
            "Accept": "application/json",
            "customer-id": customer_id,
            "x-api-key": api_key,
        },
        data=json.dumps({"numResults": 0, "pageKey": ""}),
    )
    response_data = response.json()
    return (
        response_data["conversation"][-1]["conversationId"]
        if response_data and "conversation" in response_data
        else None
    )
Explanation:
This function acts like a messenger, retrieving the latest conversation ID from your Vectara account. It does this by:
- Sending a request: It uses the
requestslibrary to send a secure message to Vectara's API, providing your API key and customer ID for authentication. - Specifying what you need: The request tells Vectara you only need the latest conversation ID, not the entire history.
- Understanding the response: The function analyzes Vectara's response and extracts the conversation ID if available.
This ID helps your app manage conversations and potentially learn from past interactions to improve the chatbot's responses over time.
6.Getting the research_and_update_corpus function
def research_and_update_corpus(
    query, serper_api_key, vectara_api_key, vectara_customer_id, corpus_number
):
    """Conducts research and updates the corpus based on the query."""
    with st.status("Updating corpus...") as status:
        status.write("Sending request to Serper.dev API...")
        response = requests.post(
            "https://google.serper.dev/search",
            headers={"X-API-KEY": serper_api_key, "Content-Type": "application/json"},
            data=json.dumps({"q": query}),
        )

        search_results = json.loads(response.text)
        top_links = [result["link"] for result in search_results["organic"][:5]]

        consolidated_content = "\n".join(
            [fetch_url_content(link) for link in top_links]
        )
        timestamp = datetime.now().strftime("%Y%m%d_%H%M%S")
        file_path = os.path.join("", f"serper_response_{timestamp}.txt")

        with open(file_path, "w", encoding="utf-8") as file:
            file.write(consolidated_content)

        status.write("Uploading consolidated file to update corpus...")
        upload_response = upload_file(
            vectara_api_key, vectara_customer_id, corpus_number, file_path
        )
        status.update(label="Corpus updated successfully!", state="complete")
        time.sleep(1)

        return upload_response
Explanation:
This function helps your chatbot learn and improve! Here's what happens:
-
User Asks a Question: The chatbot encounters a user's question (provided as
query) that it can't answer confidently. -
Updating Knowledge: The function informs the user that the corpus is being updated ("Updating corpus..."). Then, it interacts with the Serper.dev API (like a search engine) to find relevant webpages based on the user's question.
-
Gathering Information: It extracts text content from the top search results using the
fetch_url_contentfunction (imagine a mini web researcher). -
Creating a Study Guide: The function combines the collected text content into a single file. Think of this as a focused study guide tailored to the user's question.
-
Enhancing the Corpus: Finally, it uploads this study guide to your Vectara corpus (the chatbot's knowledge base) using the
upload_filefunction (like adding information to a library). This strengthens the chatbot's knowledge and improves its ability to answer similar questions in the future.
7.Getting the fetch_url_content function
def fetch_url_content(url):
    """Fetches content from a URL."""
    try:
        response = requests.get(url, timeout=10)
        response.raise_for_status()
        return response.text
    except requests.RequestException as e:
        logging.error(f"Error fetching {url}: {e}")
        return ""
Explanation:
This function acts like a personal assistant for your app. You give it a website address (URL), and it tries to fetch the text content from that webpage. Think of it as grabbing the information written on that page. If everything goes smoothly, the function brings back the text content. However, if there's a problem reaching the website, it logs the error for troubleshooting and returns an empty string, letting the app know it couldn't retrieve anything.
8. Researching, Understanding, and Updating the Corpus
if user_prompt and st.session_state["vectara_api_key"]:
    conversation_id = get_latest_conversation_id(
        st.session_state["vectara_api_key"], vectara_customer_id
    )
    response = requests.post(
        "https://api.vectara.io/v1/query",
        headers={
            "Content-Type": "application/json",
            "Accept": "application/json",
            "customer-id": vectara_customer_id,
            "x-api-key": st.session_state["vectara_api_key"],
        },
        data=json.dumps(
            {
                "query": [
                    {
                        "query": user_prompt,
                        "start": 0,
                        "numResults": 3,
                        "contextConfig": {
                            "sentences_before": 3,
                            "sentences_after": 3,
                            "start_tag": "<response>",
                            "end_tag": "</response>",
                        },
                        "corpusKey": [{"corpus_id": st.session_state["corpus_number"]}],
                        "summary": [
                            {"max_summarized_results": 3, "response_lang": "en"}
                        ],
                        "chat": {"store": True, "conversationId": conversation_id},
                    }
                ]
            }
        ),
    )
    query_response = response.json()

    if query_response["responseSet"] and query_response["responseSet"][0]["response"]:
        score = query_response["responseSet"][0]["response"][0]["score"]
        first_response = query_response["responseSet"][0]["summary"][0]["text"]

        if (
            score < 0.65
            or "The returned results did not contain sufficient information"
            in first_response
        ):
            st.write("Conversation paused. Updating corpus...")
            if st.session_state["corpus_number"] is not None:
                upload_response = research_and_update_corpus(
                    user_prompt,
                    st.session_state["serper_api_key"],
                    st.session_state["vectara_api_key"],
                    vectara_customer_id,
                    st.session_state["corpus_number"],
                )
                st.write(f"Corpus update response: {upload_response}")
            else:
                st.error("Corpus number is not set. Cannot update the corpus.")

        st.session_state.messages.append(
            {"role": "assistant", "content": first_response}
        )
This is the most complex part of the code, responsible for the clever self-improvement feature:
- Vectara API interaction: It sends the user's query to the Vectara API for a response.
- Response Analysis: The app checks the quality of the chatbot's response. If the score is low or the response indicates insufficient information, it triggers the corpus update process.
- Research Update (
research_and_update_corpus):- Uses the Serper API to search for relevant information based on the user's query.
- Fetches content from relevant search results.
- Uploads the gathered information to your Vectara corpus to enhance the chatbot's knowledge.
- Chat Display: The chatbot's response is added to the chat history (with the role "assistant").
- Message Display: The
messagefunction from thestreamlit_chatlibrary is used to visually display the chat interaction within the app.
Code:
# Display chat messages
for idx, msg in enumerate(st.session_state.messages):
    message(msg["content"], is_user=msg["role"] == "user", key=f"chat_message_{idx}")
Explanation:
Here's how it functions step-by-step:
-
Retrieving Chat History:
st.session_state.messages: This part references a list stored in Streamlit's session state, likely where your app keeps track of past chat messages (both user and chatbot).
-
Looping Through Messages:
for idx, msg in enumerate(st.session_state.messages): This line sets up a loop to go through each message in the chat history.idx: Provides an index number for each message, starting from 0.msg: Represents an individual message object.
Run streamlit run app.py to view your app locally.
Deploying your Chatbot
Great! Now that your Streamlit app is coming together, let's prepare it for hosting. We'll start by generating a requirements.txt file, check for the necessary Python files, and then push everything to GitHub. Here's how to do it:
1. Generate requirements.txt
This file lists all the Python packages your app depends on. You can generate it using pip freeze:
- Activate your virtual environment (if you aren't already in it).
- Run
pip freeze > requirements.txtin your terminal. This command creates arequirements.txtfile with all installed packages and their versions.
2. Check Your Python Files
Ensure you have the following key files in your project directory:
app.py: Your main Streamlit app file.injest.py: Contains functions for corpus creation, file upload, etc.requirements.txt: The file you just created withpip freeze.
3. Push Your Project to GitHub
Now, let's get your project onto GitHub:
-
Initialize a Git Repository (skip if you already have a Git repository):
git init -
Add Your Files to the staging area:
git add app.py injest.py requirements.txt -
Commit Your Changes:
git commit -m "Initial commit" -
Create a Repository on GitHub:
- Go to GitHub and create a new repository.
- Give it a name and an optional description.
- Keep the repository public for Streamlit sharing.
-
Link Your Local Repository to GitHub:
git remote add origin <YOUR_GITHUB_REPO_URL> -
Push Your Code to GitHub:
git push -u origin master
4. Deploy on Streamlit
- Go to Streamlit’s Community Cloud and sign in.
- Create a New App:
- Click on “New app.”
- Enter your GitHub repository details.
- Deploy Your App:
- Streamlit will automatically deploy your app and provide a URL.
- Share Your App:
- Use the URL to share your app with others.
Remember, whenever you make changes to your app and push them to GitHub, Streamlit will automatically update your deployed app.
That's it! Your Streamlit app is now live and shareable. For a more detailed explanation or any troubleshooting, check Streamlit’s documentation and community forums. Happy coding and sharing! 🎉👩💻🚀
And remember, you can explore the entire code and its intricacies at: Sanchay's Vectara Chat Essentials on GitHub.
Let's embark on a visual journey through the Vectara Chat Essentials interface. Below, I'll guide you through a series of screenshots that demonstrate the Vectara Chat Essentials demo. Each image captures a specific stage in the user experience, offering you a glimpse into the process and functionality of the platform.
Demo and Walkthrough
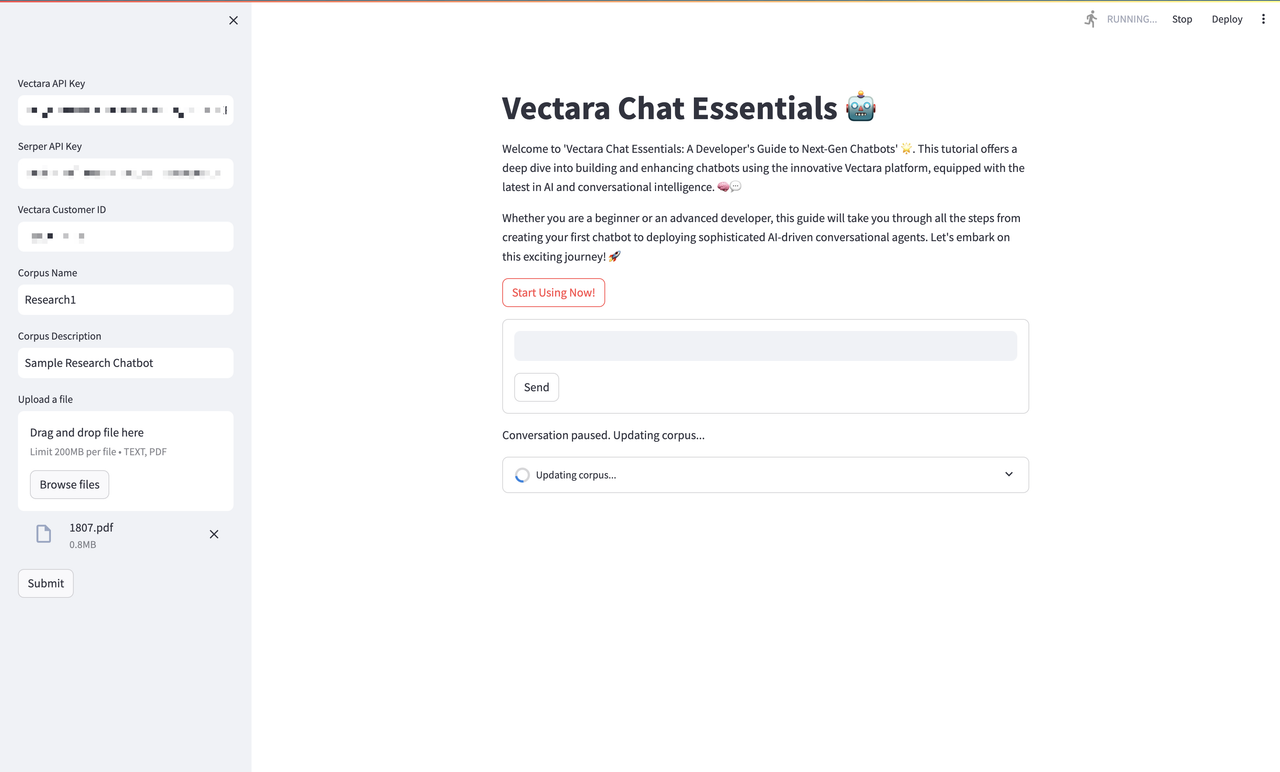
Welcome Screen & Initial Setup
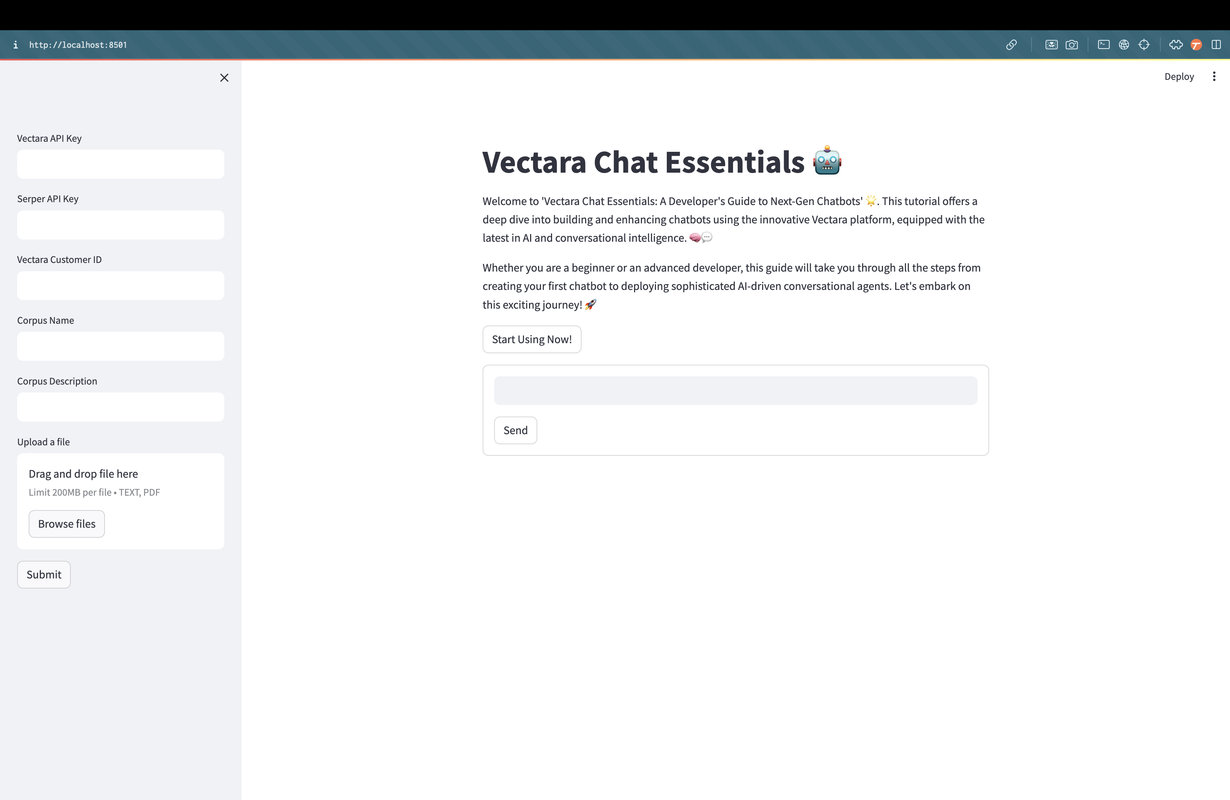
Here's the welcome screen where you'll begin your Vectara Chat Essentials journey. Notice the sidebar inviting you to enter crucial credentials such as Vectara and Serper API keys, along with your Customer ID. This initial setup is your gateway to a tailored chatbot experience. The central pane presents a warm greeting and a bold button to start using the platform, an exciting first step into the realm of conversational AI.
Entering API Keys
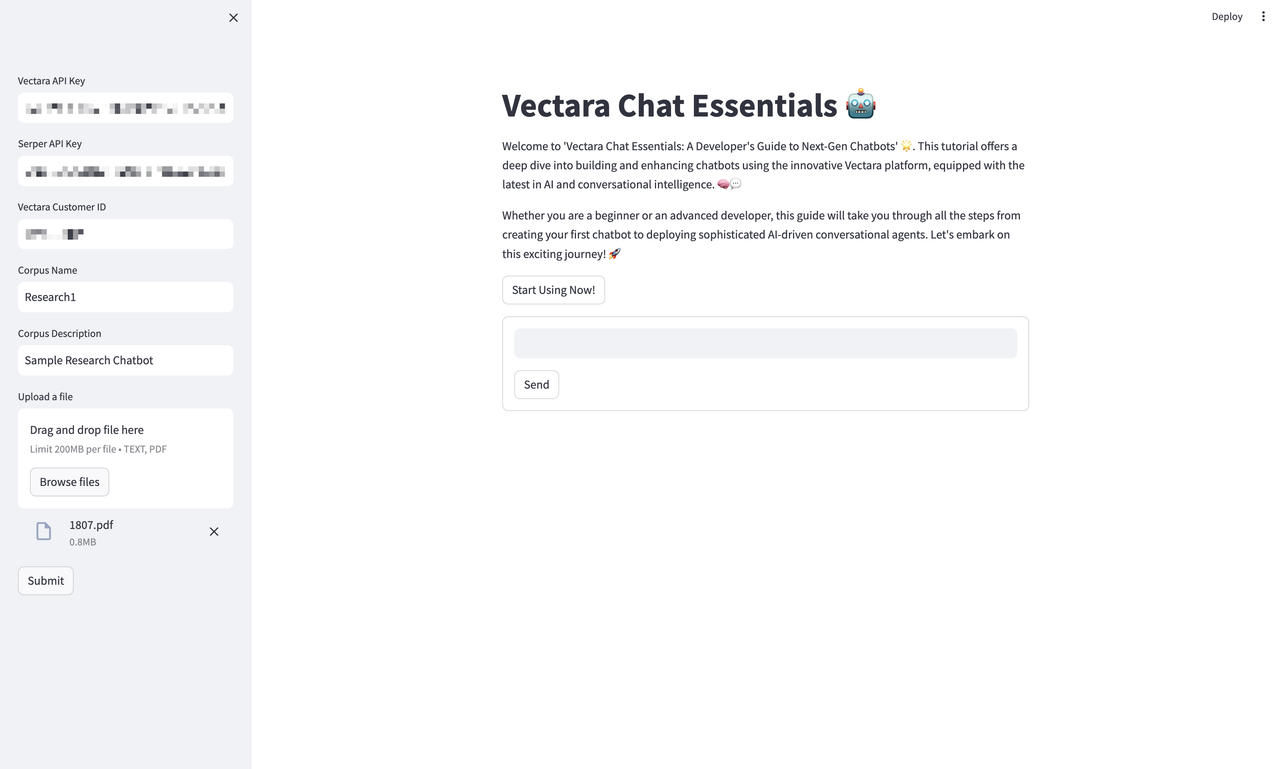
After the warm introduction, you are prompted to secure your experience by inputting your unique API keys. This step ensures that your interactions are personalized and private. In this image, we've filled out the 'Corpus Name' and 'Corpus Description' fields with our project details, laying the groundwork for our first chatbot endeavor titled 'Research1'.
Engaging with the Chatbot
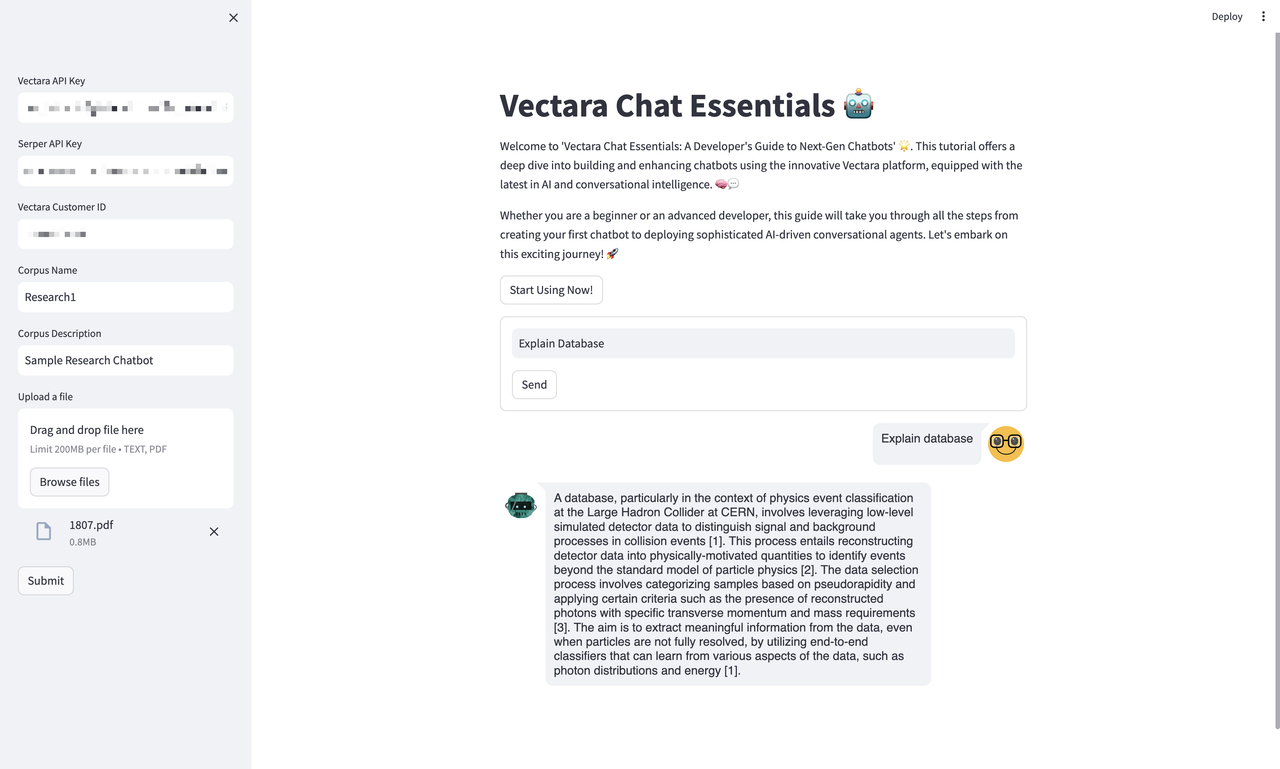
Moving on to the heart of interaction, here we see a user engaging with the chatbot. A query has been entered, and the chatbot has responded with detailed information. This illustrates the chatbot’s capacity to provide substantial responses, demonstrating the power and intelligence of the Vectara platform.
Query Input and Processing

At this juncture, you witness the interface in action as it processes a new user query. This step highlights the system’s capability to handle diverse queries, showcasing the practical application and versatility of the chatbot. The UI maintains a clean and intuitive design, indicative of a user-centric approach.
System Learning and Adaptation

Finally, we observe the system in a state of learning and adaptation. The update in progress signifies the dynamic learning capabilities of Vectara Chat Essentials, where the system assimilates new information, enhancing its database for future queries.
Enhancing Chatbot Intelligence
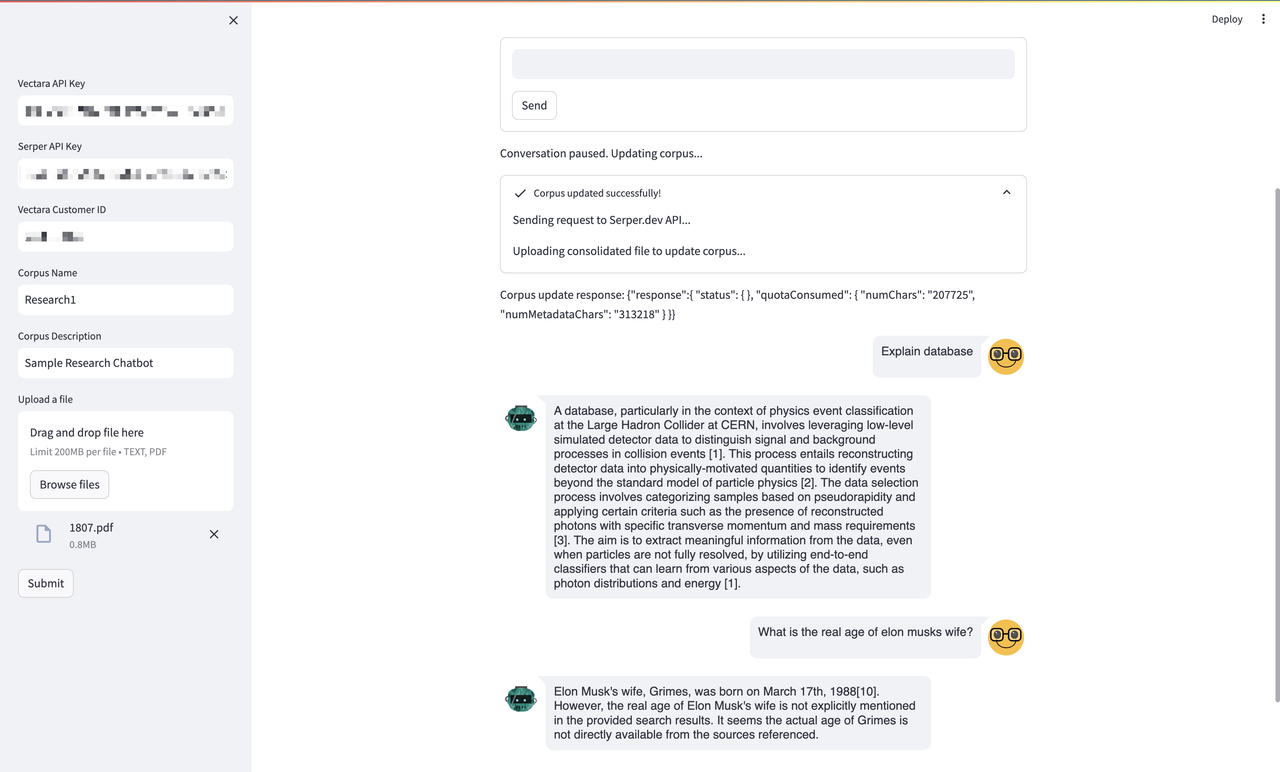
In this last snapshot of our Vectara Chat Essentials demo, you're observing the chatbot in a moment of self-improvement. The system notifies us that it's pausing the conversation to perform an update — this isn't just any update, though. It's a significant leap in the chatbot's ability to comprehend and communicate. Here's what's happening:
- The chatbot is demonstrating its unique capability to self-analyze and detect when its responses may not have the desired clarity or depth. This introspection is critical for a learning entity, and Vectara has engineered this into the heart of its platform.
- When the system detects a gap in its knowledge — perhaps triggered by a new query it struggled with or an emerging topic it hasn't encountered before — it doesn't just notify the user; it takes action. It autonomously searches for the relevant information, assimilates it, and enriches its corpus, the foundational database from which it crafts its responses.
- As we see the confirmation "Corpus updated successfully!" we're not just being informed of a completed task; we're being invited to witness the evolution of AI. The chatbot is becoming more informed, more adept at its task, and, as a result, more valuable to its user.
- The process of searching and updating isn't a static upload of data; it's an intelligent selection of what's necessary. The Vectara chatbot isn't merely increasing the quantity of its information; it's enhancing the quality of its intellect.
- The outcome is a smarter, sharper, and more sophisticated chatbot, ready to tackle more complex queries with a greater understanding of the nuances and context necessary for meaningful interaction.
Concluding Insights for Hackathon Prodigies: 🌟🎉
As you gear up for your hackathon journey, armed with Vectara Chat Essentials, let me share a few parting thoughts to guide you towards success.
- First, embrace the dynamic learning capabilities of Vectara to build chatbots that can evolve and adapt alongside your users' needs. Unleash your creativity and imagine conversational interfaces that continuously improve.
- User experience is paramount. Craft an interface that captivates and delights, leveraging Vectara's natural language processing to create seamless, engaging dialogues.
- Be bold in tackling real-world challenges. Deploy your chatbot to streamline workflows, disseminate information, or provide top-notch support. Let your ingenuity unlock new avenues of service and efficiency.
- Envision your chatbot as an integral part of a larger digital ecosystem. Explore ways to integrate it with other platforms, creating a cohesive, interconnected experience for your users.
- Of course, don't forget the importance of privacy and security. Build solutions that instill confidence and trust, safeguarding user data through Vectara's commitment to data protection.
- Resist the urge to rush through testing. Thorough, rigorous testing is what separates good chatbots from great ones. Take the time to ensure your creation is exceptional.
- Maintain an agile mindset, ready to adapt, refine, and pivot based on real-time feedback and emerging trends. Responsiveness and flexibility could be the keys to your success.
As you embark on this exciting journey, remember to have fun, embrace the challenge, and let your passion for innovation shine through. With Vectara Chat Essentials as your guide, I'm confident you'll create chatbot solutions that will impress, delight, and leave a lasting impact.
Final Thoughts: 🌟
As we conclude this tutorial, take a moment to reflect on the possibilities that Vectara Chat Essentials opens for you. With its blend of AI sophistication and user-centric design, you’re not just developing a chatbot; you’re crafting experiences, solving problems, and perhaps even changing lives.
Good luck to every hackathon warrior out there. May your code run error-free, your creativity overflow, and your solutions resonate with the heartbeat of progress.
We hope you've found this tutorial enlightening and that it ignites your passion for building with Vectara Chat Essentials. Until next time, keep coding, keep creating, and keep dazzling. 🚀✨🤖
And with that, I bid you farewell and good luck—may your hackathon journey be as rewarding as it is exhilarating. Thank you for walking through this tutorial with me!