Developing Intelligent Agents with CrewAI
Developing Intelligent Agents with CrewAI
Introduction to Intelligent Agents and CrewAI Framework
In the world of artificial intelligence, intelligent agents are becoming increasingly significant. These agents can make decisions, learn from their environment, and perform tasks ranging from basic automation to complex data analysis. This tutorial will guide you through creating intelligent agents using CrewAI, a powerful framework designed to simplify AI agent development.
Why CrewAI and Understanding Agent Systems
CrewAI stands out by handling many complexities involved in building intelligent agents, allowing you to focus on core logic and behavior. It's suitable for beginners and experienced developers alike, making it easier to bring AI ideas to life efficiently.
An agent system consists of individual agents that interact with their environment to achieve specific goals. Each agent perceives its environment, makes decisions based on observations, and acts accordingly. Some agents can even learn from past experiences, improving over time.
Getting Started and Enhancing Agents
We'll begin by creating a basic agent that performs a straightforward task. You'll learn how to define the agent's purpose, set up its environment, and configure its behavior based on inputs.
Next, we'll integrate agents with Large Language Models like GPT-4, enabling them to handle complex language-based tasks. You'll learn how to connect agents to LLMs and apply these integrations practically.
Connecting to Tools and Adapting for Different Scenarios
We'll explore how to link your agents with external resources, expanding their capabilities and making them more powerful and useful. CrewAI is adaptable across various industries, and we'll discuss how to modify your agents for different scenarios, demonstrating the framework's versatility.
Let's continue by setting up the environment, installing necessary libraries, and creating the project structure. I'll guide you through each step clearly and naturally.
Setting Up Your Development Environment
Before we start building intelligent agents with CrewAI, it's important to set up a proper development environment. This ensures that everything runs smoothly and that your project remains organized.
Setting Up a Virtual Environment
A virtual environment is like a separate workspace on your computer that keeps all the dependencies and libraries for your project isolated from others. This isolation helps avoid conflicts between different projects and ensures that your project uses the correct versions of libraries.
For Windows:
-
Open your preferred Integrated Development Environment (IDE) like PyCharm, VS Code, or even just the Command Prompt.
-
Navigate to the directory where you want to create your project. You can do this using the
cdcommand. -
Run the following command to create a virtual environment:
python -m venv myenvThis will create a folder named
myenvin your directory. -
To activate the virtual environment, run:
myenv\Scripts\activateYou’ll notice that your command line now shows
(myenv), indicating that the virtual environment is active.
For MacOS:
-
Open Terminal and navigate to the directory where you want your project.
-
Run the following command to create a virtual environment:
python3 -m venv myenvThis creates a
myenvdirectory with the virtual environment. -
To activate it, run:
source myenv/bin/activateThe terminal prompt will change, showing
(myenv)before your directory path, which means the virtual environment is active.
With the virtual environment active, you can now install the necessary libraries without affecting other projects on your system.
Installing CrewAI and Necessary Tools
With your virtual environment set up, the next step is to install CrewAI, the framework that will power our intelligent agents.
-
Ensure your virtual environment is active (you should see
(myenv)in your terminal or command prompt). -
Run the following command to install the main CrewAI package:
pip install crewai -
To install additional tools that will be helpful for your agents, you can run:
pip install 'crewai[tools]'Alternatively, you can install both the main package and the tools together:
pip install crewai crewai-tools
These commands will download and install everything you need to start working with CrewAI.
Creating Your Project
Now that CrewAI is installed, it’s time to create your project. CrewAI provides a handy command to set up the basic structure of your project, saving you time and ensuring that everything is organized correctly from the start.
-
Run the following command in your terminal:
crewai create crew <project_name>Replace
<project_name>with the name you want for your project. This command will create a folder with your project name and set up the basic structure inside it.
Understanding the Project Structure
After running the crewai create crew command, you’ll find that a project structure has been created for you. Here’s what it looks like:
my_project/
├── .gitignore
├── pyproject.toml
├── README.md
└── src/
    └── my_project/
        ├── __init__.py
        ├── main.py
        ├── crew.py
        ├── tools/
        │   ├── custom_tool.py
        │   └── __init__.py
        └── config/
            ├── agents.yaml
            └── tasks.yaml
Let’s break down what each of these files and folders does:
-
.gitignore: This file tells Git (a version control system) which files or folders to ignore. It's useful for keeping unnecessary files out of your version history.
-
pyproject.toml: This file contains configuration information for your project, including dependencies and settings needed to build and run your project.
-
README.md: This is a markdown file where you can describe your project, provide instructions, and document important details.
-
src/: This folder contains the main source code for your project.
-
my_project/: Inside the
src/folder, there’s another folder with your project’s name. This is where most of your project’s code will live.-
__init__.py: This file makes Python treat the directory as a package. You usually don’t need to modify it much.
-
main.py: This is the main entry point for your project. It’s where you’ll define how your agents are run and manage the overall flow of your application.
-
crew.py: This file is where you’ll define the logic of your agents, tools, and tasks. You’ll add custom functions, arguments, and any other specific logic that your project needs.
-
tools/: This directory is where you can add any custom tools that your agents might use. For example, if you need a specific function or utility that doesn’t come built-in, you can define it here.
-
custom_tool.py: An example file where you can start adding your own tools.
-
__init__.py: Again, this file makes Python treat the directory as a package.
-
-
config/: This folder contains configuration files where you define your agents and tasks.
-
agents.yaml: In this file, you’ll define the agents for your project, including their roles, goals, and any specific configurations they need.
-
tasks.yaml: This file is where you’ll define the tasks that your agents will perform. You’ll describe each task, outline the expected output, and link it to the appropriate agent.
-
-
-
Customizing Your Project
Now that you understand the structure, you can start customizing your project. For instance, you might want to define a new agent in the agents.yaml file, outlining its role and goals. You would then define tasks in the tasks.yaml file, specifying what the agent should do.
In the crew.py file, you’ll write the actual logic that ties everything together. This is where you’ll define how the agents interact with tasks, connect to external tools, and manage inputs and outputs.
This setup gives you a solid foundation to start building intelligent agents with CrewAI. Next, once you’re ready, we’ll go through the code in each of these files step by step, explaining the functions and how they all fit together..
Customizing Your Agents and Tasks
Now that we've set up our project, it's time to define the agents and tasks that will drive our content creation pipeline. This involves editing two key YAML files: agents.yaml and tasks.yaml. These files are where you'll specify the roles, goals, and tasks for each agent in your project.
Step 1: Navigating to the YAML Files
First, navigate to the src/my_project/config/ directory within your project structure. This is where you'll find the agents.yaml and tasks.yaml files. These files are crucial because they define the behavior and responsibilities of your agents.
- Navigate to the
agents.yamlfile: This file is where you'll define the different agents that will participate in your project. - Navigate to the
tasks.yamlfile: This file is where you'll define the specific tasks that each agent will perform.
Step 2: Defining Agents in agents.yaml
Open the agents.yaml file in your IDE or text editor. This file should look something like this:
researcher:
  role: Web Content Researcher and Analyst
  goal: Thoroughly analyze the content from {url}, extracting key information, trends, and unique insights
  backstory: >
    You're a seasoned web researcher with a background in data analysis and content curation.
    Your ability to quickly identify valuable information and spot emerging trends makes you
    invaluable for gathering comprehensive, actionable insights from web content.

planner:
  role: Content Strategist and Blog Architect
  goal: Develop a compelling, SEO-optimized outline for a blog post about {url}
  backstory: >
    With years of experience in content strategy and SEO, you excel at crafting
    content structures that engage readers and perform well in search engines.
    Your outlines are known for their logical flow, keyword optimization, and ability
    to address the target audience's needs effectively.

writer:
  role: Expert Blog Content Creator
  goal: Craft an engaging, informative, and SEO-friendly blog post about {url} based on the provided outline
  backstory: >
    As a versatile writer with expertise in various industries, you have a talent for
    translating complex information into accessible, engaging content. Your writing
    style adapts to different tones and target audiences while maintaining clarity
    and incorporating SEO best practices seamlessly.

editor:
  role: Senior Content Editor and Quality Assurance Specialist
  goal: Elevate the blog post draft to publication-ready status, ensuring factual accuracy, SEO optimization, and brand consistency
  backstory: >
    With a sharp eye for detail and a deep understanding of content marketing,
    you transform good content into great content. Your expertise in SEO, fact-checking,
    and style guide adherence ensures that every piece you edit is not only error-free
    but also optimized for both readers and search engines.
Let's break down each part of this file so you understand what’s happening:
-
researcher: This is the name of the first agent in your project. You can think of it as the identifier for this specific agent.
- role: This defines what the agent's role is within the project. Here, the Researcher is tasked with analyzing web content.
- goal: This specifies the main objective of the agent. The Researcher's goal is to analyze content from a specified URL and extract key insights.
- backstory: This provides some context or a description of the agent's capabilities. It helps in understanding what makes this agent suited for its role.
-
planner: This agent is responsible for creating a content strategy based on the Researcher's findings.
- role: The Planner's role is to develop an SEO-optimized outline for a blog post.
- goal: The goal here is to create a structured outline that will guide the writing process.
- backstory: The backstory gives insight into the Planner’s expertise in content strategy and SEO.
-
writer: The Writer is the agent that will actually create the content.
- role: This agent's role is to write the blog post based on the outline provided by the Planner.
- goal: The goal is to craft a well-written, SEO-friendly blog post.
- backstory: The Writer's backstory highlights their ability to write engaging and clear content across different industries.
-
editor: The Editor is the final agent in the pipeline, responsible for refining and polishing the content.
- role: The Editor's role is to review and edit the blog post to ensure it’s ready for publication.
- goal: The goal is to make the content publication-ready by checking for factual accuracy, optimizing for SEO, and ensuring brand consistency.
- backstory: The backstory provides context on the Editor’s skills in content marketing and quality assurance.
Step 3: Defining Tasks in tasks.yaml
Next, open the tasks.yaml file in the same directory. This file assigns specific tasks to each agent:
research_task:
  description: >
    Utilize the FirecrawlScrapeWebsiteTool to thoroughly analyze the content at {url}.
    Extract key information, identify main themes, gather relevant statistics, and uncover
    unique insights. Pay special attention to current trends, expert opinions, and any
    controversial or debated points related to the topic.
  expected_output: >
    A comprehensive research report including:
    1. Executive summary of key findings
    2. Main themes and topics identified
    3. Important statistics and data points
    4. Expert opinions and quotes (if available)
    5. Current trends and future predictions
    6. Potential areas for further exploration
    7. List of credible sources for fact-checking
  agent: researcher

planning_task:
  description: >
    Based on the research report, create a detailed, SEO-optimized outline for the blog post.
    Consider the target audience, incorporate relevant keywords, and ensure a logical flow of information.
  expected_output: >
    An SEO-optimized blog post outline including:
    1. Proposed title and meta description
    2. Introduction with a hook and thesis statement
    3. Main sections and subsections with clear headings (H2, H3)
    4. Key points to be covered under each section
    5. Suggestions for internal and external links
    6. Ideas for visual content (images, infographics, videos)
    7. Call-to-action (CTA) ideas for the conclusion
  agent: planner

writing_task:
  description: >
    Using the SEO-optimized outline, write a comprehensive first draft of the blog post.
    Focus on creating engaging, informative content that incorporates the research findings
    and follows SEO best practices.
  expected_output: >
    A well-structured first draft of the blog post in markdown format, including:
    1. Attention-grabbing introduction
    2. Well-developed body paragraphs with smooth transitions
    3. Proper use of headings and subheadings (H2, H3)
    4. Incorporation of relevant statistics and expert quotes
    5. Optimized for target keywords without keyword stuffing
    6. Engaging conclusion with a strong call-to-action
    7. Placeholder suggestions for images or other media
  agent: writer

editing_task:
  description: >
    Thoroughly review and refine the blog post draft. Focus on enhancing clarity,
    coherence, SEO optimization, and overall quality. Ensure factual accuracy,
    proper citation, and adherence to the brand's style guide.
  expected_output: >
    A polished, publication-ready blog post with:
    1. Tracked changes and comments explaining major edits
    2. Improved sentence structure and word choice
    3. Enhanced SEO elements (title, meta description, headers, etc.)
    4. Fact-checked information with proper citations
    5. Suggestions for additional internal/external links
    6. Recommendations for visual content placement
    7. A final proofread for grammar, spelling, and punctuation
    8. Summary of improvements and any outstanding concerns
  agent: editor
Here's what each part means:
-
research_task: This task is assigned to the Researcher agent. It involves using a tool (like the FirecrawlScrapeWebsiteTool) to analyze web content, extract key information, and produce a detailed research report.
- description: Provides a clear overview of what the task involves.
- expected_output: Outlines what the task should produce—a comprehensive research report with specific sections.
- agent: Specifies which agent is responsible for this task.
-
planning_task: This task is assigned to the Planner agent. It involves creating an SEO-optimized outline based on the research report.
- description: Explains what the task entails, focusing on developing a content strategy.
- expected_output: Details what the task should produce—an organized and optimized outline for the blog post.
- agent: Links the task to the Planner agent.
-
writing_task: The Writing Task is handled by the Writer agent. It involves drafting the blog post based on the outline.
- description: Describes the task of writing the blog post, incorporating research findings and following SEO practices.
- expected_output: Specifies what the output should be—a well-written first draft in markdown format.
- agent: Assigns the task to the Writer agent.
-
editing_task: The Editor agent takes on this task, refining the blog post draft to make it publication-ready.
- description: Outlines the task of editing the draft, ensuring quality, accuracy, and SEO optimization.
- expected_output: Describes what the final output should be—a polished and ready-to-publish blog post.
- agent: Connects this task to the Editor agent.
Next, we'll move on to integrating tools and writing the logic in the crew.py and main.py files. These steps will tie everything together, allowing your agents to execute their tasks and produce the final content. Once you provide those files, we can continue with the detailed explanation and implementation.
Continuing from where we left off, now that we’ve set up the agents and tasks in the agents.yaml and tasks.yaml files, it’s time to integrate everything using the crew.py file. This file is where the logic comes together, allowing your agents to carry out their tasks and ultimately produce the final content.
Writing the Logic in crew.py
The crew.py file is essentially the brain of your project. Here, you'll define how each agent operates, how they interact with the tasks, and how the overall workflow is managed. Let’s walk through this file step by step.
Starting with Imports
At the very top of the file, we import several essential modules:
from crewai import Agent, Crew, Process, Task
from crewai.project import CrewBase, agent, crew, task
from crewai_tools import FirecrawlScrapeWebsiteTool
from firecrawl import FirecrawlApp
from langchain_openai import ChatOpenAI
This section brings in the core components of CrewAI that we’ll use to define agents, tasks, and processes. Additionally, it includes tools like FirecrawlScrapeWebsiteTool, which the agents will use to scrape and analyze web content, and ChatOpenAI, which connects to a large language model for tasks requiring more complex language processing.
Defining the Blogagent2Crew Class
Next, we define the main class for our project, Blogagent2Crew. This class will contain all the agents and tasks we’ve previously defined in the YAML files, and it will control how they work together.
@CrewBase
class Blogagent2Crew:
    """Blogagent2 crew"""

    agents_config = "config/agents.yaml"
    tasks_config = "config/tasks.yaml"
Here, the @CrewBase decorator indicates that this class will define a crew—a group of agents working together. The agents_config and tasks_config variables point to the YAML files where the definitions of agents and tasks are stored. This setup ensures that the logic in crew.py directly corresponds to what you’ve defined in the configuration files.
Defining Agents
Inside the Blogagent2Crew class, we define each agent using the @agent decorator. This decorator links each agent to its corresponding configuration in agents.yaml.
@agent
def researcher(self) -> Agent:
    return Agent(
        config=self.agents_config["researcher"],
        tools=[FirecrawlScrapeWebsiteTool()],
        verbose=True,
    )
This block of code defines the Researcher agent. The config parameter pulls the configuration from agents.yaml under the "researcher" key. The tools parameter assigns the FirecrawlScrapeWebsiteTool to this agent, enabling it to scrape and analyze web content. The verbose=True setting ensures that the agent’s actions are logged, which is useful for debugging and understanding the agent's behavior.
Similarly, we define the other agents—Planner, Writer, and Editor—each linked to their respective configurations:
@agent
def planner(self) -> Agent:
    return Agent(
        config=self.agents_config["planner"],
        tools=[FirecrawlScrapeWebsiteTool()],
        verbose=True,
    )

@agent
def writer(self) -> Agent:
    return Agent(config=self.agents_config["writer"], verbose=True)

@agent
def editor(self) -> Agent:
    return Agent(config=self.agents_config["editor"], verbose=True)
Each agent is set up to perform specific roles in the content creation process, with their behavior and tools defined according to the settings in agents.yaml.
Defining Tasks
Following the agent definitions, we define the tasks that each agent will perform. This is done using the @task decorator.
@task
def research_task(self) -> Task:
    return Task(
        config=self.tasks_config["research_task"],
    )
This block of code sets up the Research Task. It pulls the configuration from tasks.yaml under the "research_task" key. This configuration defines what the task involves and what the expected output is. The same pattern is followed for the other tasks:
@task
def planning_task(self) -> Task:
    return Task(
        config=self.tasks_config["planning_task"],
    )

@task
def writing_task(self) -> Task:
    return Task(
        config=self.tasks_config["writing_task"],
    )

@task
def editing_task(self) -> Task:
    return Task(
        config=self.tasks_config["editing_task"], output_file="blog_post.md"
    )
Each task is connected to a specific agent and defines the steps necessary to complete that part of the content creation pipeline. For example, the Editing Task is configured to output the final blog post as a markdown file named blog_post.md.
Bringing It All Together with the Crew
Finally, we define the crew using the @crew decorator. The crew is responsible for coordinating all the agents and tasks, ensuring they work in sequence to produce the final content.
@crew
def crew(self) -> Crew:
    """Creates the Blogagent2 crew"""
    return Crew(
        agents=self.agents,
        tasks=self.tasks,
        process=Process.sequential,
        verbose=True,
        output_log_file="new-logs.txt",
        planning=True,
        planning_llm=ChatOpenAI(model="gpt-4o"),
    )
This code block sets up the Blogagent2 Crew, which ties everything together. The agents and tasks parameters pull in the agents and tasks we defined earlier. The process=Process.sequential setting ensures that the tasks are executed one after the other, in the correct order. The verbose=True flag enables detailed logging, which is helpful for tracking the crew’s activity.
Additionally, the crew is configured to use the ChatOpenAI model (gpt-4o) for any planning tasks that require more complex language understanding and generation. The output of the crew’s actions is logged to a file named new-logs.txt, making it easy to review what happened during the process.
Setting Up the main.py File
The main.py file is where you initiate your crew and run the tasks you've set up in crew.py. This file serves as the entry point for your project, allowing you to execute everything locally.
Here’s how the main.py file starts:
#!/usr/bin/env python
import sys
from blogagent2.crew import Blogagent2Crew
from dotenv import load_dotenv
import os
Explanation:
- Shebang (
#!/usr/bin/env python): This line ensures that the script is executed using the Python interpreter. It’s a standard practice in Python scripts that are meant to be run from the command line. - Imports:
sys: Used for interacting with the Python runtime and handling command-line arguments.Blogagent2Crew: This is the class from yourcrew.pyfile that contains all your agents and tasks. Importing this allows you to use the crew you've defined.load_dotenv: This function loads environment variables from a.envfile, making it easier to manage configuration settings without hardcoding them into the script.os: Theosmodule is used for interacting with the operating system, such as setting environment variables.
Loading Environment Variables
Next, we load environment variables, which might include API keys or other configuration settings that are better kept outside your main code for security and flexibility:
load_dotenv()
Explanation:
- load_dotenv(): This function loads all the environment variables defined in a
.envfile into your script's environment. This is useful for keeping sensitive information like API keys or model names secure and separate from your code.
Setting an Environment Variable
We also set a specific environment variable directly in the script:
os.environ["OPENAI_MODEL_NAME"] = "gpt-4o-mini"
Explanation:
- Setting
OPENAI_MODEL_NAME: This line sets an environment variable calledOPENAI_MODEL_NAMEto"gpt-4o-mini". This variable might be used later in the project, particularly if your crew interacts with an OpenAI model. By setting it here, you ensure that whenever the crew runs, it knows which model to use.
Running the Crew
Now, let’s look at the core function of this script, which is responsible for running the crew:
def run():
    print("Running crew...")
    inputs = {"url": "https://openai.com/index/conde-nast/"}
    Blogagent2Crew().crew().kickoff(inputs=inputs)
Explanation:
- run() function: This is the main function you’ll use to start the crew. It prints a message to the console to indicate that the crew is running.
- inputs: The
inputsdictionary contains data that the agents will use during execution. In this case, it includes a URL, which the Researcher agent will analyze. You can modify this URL or add other inputs depending on what you want the crew to work on. - kickoff(): The
kickoff()method initiates the sequence of tasks defined increw.py. It uses theinputsto start the process, passing the data through the tasks as needed. This is where the actual execution happens, with the agents working in the order you’ve set up.
Running the Project
Once you've set up everything as described in the previous sections, it's time to run your project and watch your agents at work. To do this, you'll need to use the following command in your terminal:
poetry run <project_name>
Explanation:
- Replace
<project_name>with the actual name of your project. This command will start the execution of your crew, initiating the sequence of tasks you've defined.
What to Expect in the Terminal
After you run the command, you'll see a series of outputs in your terminal that represent the actions of your agents as they execute their tasks. The terminal will display logs and messages that indicate the progress of each agent.
As your agents begin their tasks, you’ll notice detailed logs and outputs, such as:
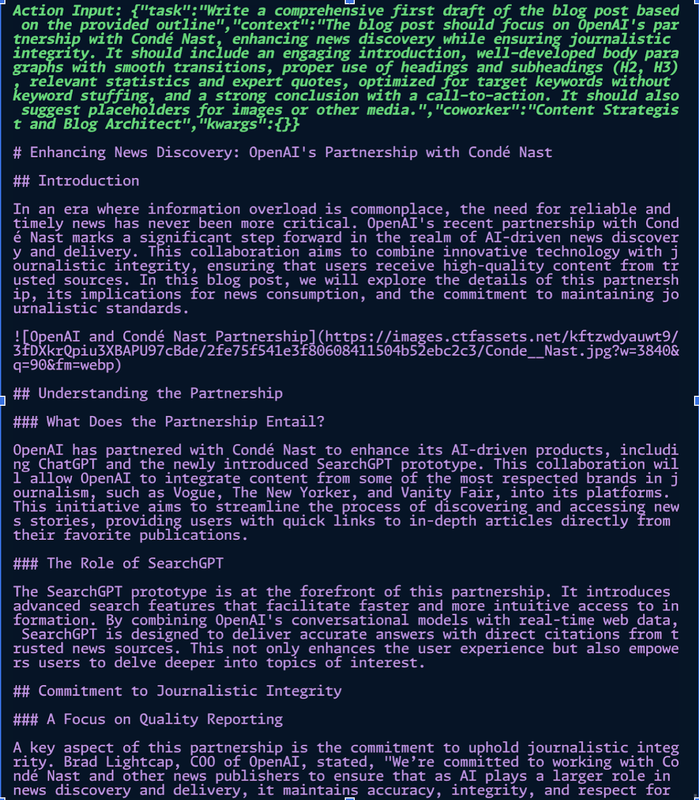
This show's the Researcher agent analyzing the content from the specified URL and extracting key insights.
Here, you might see the Planner agent generating an SEO-optimized outline based on the research findings.
Final Outputs
Once the execution is complete, you’ll find two key output files in your project directory:
- blog_post.md: This file contains the final content generated by your agents. For example, if your task was to create a blog post, this file will have the complete draft, including all sections as planned by the agents.
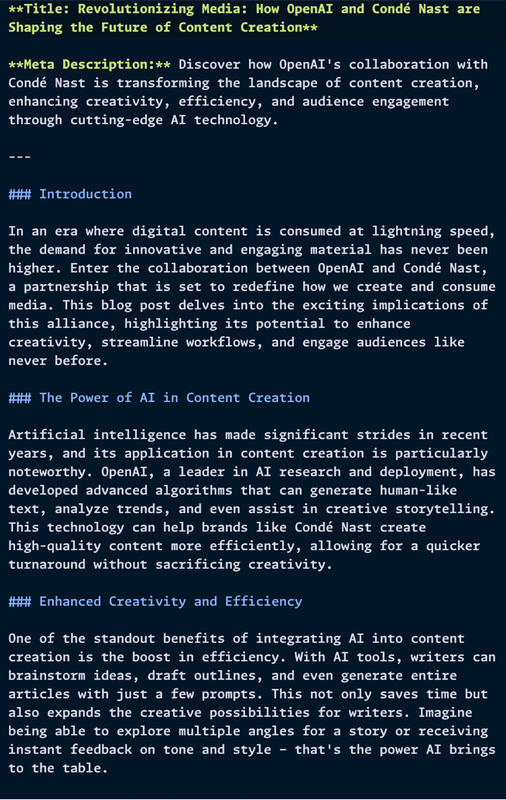
The content in this file will be structured according to the outline created by your Planner agent, and filled in by the Writer agent.
- new-logs.txt: This file holds the logs from the entire process. It details the actions taken by each agent, providing a comprehensive record of the workflow. This is useful for reviewing the execution process and for debugging purposes.
Conclusion
By following this tutorial, you’ve set up and run a complete project using CrewAI, from defining agents and tasks to seeing the final outputs generated by your AI agents. This process not only demonstrates the power of CrewAI but also provides a practical framework for developing intelligent agents that can be adapted across various scenarios.
As you continue to explore and refine your project, you can build upon this foundation, adding more complexity or tailoring the agents to specific needs. Whether you’re looking to automate content creation, streamline research processes, or implement sophisticated workflows, CrewAI offers the tools to make it happen. Happy coding!