Building an AI-Powered Personal Health Dashboard with Falcon 180B
Developing an AI-Powered Personal Health Dashboard
Introduction
Hi, I'm Sanchay Thalnerkar, and I'm excited to guide you through creating a Personal Health Dashboard using the powerful Falcon 180B language model. The intersection of artificial intelligence and healthcare has ushered in a new era of personalized health management. This tutorial guides you through the creation of a Personal Health Dashboard, a tool that harnesses the power of the Falcon 180B language model to analyze medical reports and provide actionable health insights.
Developed by the Technology Innovation Institute (TII), Falcon 180B is an open-source language model boasting 180 billion parameters. Its training on approximately 3.5 trillion tokens places its capabilities on par with leading models like GPT-3.5 and GPT-4, making it exceptionally well-suited for the complex task of medical report analysis.
This project combines this advanced AI capability with modern web development practices. We'll use Next.js to create a responsive frontend and Flask to build a robust backend. This combination allows us to deliver a user-friendly interface backed by sophisticated data processing and AI-driven insights.
Project Overview
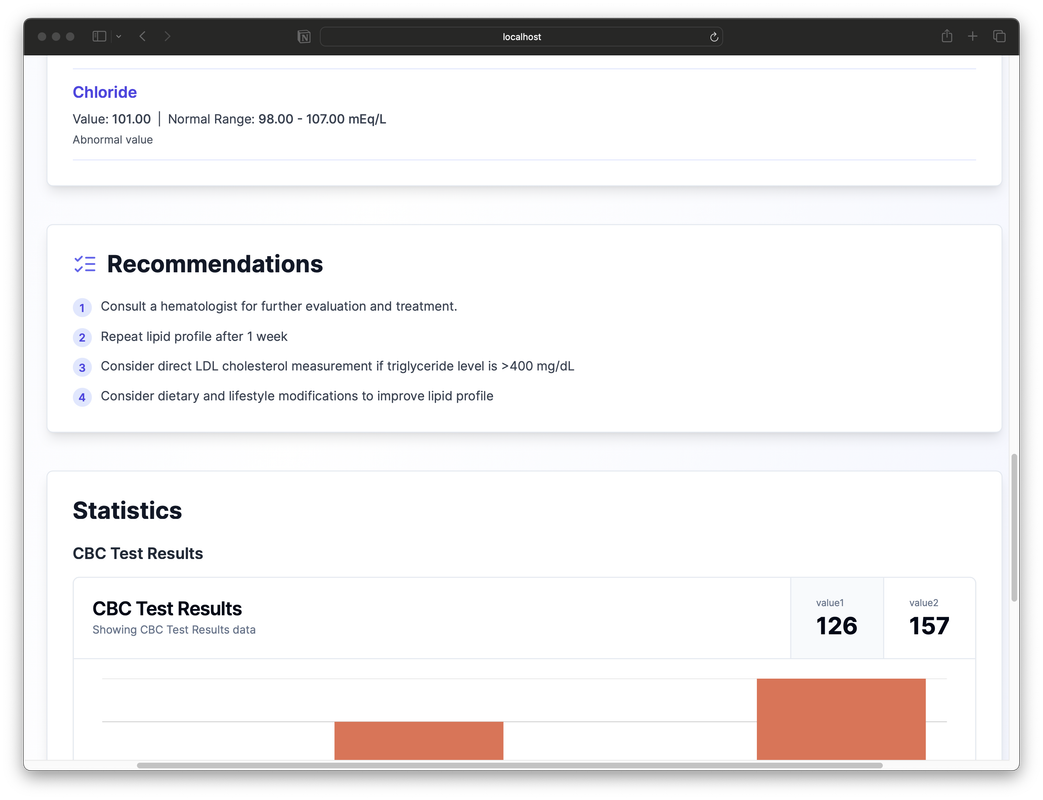
The Personal Health Dashboard we're developing is designed to transform how individuals interact with their medical data. At its core, the dashboard serves as a digital health companion, capable of ingesting and analyzing medical reports, presenting health metrics in an easily digestible format, and offering personalized recommendations.
When a user uploads a medical report, this system leverages the Falcon 180B model to parse and understand the document's contents. The AI extracts key health indicators, identifies trends, and generates insights. These are then presented on the dashboard through intuitive visualizations and clear, concise summaries.
One of the dashboard's most valuable features is its ability to track health metrics over time.

Users can view their progress across various health indicators, allowing them to see the impact of lifestyle changes or medical interventions. This longitudinal view of health data can be incredibly empowering, giving users a clearer picture of their overall health trajectory.
The system goes beyond mere data presentation. By analyzing the patterns in a user's health data, the AI generates personalized health recommendations.
These might include suggestions for lifestyle modifications, reminders for follow-up tests, or alerts about potential health risks that warrant attention from a healthcare provider.

From a technical standpoint, the application is built on a client-server architecture. The frontend, developed with Next.js, provides a dynamic and responsive user interface. It communicates with our Flask-based backend, which handles data processing, integrates with the Falcon 180B model, and serves API endpoints. This separation of concerns allows for scalability and easier maintenance of the system.
As we progress through this tutorial, we'll delve into each component of the system, from setting up the development environment to integrating the AI model and creating an intuitive user interface. Whether you're an experienced developer looking to expand your AI and healthcare tech skills, or a newcomer to the field, this project offers valuable insights into creating impactful, AI-driven web applications.
Let's begin our journey into building this innovative health management tool.
Setting Up Your Development Environment
Before we dive into building our AI-powered Personal Health Dashboard, we need to set up our development environment. This process involves installing necessary software, cloning the project repository, and configuring our workspace. Let's walk through these steps together.
Prerequisites
First, ensure that you have Python and Node.js installed on your system. These are the foundational technologies we'll be using for our backend and frontend, respectively. If you haven't installed them yet, visit the official Python and Node.js websites to download and install the latest stable versions.
Cloning the Repository
Our project is hosted on GitHub. To get started, open your terminal and run the following command to clone the repository:
git clone https://github.com/Sanchay-T/healthsyncfalcon.git
This will create a local copy of the project on your machine.
Setting Up the Python Environment
Navigate into the project directory:
cd healthsyncfalcon
It's a good practice to use a virtual environment for Python projects. This keeps our project dependencies isolated. Create and activate a virtual environment like this:
python -m venv venv
source venv/bin/activate  # On Windows, use `venv\Scripts\activate`
With the virtual environment activated, install the required Python packages:
pip install -r requirements.txt
Configuring the Frontend
Our frontend is located in the my-app directory. Navigate there and install the necessary Node.js packages:
cd my-app
npm install
Setting Up Environment Variables
For security reasons, we keep sensitive information like API keys in environment variables. Before we set up our .env file, let's obtain the necessary API key for the Falcon model.
Obtaining the Falcon API Key
- Visit the AI71 Marketplace.
- If you don't have an account, click on the "Sign Up" button and create one. If you already have an account, simply log in.
- Once logged in, navigate to the API Keys section.
- Click on the "Create new API key" button.
- Give your API key a name (e.g., "Health Dashboard Project") and click "Create".
- You'll see your new API key displayed. Make sure to copy this key immediately and store it securely, as you won't be able to see it again.
Now that you have your API key, let's set it up in our project.
Create a .env file in the root directory of the project:
touch .env # On Windows, use `type nul > .env`
Open this file in your text editor and add your Falcon API key:
FALCON_API_KEY=your_api_key_here
Replace your_api_key_here with the API key you just copied from the AI71 Marketplace.
Remember, never share your API key publicly or commit it to version control. The .env file is included in our .gitignore to prevent accidental exposure of sensitive information.
With your API key securely stored in the .env file, we're now ready to start using the Falcon model in our project.
Verifying the Setup
At this point, your development environment should be ready. Here's a quick checklist to ensure everything is set up correctly:
- The project repository is cloned to your local machine.
- Python virtual environment is created and activated.
- Python dependencies are installed.
- Node.js dependencies are installed in the
my-appdirectory. - The
.envfile is created with your Falcon API key.
With these steps completed, you're now ready to start building your AI-powered Personal Health Dashboard. In the next section, we'll begin by setting up our Flask backend and integrating the Falcon 180B model.
Guide to main.py: Building Our Health Dashboard Backend
The main.py file is the cornerstone of our Personal Health Dashboard's backend. It's responsible for handling file uploads, processing medical reports, and communicating with both the AI model and our frontend. Let's go through this file step by step, understanding not just what each part does, but why it's necessary for our application.
Imports and Initial Setup
from fastapi import FastAPI, UploadFile, File, HTTPException, WebSocket
from fastapi.middleware.cors import CORSMiddleware
import PyPDF2
import io
import json
import aiohttp
import logging
import traceback
import asyncio
import os
from dotenv import load_dotenv

load_dotenv()

logging.basicConfig(level=logging.DEBUG)
logger = logging.getLogger(__name__)

app = FastAPI()
We start by importing the necessary libraries. FastAPI is our web framework of choice because it's designed for creating APIs quickly and efficiently. It also provides automatic API documentation, which is invaluable for development and testing.
We import UploadFile and File to handle PDF uploads, WebSocket for real-time communication, and various other libraries for tasks like PDF processing (PyPDF2), asynchronous HTTP requests (aiohttp), and logging.
Logging is set up at the DEBUG level. This is crucial for development as it provides detailed information about what's happening in our application. When issues arise, these logs will be our first point of reference for troubleshooting.
CORS Configuration
app.add_middleware(
    CORSMiddleware,
    allow_origins=["http://localhost:3000"],
    allow_credentials=True,
    allow_methods=["*"],
    allow_headers=["*"],
)
CORS (Cross-Origin Resource Sharing) is a security feature implemented by web browsers. It's necessary because our frontend (the Next.js application you cloned earlier) runs on localhost:3000, while our backend will run on a different port (typically 8000 for FastAPI applications).
Without CORS, the browser would block requests from our frontend to our backend, as they're considered to be from different origins. By adding this middleware, we're telling our server to accept requests from localhost:3000, allowing our frontend and backend to communicate.
API Configuration and WebSocket Setup
API_URL = "https://api.ai71.ai/v1/chat/completions"
API_KEY = os.getenv('FALCON_API_KEY')


active_websockets = set()

@app.websocket("/ws")
async def websocket_endpoint(websocket: WebSocket):
    await websocket.accept()
    active_websockets.add(websocket)
    try:
        while True:
            await websocket.receive_text()
    finally:
        active_websockets.remove(websocket)

async def send_status_update(message: str):
    for websocket in active_websockets:
        await websocket.send_json({"status": message})
Here, we set up our connection to the Falcon 180B model API. The API_URL is the endpoint we'll send requests to, and the API_KEY is our authentication token. In a production environment, you'd store this key securely, typically as an environment variable.
We use WebSockets to provide real-time updates to users as their medical reports are being processed. The websocket_endpoint function handles new WebSocket connections, and send_status_update allows us to broadcast messages to all connected clients. This real-time communication enhances the user experience, keeping them informed about the progress of their report analysis.
File Upload and Initial Processing
@app.post("/upload")
async def upload_file(file: UploadFile = File(...)):
    await send_status_update("Received file. Starting analysis...")
    logger.info(f"Received file: {file.filename}")
    try:
        if not file.filename.endswith(".pdf"):
            raise HTTPException(status_code=400, detail="Only PDF files are allowed")

        content = await file.read()
        await send_status_update(f"File size: {len(content)} bytes. Extracting content...")
        logger.info(f"File size: {len(content)} bytes")

        pdf_content = await extract_pdf_content(content)
        await send_status_update(f"Extracted {len(pdf_content)} characters from PDF. Analyzing...")
        logger.info(f"Extracted PDF content length: {len(pdf_content)} characters")

        analysis = await analyze_medical_report(pdf_content)
        await send_status_update("Analysis completed successfully.")
        logger.info("Analysis completed successfully")
        return analysis
    except Exception as e:
        error_message = f"Error processing file: {str(e)}"
        await send_status_update(error_message)
        logger.error(error_message)
        logger.error(traceback.format_exc())
        raise HTTPException(status_code=500, detail=error_message)
This function is the entry point for our file processing pipeline. We've designed it to be robust and informative, handling various scenarios that might occur during file upload and processing.
We start by immediately sending a status update to the user. This is crucial for user experience - it lets them know that their upload was successful and processing has begun. We then log the filename, which helps us track files in our server logs if we need to debug issues later.
The first check we perform is to ensure the uploaded file is a PDF. We've chosen to restrict uploads to PDFs because they're a common format for medical reports, and we have reliable tools to extract text from them. If a user tries to upload a non-PDF file, we raise an HTTP exception with a 400 status code, indicating a bad request.
We then read the file content and log its size. This information is useful for performance monitoring - if we notice that larger files are causing issues, we might need to implement file size limits or optimize our processing for larger documents.
The actual extraction of PDF content is delegated to a separate function, extract_pdf_content. This separation of concerns makes our code more modular and easier to maintain. If we ever need to change how we extract PDF content, we only need to modify this one function.
After extraction, we send the content for analysis. Again, we delegate this to a separate function, analyze_medical_report. This modular approach allows us to easily swap out or upgrade our analysis method in the future without changing the overall structure of our upload function.
Throughout the process, we're sending status updates to the user. This keeps them informed about what's happening with their file, which is especially important for longer processes like AI analysis.
Finally, we have comprehensive error handling. If anything goes wrong at any point in the process, we catch the exception, log it (which is crucial for debugging), inform the user, and raise an HTTP exception. This ensures that errors are handled gracefully and the user isn't left wondering what happened if something goes wrong.
PDF Content Extraction
async def extract_pdf_content(content: bytes) -> str:
    try:
        pdf_reader = PyPDF2.PdfReader(io.BytesIO(content))
        text = ""
        for i, page in enumerate(pdf_reader.pages):
            text += page.extract_text() + "\n"
            await send_status_update(f"Extracted page {i+1} of {len(pdf_reader.pages)}")
        logger.info(f"Extracted {len(pdf_reader.pages)} pages from PDF")
        return text
    except Exception as e:
        logger.error(f"Error extracting PDF content: {str(e)}")
        logger.error(traceback.format_exc())
        raise
This function is responsible for extracting text content from the uploaded PDF file. We've chosen to use PyPDF2 for this task because it's a reliable, pure-Python library that doesn't require any system dependencies, making our application easier to deploy and maintain.
We start by creating a PdfReader object from the file content. We use io.BytesIO to create a file-like object from the bytes we received. This approach allows us to work with the file content in memory without needing to save it to disk, which is more efficient and secure.
We then iterate through each page of the PDF, extracting the text and appending it to our text variable. We add a newline character after each page to ensure that content from different pages doesn't run together.
After each page is processed, we send a status update to the user. This gives them a sense of progress, which is particularly important for longer documents. It also helps us identify if the process is stalling on a particular page.
If any exception occurs during this process, we catch it, log the error details, and re-raise the exception. This allows us to handle the error in our upload function and provide appropriate feedback to the user.
Medical Report Analysis
async def analyze_medical_report(report_content: str) -> dict:
    logger.info("Analyzing medical report")
    await send_status_update("Analyzing medical report...")

    max_chunk_size = 1500
    chunks = [report_content[i:i+max_chunk_size] for i in range(0, len(report_content), max_chunk_size)]

    all_results = []

    async with aiohttp.ClientSession() as session:
        for i, chunk in enumerate(chunks):
            await send_status_update(f"Processing chunk {i+1} of {len(chunks)}...")
            logger.info(f"Processing chunk {i+1} of {len(chunks)}")

            prompt = f"""
            Analyze the following part of a medical report and extract key information.
            Return the results in a JSON format with the following structure:
            {{
                "summary": "A brief summary of this part of the report",
                "abnormal_results": [
                    {{"test_name": "Test Name", "value": "Abnormal Value", "reference_range": "Normal Range", "interpretation": "Brief interpretation"}}
                ],
                "charts": [
                    {{
                        "chart_type": "bar",
                        "title": "Chart Title",
                        "data": [
                            {{"label": "Category1", "value1": Number1, "value2": Number2, ...}},
                            {{"label": "Category2", "value1": Number1, "value2": Number2, ...}},
                            ...
                        ]
                    }},
                    {{
                        "chart_type": "area",
                        "title": "Chart Title",
                        "x_axis_key": "month",
                        "data_keys": ["value1", "value2", ...],
                        "data": [
                            {{"month": "January", "value1": Number1, "value2": Number2, ...}},
                            {{"month": "February", "value1": Number1, "value2": Number2, ...}},
                            ...
                        ],
                        "trend_percentage": 5.2,
                        "date_range": "January - June 2024"
                    }}
                ],
                "recommendations": ["Recommendation 1", "Recommendation 2", ...]
            }}

            Medical Report Part {i+1}/{len(chunks)}:
            {chunk}
            """

            headers = {
                "Content-Type": "application/json",
                "Authorization": f"Bearer {API_KEY}",
            }
            payload = {
                "model": "tiiuae/falcon-180B-chat",
                "messages": [
                    {"role": "system", "content": "You are a medical expert analyzing health reports."},
                    {"role": "user", "content": prompt},
                ],
            }

            try:
                await send_status_update(f"Sending request to AI model for chunk {i+1}")
                async with session.post(API_URL, headers=headers, json=payload) as response:
                    response.raise_for_status()
                    result = await response.json()
                    await send_status_update(f"Received response from AI model for chunk {i+1}")

                parsed_content = json.loads(result["choices"][0]["message"]["content"])
                all_results.append(parsed_content)
                await send_status_update(f"Successfully parsed AI model response for chunk {i+1}")
            except Exception as e:
                error_message = f"Error processing chunk {i+1}: {str(e)}"
                await send_status_update(error_message)
                logger.error(error_message)
                logger.error(traceback.format_exc())

    combined_results = {
        "summary": " ".join([r["summary"] for r in all_results]),
        "abnormal_results": [item for r in all_results for item in r.get("abnormal_results", [])],
        "charts": [item for r in all_results for item in r.get("charts", [])],
        "recommendations": [item for r in all_results for item in r.get("recommendations", [])]
    }

    await send_status_update("Analysis completed. Preparing final results...")
    return combined_results
This function is the heart of our application, where we leverage the power of the Falcon 180B model to analyze the medical report. Let's break down the key components and the reasoning behind our approach.
First, we split the report content into chunks of 1500 characters each. We do this for two reasons:
- Many AI models have a maximum input length, and splitting the text ensures we don't exceed this limit.
- Processing smaller chunks allows us to provide more granular progress updates to the user.
We then iterate through these chunks, sending each one to the AI model for analysis. We use an asynchronous approach with aiohttp.ClientSession to make these requests efficiently.
The prompt we send to the AI model is crucial. We've designed it to instruct the model to return information in a specific JSON structure. This structure includes:
- A summary of the report section
- Any abnormal test results
- Data for charts (which can be easily visualized on the frontend)
- Health recommendations
We've chosen this structure because it provides a comprehensive overview of the medical report in a format that's easy for our frontend to process and display. The specific fields (like "abnormal_results" and "charts") are chosen based on what we believe will be most useful for users trying to understand their health data.
For each chunk, we send a request to the Falcon 180B model. We use the model "tiiuae/falcon-180B-chat" and set up the conversation with a system message defining the AI's role as a medical expert. This helps to frame the context for the AI and should lead to more relevant and accurate analyses.
After each chunk is processed, we parse the AI's response and add it to our all_results list. We also send status updates to the user after each chunk is processed, keeping them informed of the progress.
Once all chunks have been processed, we combine the results. We concatenate the summaries, and merge the lists of abnormal results, charts, and recommendations. This gives us a comprehensive analysis of the entire report.
Throughout this process, we have error handling in place. If any part of the analysis fails, we log the error and continue processing other chunks. This ensures that even if one part of the report causes issues, we can still provide partial results to the user.
This function showcases how we can use AI to extract meaningful insights from complex medical data, presenting it in a structured format that can be easily understood and visualized. The modular design allows for future enhancements, such as more sophisticated merging of results or additional types of analysis.
The Power of Dynamic Prompts: Flexible Analysis for Varied Medical Reports
prompt = f"""
            Analyze the following part of a medical report and extract key information.
            Return the results in a JSON format with the following structure:
            {{
                "summary": "A brief summary of this part of the report",
                "abnormal_results": [
                    {{"test_name": "Test Name", "value": "Abnormal Value", "reference_range": "Normal Range", "interpretation": "Brief interpretation"}}
                ],
                "charts": [
                    {{
                        "chart_type": "bar",
                        "title": "Chart Title",
                        "data": [
                            {{"label": "Category1", "value1": Number1, "value2": Number2, ...}},
                            {{"label": "Category2", "value1": Number1, "value2": Number2, ...}},
                            ...
                        ]
                    }},
                    {{
                        "chart_type": "area",
                        "title": "Chart Title",
                        "x_axis_key": "month",
                        "data_keys": ["value1", "value2", ...],
                        "data": [
                            {{"month": "January", "value1": Number1, "value2": Number2, ...}},
                            {{"month": "February", "value1": Number1, "value2": Number2, ...}},
                            ...
                        ],
                        "trend_percentage": 5.2,
                        "date_range": "January - June 2024"
                    }}
                ],
                "recommendations": ["Recommendation 1", "Recommendation 2", ...]
            }}

            Medical Report Part {i+1}/{len(chunks)}:
            {chunk}
            """
The way I have structured our prompt for the Falcon 180B model is a crucial aspect of our application's design. Let's delve into why I chose this approach and the benefits it provides.
Our prompt instructs the AI to return information in a specific JSON structure, but the content within that structure is entirely dynamic. This design choice is deliberate and powerful, allowing our application to handle a wide variety of medical reports without any changes to our code.
Here's why this is so important:
-
Adaptability: Handles various report types without hardcoding.
-
Comprehensive Extraction:
- Identifies abnormal results
- Extracts chart-worthy data
- Captures recommendations
-
Intelligent Visualization:
- Chooses appropriate chart types (e.g., bar, area)
- Adapts to data characteristics
-
Flexible Data Representation:
- Supports multi-dimensional data
- Allows complex visualizations
-
Context-Aware Insights:
- Tailored summaries
- Personalized recommendations
-
Future-Proof:
- Easily incorporates new medical tests/metrics
- No core code changes required
-
Personalization:
- Highlights most relevant information
- Avoids one-size-fits-all approach
This dynamic approach does require more complex processing on the frontend to interpret and display the data. However, it provides a level of flexibility and personalisation that would be impossible with a more rigid, hardcoded approach. It transforms our application from a simple report reader into an intelligent health data interpreter, capable of providing unique insights for each user's medical report.
By leveraging the power of AI in this way, we're able to create a truly adaptive Personal Health Dashboard that can provide valuable, personalized insights from a wide range of medical reports. This flexibility is key to making our application useful for a diverse user base with varying health conditions and types of medical data.
Running the Application
if __name__ == "__main__":
    import uvicorn
    uvicorn.run(app, host="0.0.0.0", port=8000)
This section allows us to run the FastAPI application using Uvicorn, a lightning-fast ASGI server. It will start our server on port 8000, making it accessible to our frontend application.
Now that we've built our backend and understood its components, let's bring everything together and run our Personal Health Dashboard.
Get your application up and running:
-
Start the Backend: Navigate to the root directory of your project in the terminal and run:
python main.pyYou should see output indicating that the FastAPI application is running, typically on
http://0.0.0.0:8000. -
Start the Frontend: Open a new terminal window, navigate to the
my-appdirectory, and run:npm run devThis will start the Next.js development server, usually on
http://localhost:3000. -
Access the Application: Open your web browser and go to
http://localhost:3000. You should see the frontend of your Personal Health Dashboard.
Conclusion
Congratulations! You've successfully built and run your AI-powered Personal Health Dashboard. This application demonstrates the power of combining modern web technologies with advanced AI models to create meaningful, personalized health insights.
Through this project, we've explored:
- Building a robust backend with FastAPI
- Integrating the Falcon 180B AI model for medical report analysis
- Creating a dynamic, flexible system for handling various types of medical data
- Developing a user-friendly frontend for uploading reports and visualizing results
Remember, this is just the beginning. There are many ways you could extend and improve this application, such as:
- Adding user authentication for secure, personalized experiences
- Implementing data persistence to track health trends over time
- Expanding the types of medical reports the system can analyze
- Enhancing the visualization capabilities with more chart types and interactive features
I hope this tutorial has given you a solid foundation in building AI-powered web applications and inspired you to explore further possibilities in the intersection of healthcare and technology.