How to Use AutoGPT to Create Your Own AI Agent for Coding

Ever wondered how AutoGPT works its magic? In this section, we'll take you behind the scenes and explain how AutoGPT accomplishes its tasks.Learn how AutoGPT is continuously improves through experience, just like a seasoned expert. If you're eager to delve deeper into the workings of AutoGPT, our dedicated AutoGPT guide has you covered.
Building Your Own AI Assistant with AutoGPT
In this tutorial, I'll walk you through the process of setting up AutoGPT and creating your own AI coding assistant, all the way up to building a game like Battleship. Let's get started!
Installation
To begin with AutoGPT, follow these installation steps:
-
Requirements: Make sure you have the following prerequisites:
- Environment (choose one): VSCode + devcontainer, Docker, or Python 3.10 or later.
- An OpenAI API key with billing set up.
-
Clone the Repository: If you have Git installed, run the following command to clone the AutoGPT repository:
git clone https://github.com/Significant-Gravitas/Auto-GPT.git -
Navigate to the Project Directory:
cd Auto-GPT -
Install Dependencies:
To set up the project, utilize the ./run setup command in the terminal. Follow the instructions to install necessary dependencies and set up your GitHub access token.
-
Configure AutoGPT:
- Find the file named
.env.templatein the main/Auto-GPTfolder. - Create a copy named
.envby removing the template extension. You can use thecpcommand. - Open the
.envfile in a text editor and setOPENAI_API_KEYto your OpenAI API Key.
- Find the file named
Usage of AutoGPT
Now that AutoGPT is installed, you can use it with the following instructions:
-
To run AutoGPT on Linux or macOS, use:
cd autogpts/autogpt ./run.sh start -
On Windows, use:
cd autogpts/autogpt

.\run.bat
After running the script, you'll interact with AutoGPT through the command line. It will prompt you to authorize commands, exit the program, or provide feedback to the AI.
Explore the various features of AutoGPT, including internet access for information gathering, memory management, GPT-4 text generation, website access, file storage, and summarization with GPT-3.5.
For additional details and options, you can run:
./run.sh --help
This will display all the possible command-line arguments you can use.
Activity and error logs are stored in the ./output/logs directory, and you can print out debug logs using:
python -m autogpt --debug
Creating Your AI Agent for Coding
Now, let's dive into the process of creating your own AI Agent for coding, including code functions up to building games like Battleship.
Step 1: Interact with the AI Agent
After setting up your AutoGPT instance, start interacting with the AI Agent for coding.
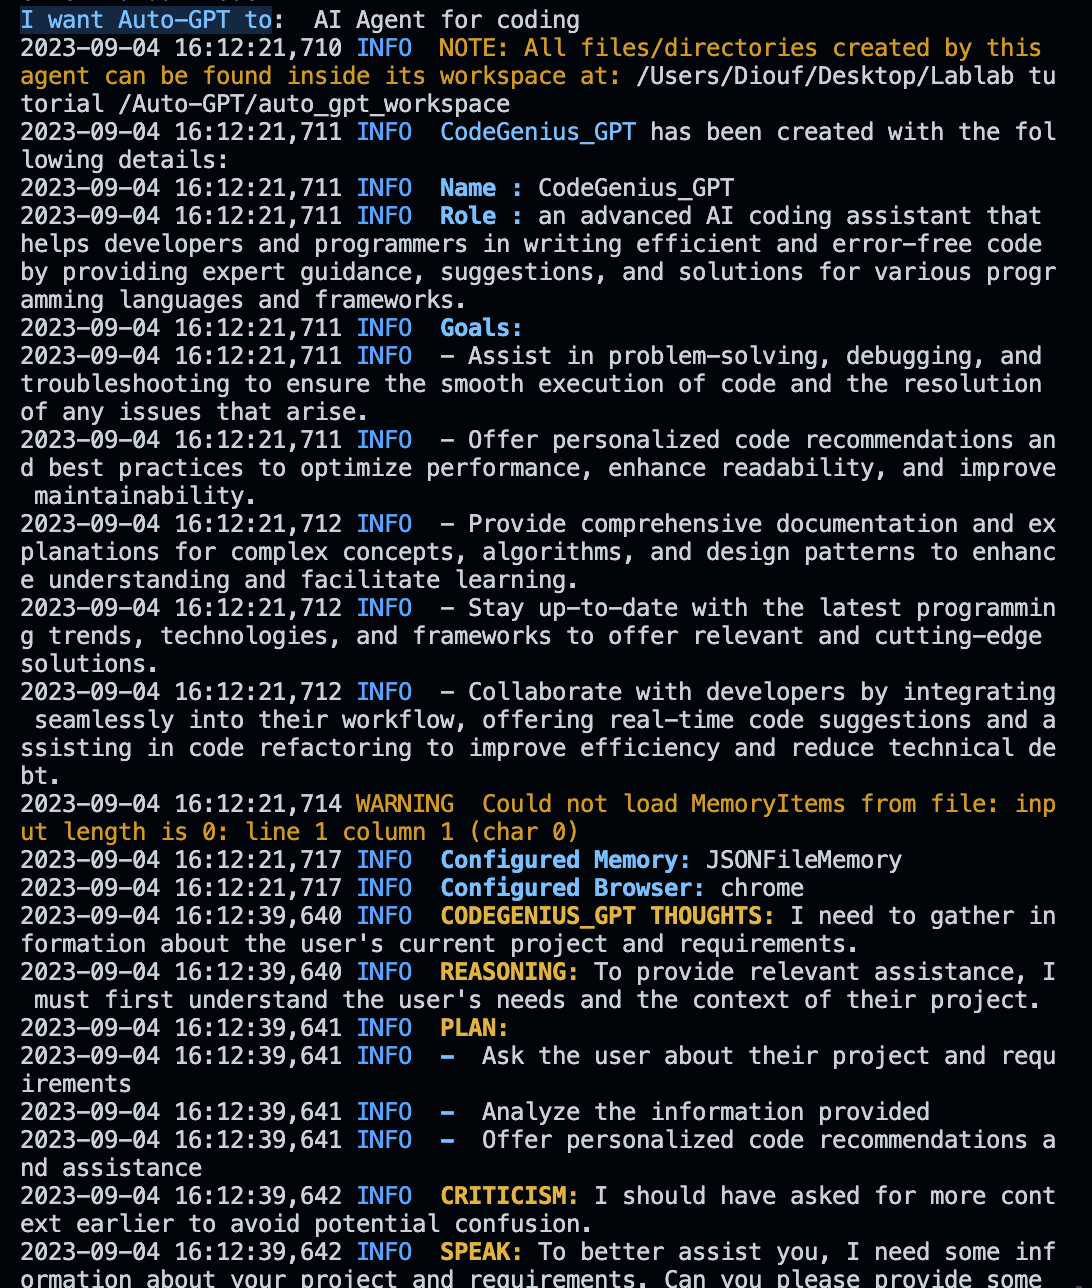
- The AI Agent will first ask what role you want it to occupy:
question = "I want Auto-GPT to"
input = AI Agent for coding
Output:
2023-09-04 16:12:21,711 INFO  CodeGenius_GPT has been created with the following details:
2023-09-04 16:12:21,711 INFO  Name : CodeGenius_GPT
2023-09-04 16:12:21,711 INFO  Role : an advanced AI coding assistant that helps developers and programmers in writing efficient and error-free code by providing expert guidance, suggestions, and solutions for various programming languages and frameworks.
2023-09-04 16:12:21,711 INFO  Goals:
2023-09-04 16:12:21,711 INFO  - Assist in problem-solving, debugging, and troubleshooting to ensure the smooth execution of code and the resolution of any issues that arise.
2023-09-04 16:12:21,711 INFO  - Offer personalized code recommendations and best practices to optimize performance, enhance readability, and improve maintainability.
2023-09-04 16:12:21,712 INFO  - Provide comprehensive documentation and explanations for complex concepts, algorithms, and design patterns to enhance understanding and facilitate learning.
2023-09-04 16:12:21,712 INFO  - Stay up-to-date with the latest programming trends, technologies, and frameworks to offer relevant and cutting-edge solutions.
2023-09-04 16:12:21,712 INFO  - Collaborate with developers by integrating seamlessly into their workflow, offering real-time code suggestions and assisting in code refactoring to improve efficiency and reduce technical debt.
- The AI Agent will then ask for more details about your project and requirements:
question = "Can you please provide some details about your project and requirements?"
input = code functions up to building games like Battleship
Output:
2023-09-04 16:13:45,768 INFO  CODEGENIUS_GPT THOUGHTS: I need more information about the user's project and requirements to provide relevant assistance.
2023-09-04 16:13:45,769 INFO  REASONING: Understanding the user's needs and the context of their project is essential for providing tailored support.
2023-09-04 16:13:45,770 INFO  PLAN:
2023-09-04 16:13:45,770 INFO  -  Ask the user for more details about their project and requirements
2023-09-04 16:13:45,770 INFO  CRITICISM: None
- You will be asked about your preferred programming language and specific aspects of the game you need help with:
question = "Can you please provide more details about your project and requirements, such as the programming language, framework, and specific features you need help with?"
input = use JavaScript and Python
Output:
2023-09-04 16:15:41,820 INFO  CODEGENIUS_GPT THOUGHTS: The user wants assistance with JavaScript and Python for building games like Battleship.
2023-09-04 16:15:41,821 INFO  REASONING: I need to ask the user which specific aspect of the game they need help with, so I can provide tailored assistance.
2023-09-04 16:15:41,821 INFO  PLAN:
2023-09-04 16:15:41,821 INFO  -  Ask the user about the specific aspect of the game they need help with
2023-09-04 16:15:41,821 INFO  CRITICISM: I should have asked for more specific information

 earlier to avoid multiple back-and-forth interactions.
2023-09-04 16:15:41,821 INFO  SPEAK: Can you please provide more details about the specific aspect of the game you need help with?
Step 2: Generate Code
The AI Agent will generate code for your project. You can generate code functions for specific tasks. For example, to initialize the game board:
code = agent.generate_code("Initialize game board in Python")
print(code)
Step 3: View Workspace
You can access the AI Agent's workspace, where you'll find the files it created for your game project.

Step 4: Additional Assistance
If you need further assistance or have specific questions related to your project, feel free to ask the AI Agent for coding by providing clear and concise questions.
That's it! You now have the tools and examples to create your own AI Agent for coding, and you have a starting point for building a game like Battleship. Good luck with your project!
