Building an Autonomous Wallet Agent for AI Hackathons: AI-Powered Smart Wallets
Building an Autonomous Wallet Agent: AI-Powered Smart Wallets That Execute Transactions
1. Introduction: The Future of Autonomous Wallets
Imagine telling your wallet "Buy me 'The Art of Programming' e-book" and watching it autonomously check your balance, find the book in a marketplace, transfer USDC, and confirm the purchase—all without you manually clicking through interfaces or copying addresses. This is the power of autonomous wallet agents.
This technology is particularly valuable for AI hackathons, where developers need to rapidly prototype intelligent financial systems within tight timeframes. Whether you're participating in online AI hackathons or virtual AI hackathons, understanding how to build autonomous wallet agents can give you a competitive edge in creating innovative blockchain and DeFi solutions. If you're looking for upcoming AI hackathons to apply these skills, explore LabLab.ai's global AI hackathons.
Autonomous wallet agents represent a fundamental shift in how we interact with blockchain wallets. Instead of manually executing every transaction, you can delegate tasks to an AI agent that understands natural language, makes decisions, and executes blockchain operations on your behalf. This tutorial will teach you how to build one from scratch.
What Makes This Different?
Traditional wallet interactions require:
- Manual address copying
- Precise transaction parameters
- Multiple confirmation steps
- Technical blockchain knowledge
An autonomous wallet agent enables:
- Natural language commands: "Send 0.1 USDC to Alice"
- Autonomous decision-making: The agent checks balances, validates transactions, and executes them
- Context awareness: The agent understands your wallet state and transaction history
- Multi-step operations: "Buy the e-book" triggers balance checks, marketplace searches, and purchases
The Technology Stack
This tutorial combines several powerful technologies:
- Circle Developer-Controlled Wallets: Programmatic wallet management without user interaction
- Groq AI (Llama 3.3): Fast, free LLM for natural language understanding
- LangChain.js: Agent framework for tool orchestration
- React + TypeScript: Modern frontend for chat interface
- Node.js + Express: Backend API for wallet operations
Follow Along with the Video Tutorial
We've created a comprehensive video tutorial to guide you through building this autonomous wallet agent. Follow along as we walk through each step:
2. Understanding the Architecture
Before diving into code, let's understand how all the pieces fit together:
┌─────────────────────────────────────────────────────────────┐
│  User Interface: Chat Interface                              │
│  - Natural language input                                   │
│  - Real-time message display                                │
│  - Purchase history                                         │
└──────────────────────┬──────────────────────────────────────┘
                        │ HTTP POST /api/chat
┌──────────────────────▼──────────────────────────────────────┐
│  Backend: Express + TypeScript                              │
│                                                             │
│  ┌─────────────────────────────────────────────────────┐   │
│  │  Chat API Endpoint                                  │   │
│  │  - Receives user message                            │   │
│  │  - Routes to AI agent                               │   │
│  └────────────────────┬────────────────────────────────┘   │
│                       │                                      │
│  ┌────────────────────▼────────────────────────────────┐   │
│  │  Groq AI Agent (LangChain)                          │   │
│  │  - Understands user intent                           │   │
│  │  - Decides which tools to use                        │   │
│  │  - Executes multi-step workflows                     │   │
│  └────────────────────┬────────────────────────────────┘   │
│                       │                                      │
│  ┌────────────────────▼────────────────────────────────┐   │
│  │  Agent Tools                                        │   │
│  │  - Wallet Tools: balance, transfer, transactions   │   │
│  │  - Marketplace Tools: browse, search, purchase     │   │
│  └────────────────────┬────────────────────────────────┘   │
│                       │                                      │
│  ┌────────────────────▼────────────────────────────────┐   │
│  │  Circle SDK Wrapper                                │   │
│  │  - Wallet operations                                │   │
│  │  - Token transfers                                 │   │
│  │  - Transaction queries                             │   │
│  └────────────────────┬────────────────────────────────┘   │
└──────────────────────┬──────────────────────────────────────┘
                       │
                       ▼
            Circle API (ARC Testnet)
The Agent Loop
The core of our autonomous wallet is the agent loop:
- User Input: "Buy me 'The Art of Programming'"
- Intent Understanding: Agent parses the request
- Tool Selection: Agent decides to use
browse_ebooks,get_ebook_price,check_wallet_balance, andpurchase_ebook - Tool Execution: Each tool executes sequentially
- Response Generation: Agent synthesizes results into a natural language response
- User Feedback: "I've purchased 'The Art of Programming' for 0.15 USDC. Transaction ID: 0x..."
3. Getting Started: Clone and Setup
Prerequisites
Before we begin, ensure you have:
- Node.js 18+ and npm
- Circle Developer Account (Sign up here)
- Groq API Key (Get one here - it's free!)
Clone the Repository
Let's start by cloning the repository:
git clone https://github.com/Stephen-Kimoi/wallet-intergrated-ai
cd wallet-intergrated-ai
Install Dependencies
Install all dependencies for both backend and frontend:
npm install
npm run install:all
4. Initial Setup: Circle Wallet Configuration
Before the agent can execute transactions, we need to set up Circle Developer-Controlled Wallets. The project includes scripts to make this easy.
Step 1: Generate Entity Secret
The Entity Secret is a cryptographic key that allows programmatic control of your wallets. The project includes a script to generate it:
cd backend
npm run generate:entity-secret
This will output a 32-byte hex string. Copy this value - you'll need it for the next step.
What this does: The script (backend/src/scripts/generateEntitySecret.ts) uses Node.js crypto to generate a secure random 32-byte secret. This secret is used to authenticate all wallet operations with Circle.
Step 2: Register Entity Secret
Register your Entity Secret with Circle:
npm run register:entity-secret
This encrypts and registers your Entity Secret with Circle. Save the recovery file securely!
What this does: The script (backend/src/scripts/registerEntitySecret.ts) uses the Circle SDK to register your Entity Secret. This is a one-time setup that enables programmatic wallet control.
Step 3: Create Wallets
-
Create a Wallet Set:
npm run create:wallet-setOr with a custom name:
npm run create:wallet-set "My Custom Wallet Set Name"Save the Wallet Set ID from the output.
-
Create Wallets:
npm run create:wallets <wallet-set-id>This creates 2 wallets by default:
- Wallet 1: Your primary wallet (for purchases and transactions)
- Wallet 2: Marketplace wallet (receives payments from purchases)
Save both wallet IDs and addresses from the output.
How it works: The wallet creation process uses two scripts:
createWalletSet.ts- Creates a wallet set (a collection of wallets managed by a single cryptographic key). This script uses the Circle SDK to create a new wallet set and returns a Wallet Set ID.createWallets.ts- Creates individual wallets within the wallet set. This script creates 2 SCA (Smart Contract Account) wallets on ARC-TESTNET by default: one for your primary wallet (used for purchases) and one for the marketplace (receives payments).
- Fund Your Wallets:
- Visit Circle Faucet
- Select ARC Testnet
- Enter your primary wallet address
- Request testnet USDC
Step 4: Environment Configuration
-
Backend Configuration:
cd backend
cp .env.example .env
Edit
backend/.envand add:CIRCLE_API_KEY=your_circle_api_key_here CIRCLE_ENTITY_SECRET=your_32_byte_hex_entity_secret_here GROQ_API_KEY=your_groq_api_key_here PRIMARY_WALLET_ID=your_primary_wallet_id_here MARKETPLACE_WALLET_ADDRESS=your_marketplace_wallet_address_here -
Generate API Secret:
node -e "console.log(require('crypto').randomBytes(32).toString('hex'))"Add the output to both
.envfiles:# backend/.env API_KEY_SECRET=generated_api_secret_here # frontend/.env VITE_API_KEY=generated_api_secret_here -
Frontend Configuration:
cd ../frontend
cp .env.example .env
Edit
frontend/.env:VITE_API_KEY=generated_api_secret_here VITE_API_BASE_URL=/api VITE_PRIMARY_WALLET_ID=your_primary_wallet_id_here
Step 5: Start the Application
Run both frontend and backend simultaneously:
npm run dev
Or run them separately:
# Terminal 1 - Backend
npm run dev:backend

# Terminal 2 - Frontend
npm run dev:frontend
The application will be available at:
- Frontend: http://localhost:3000
- Backend API: http://localhost:3001
5. Understanding the Project Structure
Let's explore the codebase to understand how everything works together:
wallet-intergrated-ai/
├── backend/
│   ├── src/
│   │   ├── agent/              # AI agent (Groq + LangChain)
│   │   │   ├── agent.ts        # Core agent logic
│   │   │   └── tools/          # Agent tools
│   │   ├── marketplace/        # E-book marketplace logic
│   │   ├── routes/             # API routes
│   │   ├── wallet/             # Circle SDK wrapper
│   │   └── scripts/            # Setup scripts
│   └── .env.example
├── frontend/
│   ├── src/
│   │   ├── components/         # React components
│   │   └── services/           # API service
│   └── .env.example
└── documentation/               # Detailed guides
6. Understanding the AI Agent Core
The heart of the autonomous wallet is the AI agent. Let's examine the key file: backend/src/agent/agent.ts.
How the Agent Works
The agent uses Groq (Llama 3.3) for natural language understanding and LangChain.js for tool orchestration. Here's how it processes messages:
Key Components:
-
Groq Model Initialization - Creates the LLM instance:
export function createGroqModel(temperature: number = 0) {
  return new ChatGroq({
    model: "llama-3.3-70b-versatile",
    temperature,
    apiKey: process.env.GROQ_API_KEY,
  });
}
See the implementation:
agent.ts#L23 -
System Prompt - Defines the agent's behavior and capabilities. The prompt instructs the agent to:
- Always use tools to get real data (never hallucinate)
- Check balances before transactions
- Confirm purchases clearly
- List e-books when asked (actually call the tool)
See the system prompt:
agent.ts#L38-L86 -
Message Processing Loop - The core agent loop:
- Receives user message
- Agent decides which tools to use
- Executes tools sequentially
- Synthesizes results into natural language response
- Returns final answer to user
See the message processing implementation:
agent.ts#L92-L229
The Agent Loop in Action:
When you say "Buy me 'The Art of Programming'", the agent:
- Recognizes purchase intent
- Calls
browse_ebooksto find the book - Calls
check_wallet_balanceto verify funds - Calls
purchase_ebookto execute the purchase - Returns: "✅ I've purchased 'The Art of Programming' for 0.15 USDC"
The loop continues until the agent has all the information it needs to respond, with a maximum of 5 iterations to prevent infinite loops.
7. Understanding Agent Tools
Tools are the agent's "hands" - they allow the agent to interact with the wallet and marketplace. The project includes two main tool sets:
Wallet Tools (backend/src/agent/tools/wallet.tools.ts)
These tools enable wallet operations:
check_wallet_balance- Checks USDC balance and returns token ID needed for transfers -wallet.tools.ts#L11-L38get_wallet_info- Gets wallet details including address -wallet.tools.ts#L40-L68list_transactions- Lists transaction history with optional filters -wallet.tools.ts#L70-L109get_transaction- Gets specific transaction details -wallet.tools.ts#L111-L146transfer_tokens- Transfers USDC to another address -wallet.tools.ts#L148-L205
How it works: Each tool is a DynamicStructuredTool with:
- A descriptive name and description (the LLM uses these to decide when to call the tool)
- A Zod schema defining required parameters
- A function that executes the actual operation
For example, when you ask "What's my balance?", the agent calls check_wallet_balance which uses the Circle SDK to fetch real balance data.
Marketplace Tools (backend/src/agent/tools/marketplace.tools.ts)
These tools enable marketplace interactions:
browse_ebooks- Lists all available e-books -marketplace.tools.ts#L13-L41search_ebooks- Searches e-books by title/author -marketplace.tools.ts#L43-L73get_ebook_price- Gets price for a specific e-book -marketplace.tools.ts#L75-L105purchase_ebook- Executes purchase by transferring USDC -marketplace.tools.ts#L107-L142
Key Design: The purchase_ebook tool accepts both string and number IDs (using z.union([z.string(), z.number()])) because Groq sometimes passes numbers. The tool converts to string internally for consistency.
8. Understanding the Mock Marketplace
The marketplace is a simple mock implementation demonstrating the concept. Key files:
E-Book Catalog (backend/src/marketplace/catalog.ts)
Contains a hardcoded list of 20 e-books with:
- ID, title, author, description
- Price in USDC (0.1 - 0.2 USDC range)
Functions:
getAllEbooks()- Returns all e-books -catalog.ts#L173-L178findEbookById(id)- Finds specific e-book -catalog.ts#L180-L185searchEbooks(query)- Searches by title/author -catalog.ts#L187-L199
Purchase Processing (backend/src/marketplace/marketplace.ts)
The processPurchase function:
- Finds the e-book by ID
- Transfers USDC to the marketplace wallet address
- Records the purchase (in-memory tracking)
- Returns success/error status
Purchase Tracking: Uses an in-memory Map to track purchases per wallet. In production, you'd use a database.
9. Understanding the Chat API
The chat API (backend/src/routes/chat.routes.ts) is the bridge between the frontend and the agent:
Endpoint: POST /api/chat
Flow:
- Receives user message from frontend
- Validates input
- Gets active wallet ID (from request or environment)
- Combines all tools (wallet + marketplace)
- Calls
processMessage()with agent - Returns agent's response
Security: Uses apiKeyAuth middleware to require API key authentication.
10. Understanding the Frontend
The frontend (frontend/src/components/ChatInterface.tsx) provides the chat UI:
Key Features:
- Message history display
- Input field with Enter key support
- Loading states during agent processing
- Error handling
API Integration: Uses frontend/src/services/api.ts which:
- Handles API key injection
- Manages request/response formatting
- Provides typed interfaces for all API calls
The frontend also includes:
- Sidebar - Navigation between Chat, Wallets, Transactions, and Marketplace
- Marketplace View - Browse e-books and see purchase status
- Dashboard Views - View wallet details, balances, and transaction history
11. How It All Works Together: The Complete Flow
Let's trace through a complete example to see how everything connects:
Example: Purchasing an E-Book
User types: "Buy me 'The Art of Programming' e-book"
Step 1: Frontend ChatInterface.tsx
- User submits message
- Frontend sends POST request to
/api/chatwith message -ChatInterface.tsx#L32-L72
Step 2: Chat API (chat.routes.ts)
- Receives message
- Validates input
- Gets wallet ID from environment
- Combines all tools (wallet + marketplace)
- Calls
processMessage()with agent
Step 3: AI Agent (agent.ts)
- Agent analyzes message: "Buy me 'The Art of Programming' e-book"
- Recognizes purchase intent
- Decides to use tools:
browse_ebooks,check_wallet_balance,purchase_ebook
Step 4: Tool Execution
browse_ebooks: Returns list of all e-books, agent finds "The Art of Programming" (ID: 1, price: 0.15 USDC)check_wallet_balance: Verifies wallet has sufficient funds and gets token IDpurchase_ebook:- Calls
processPurchase()in marketplace - Marketplace transfers 0.15 USDC to marketplace wallet
- Records purchase in memory
- Returns transaction ID
- Calls
Step 5: Agent Response
- Agent synthesizes tool results
- Returns: "✅ I've purchased 'The Art of Programming' for 0.15 USDC. Transaction ID: 0x..."
Step 6: Frontend Display
- Frontend receives response
- Displays agent's message in chat interface
- User sees confirmation
12. Using the Agent: Real-World Examples
Once your setup is complete, you can interact with the agent through the chat interface. Here are some example queries:
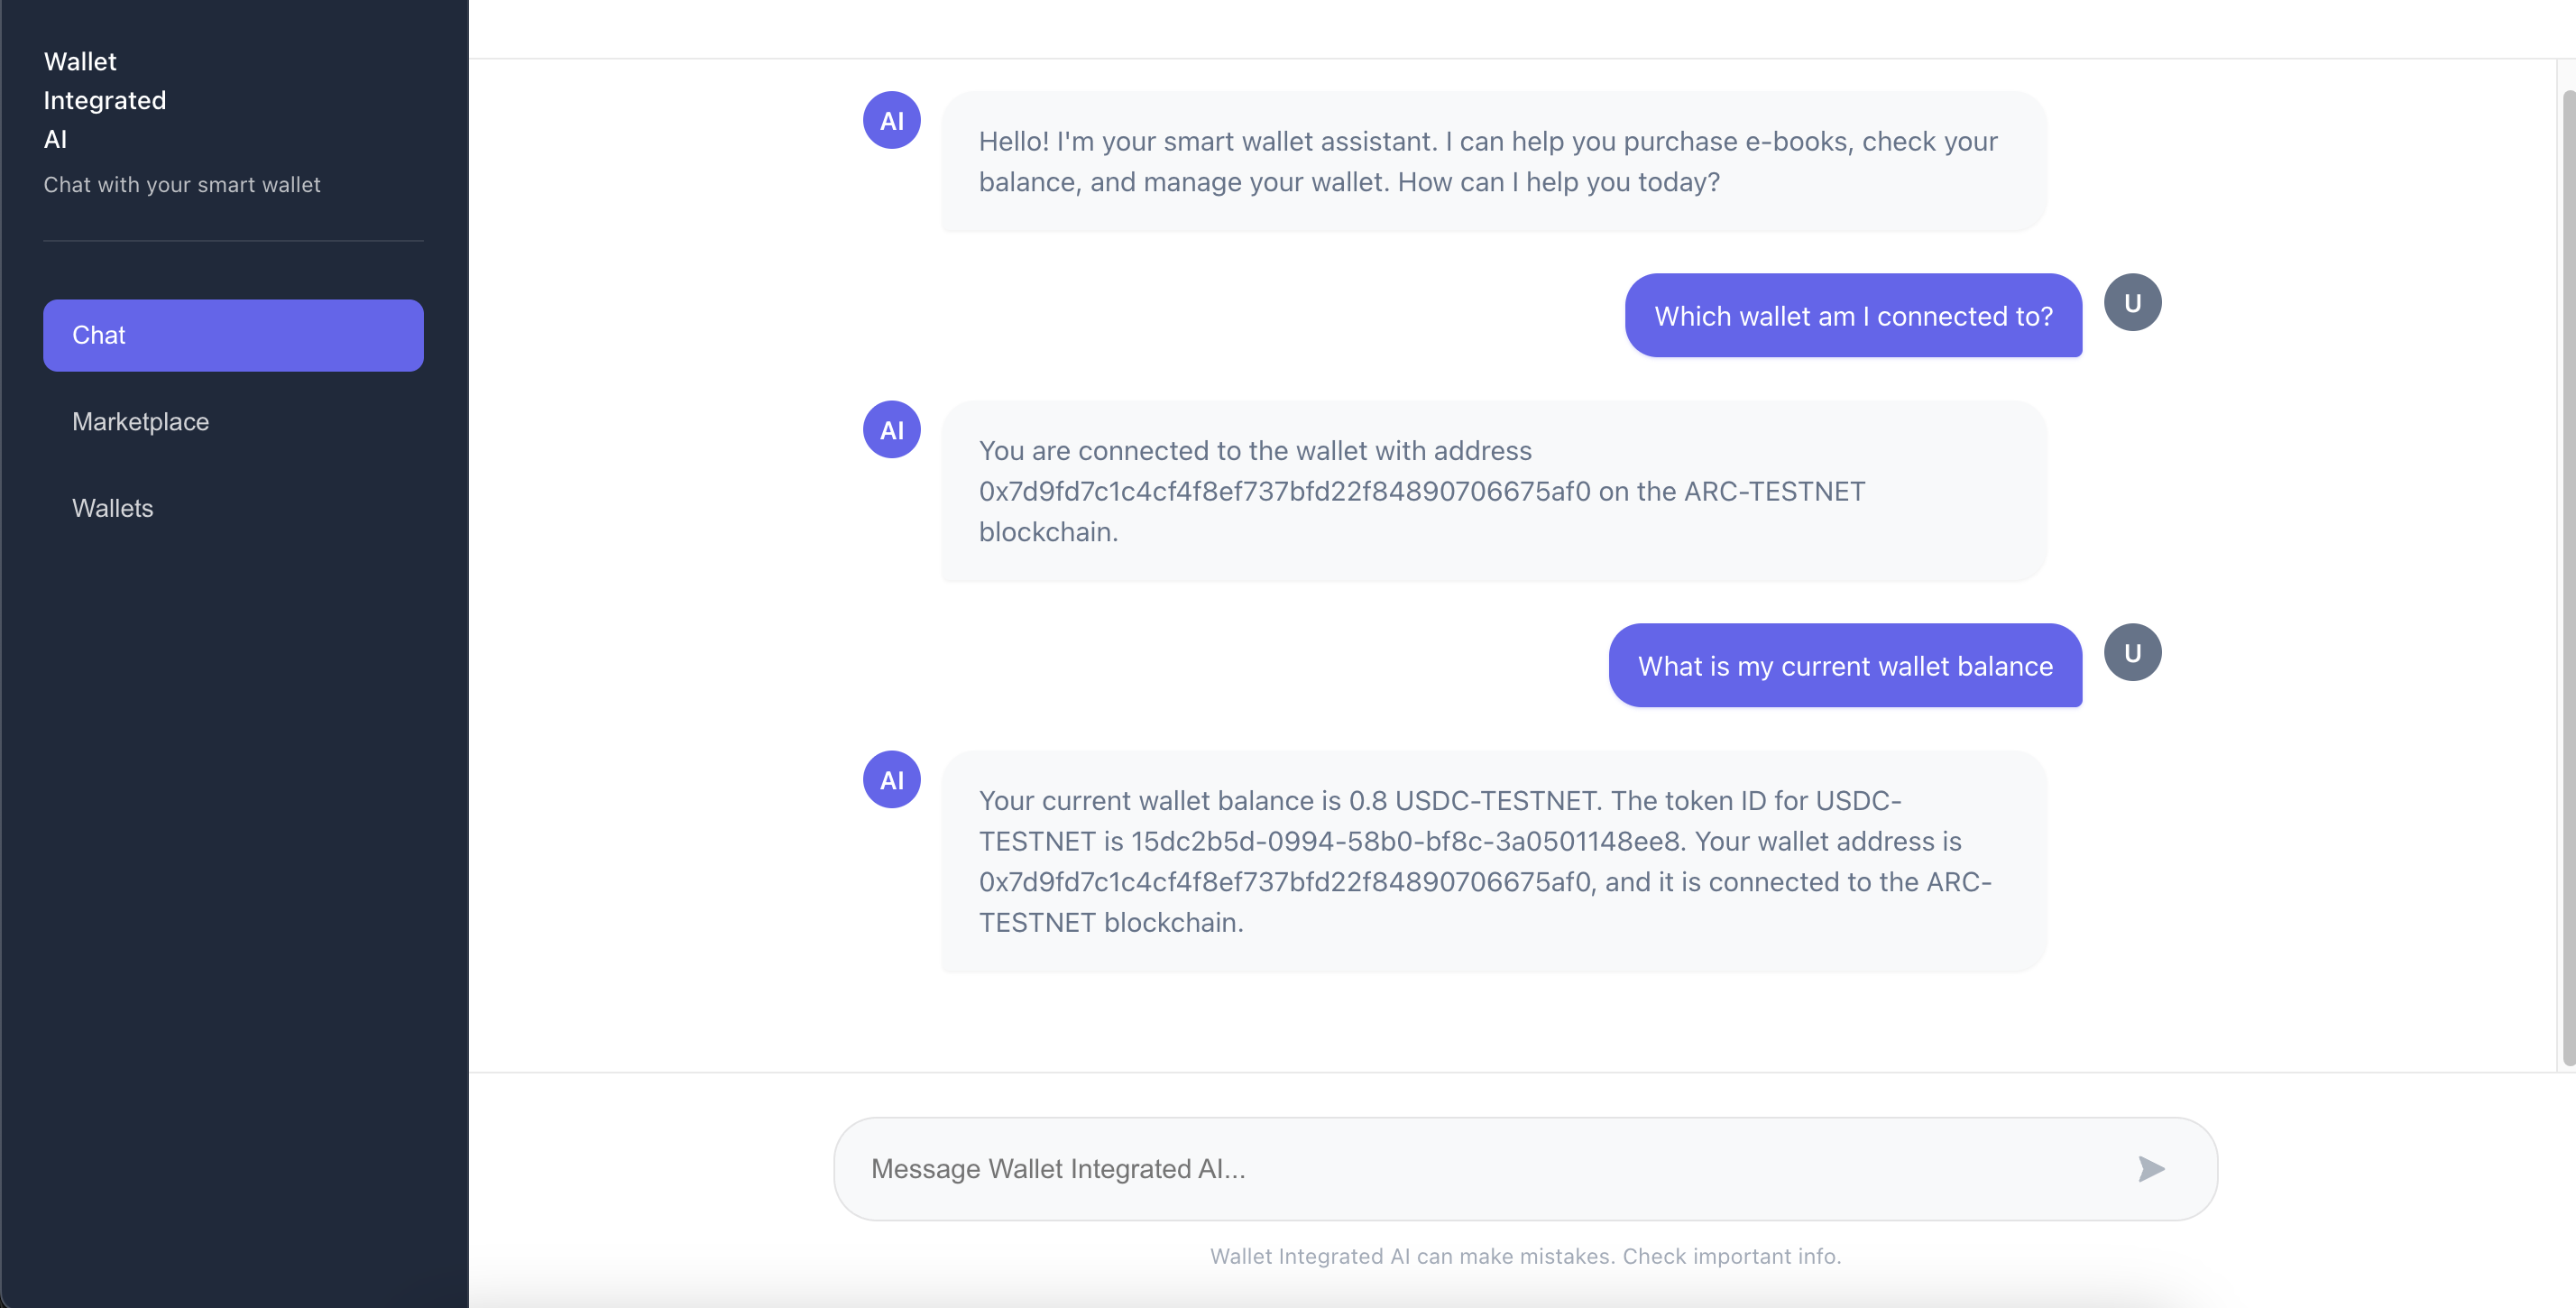
Example 1: Checking Wallet Balance
You type: "What's my current wallet balance?"
Agent responds: "Your wallet currently has 1.5 USDC"
What happened: Agent called check_wallet_balance tool and retrieved real balance from Circle API.
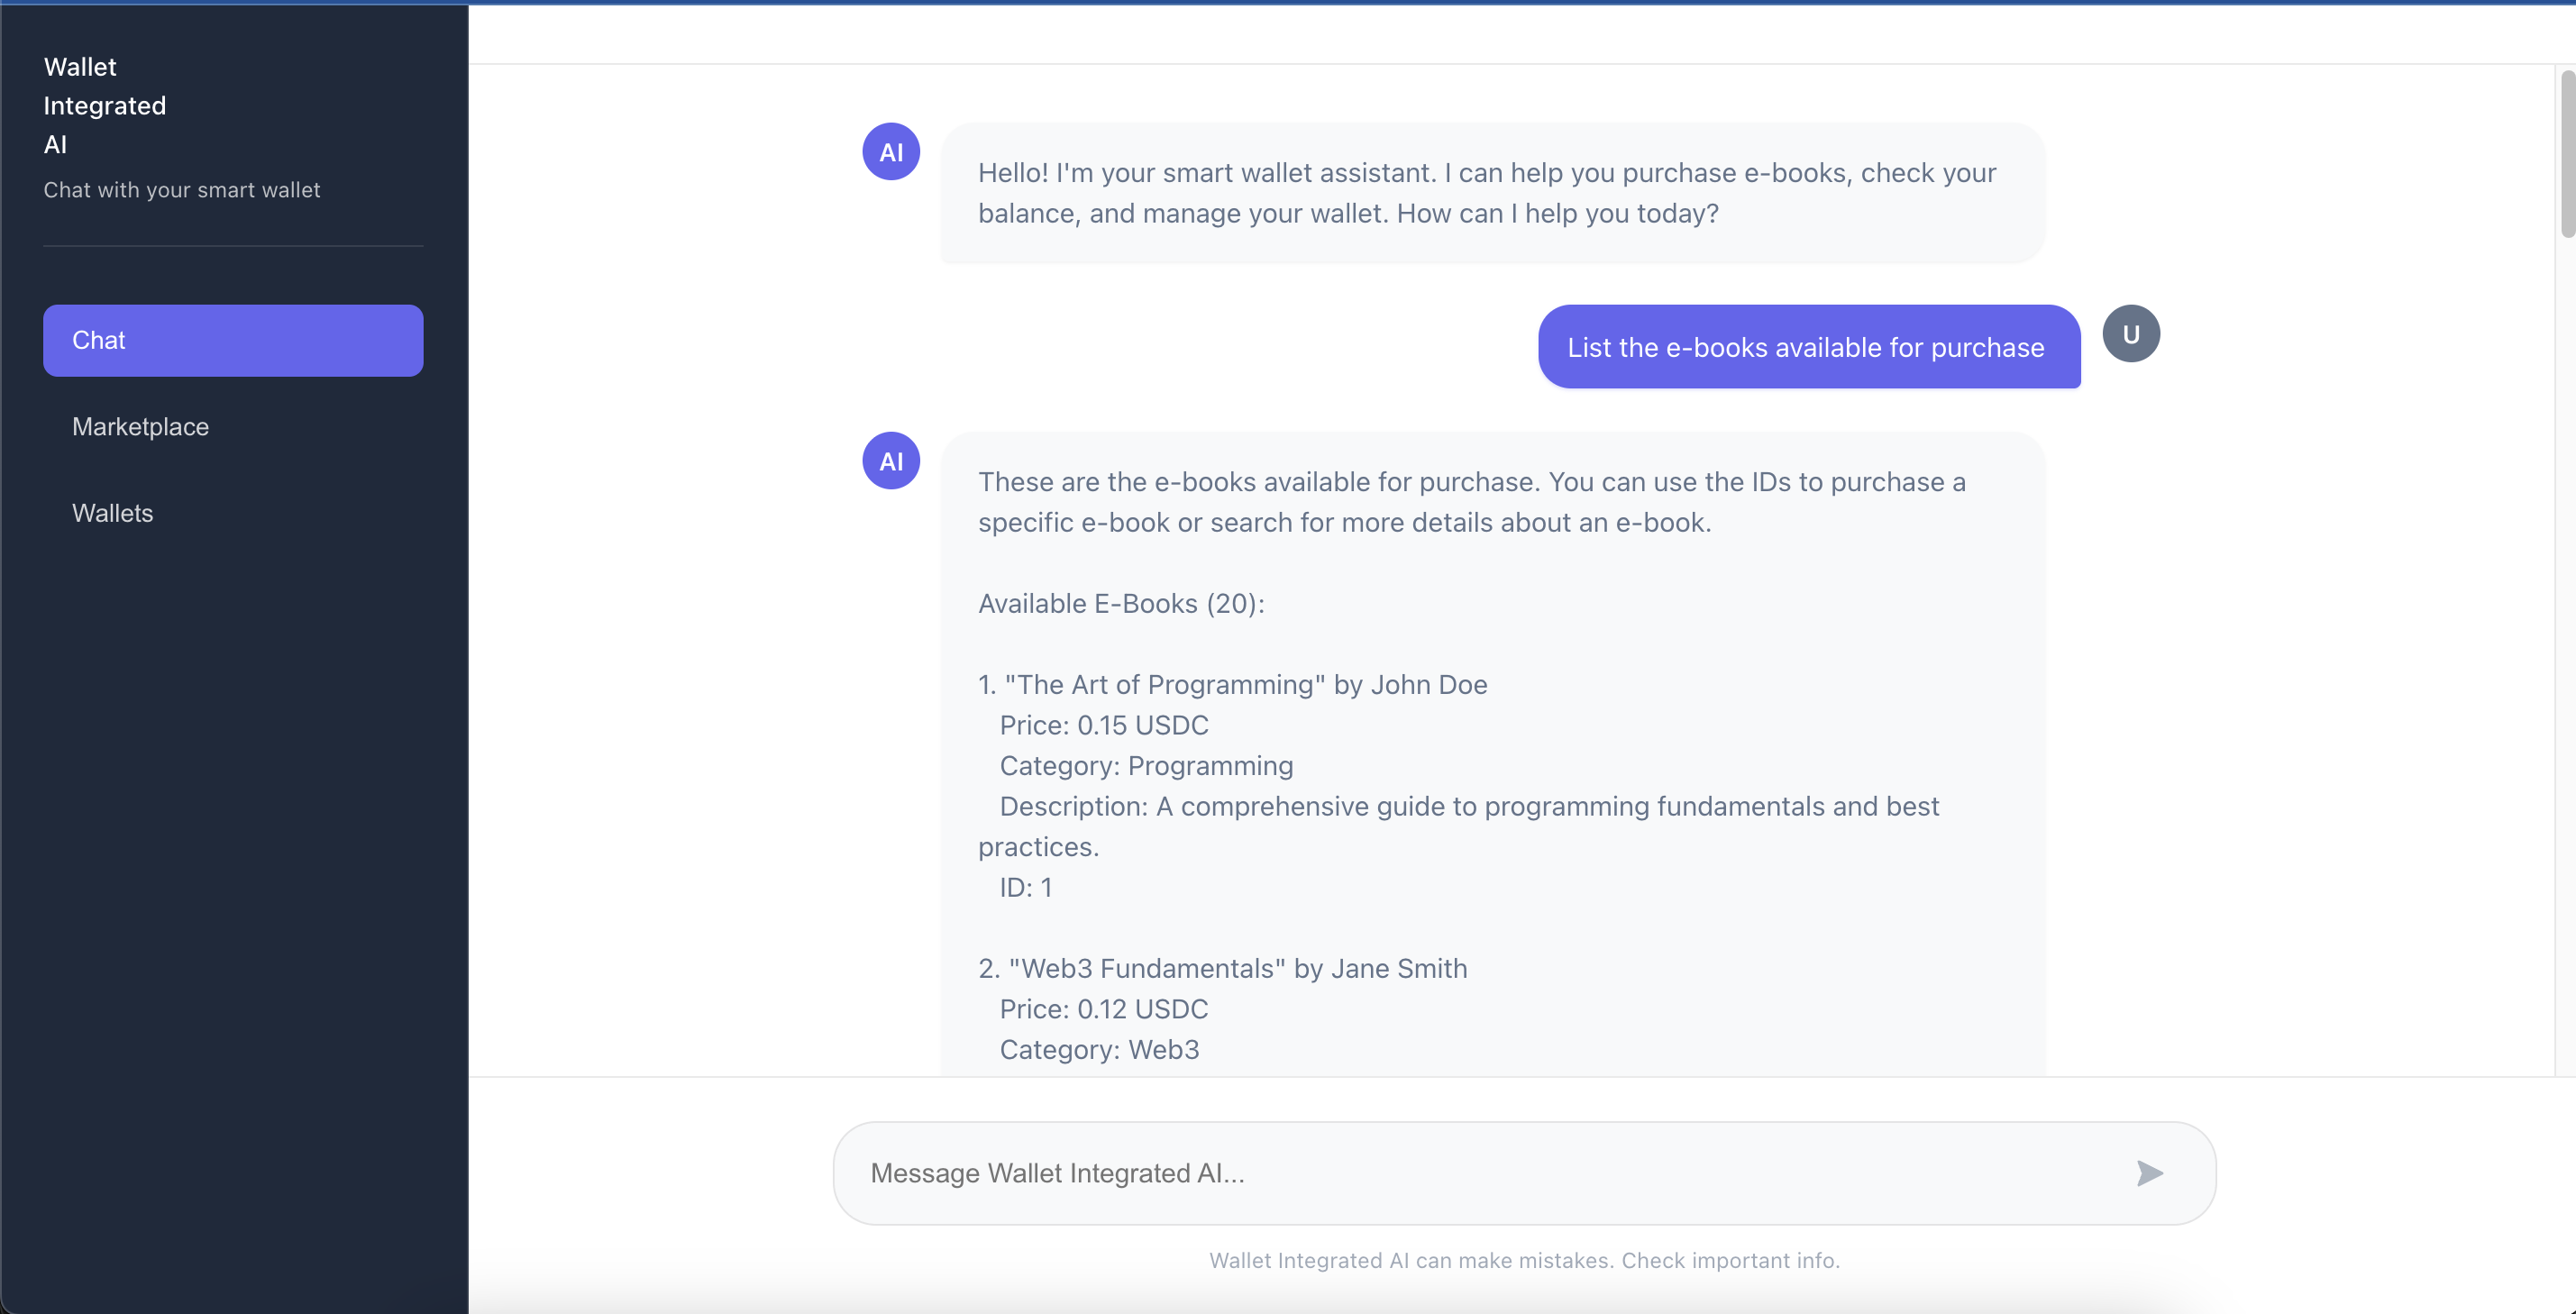
Example 2: Listing E-Books
You type: "List the e-books available for purchase"
Agent responds: Lists all 20 e-books with titles, authors, and prices
What happened: Agent called browse_ebooks tool and displayed the complete catalog.
Example 3: Purchasing an E-Book
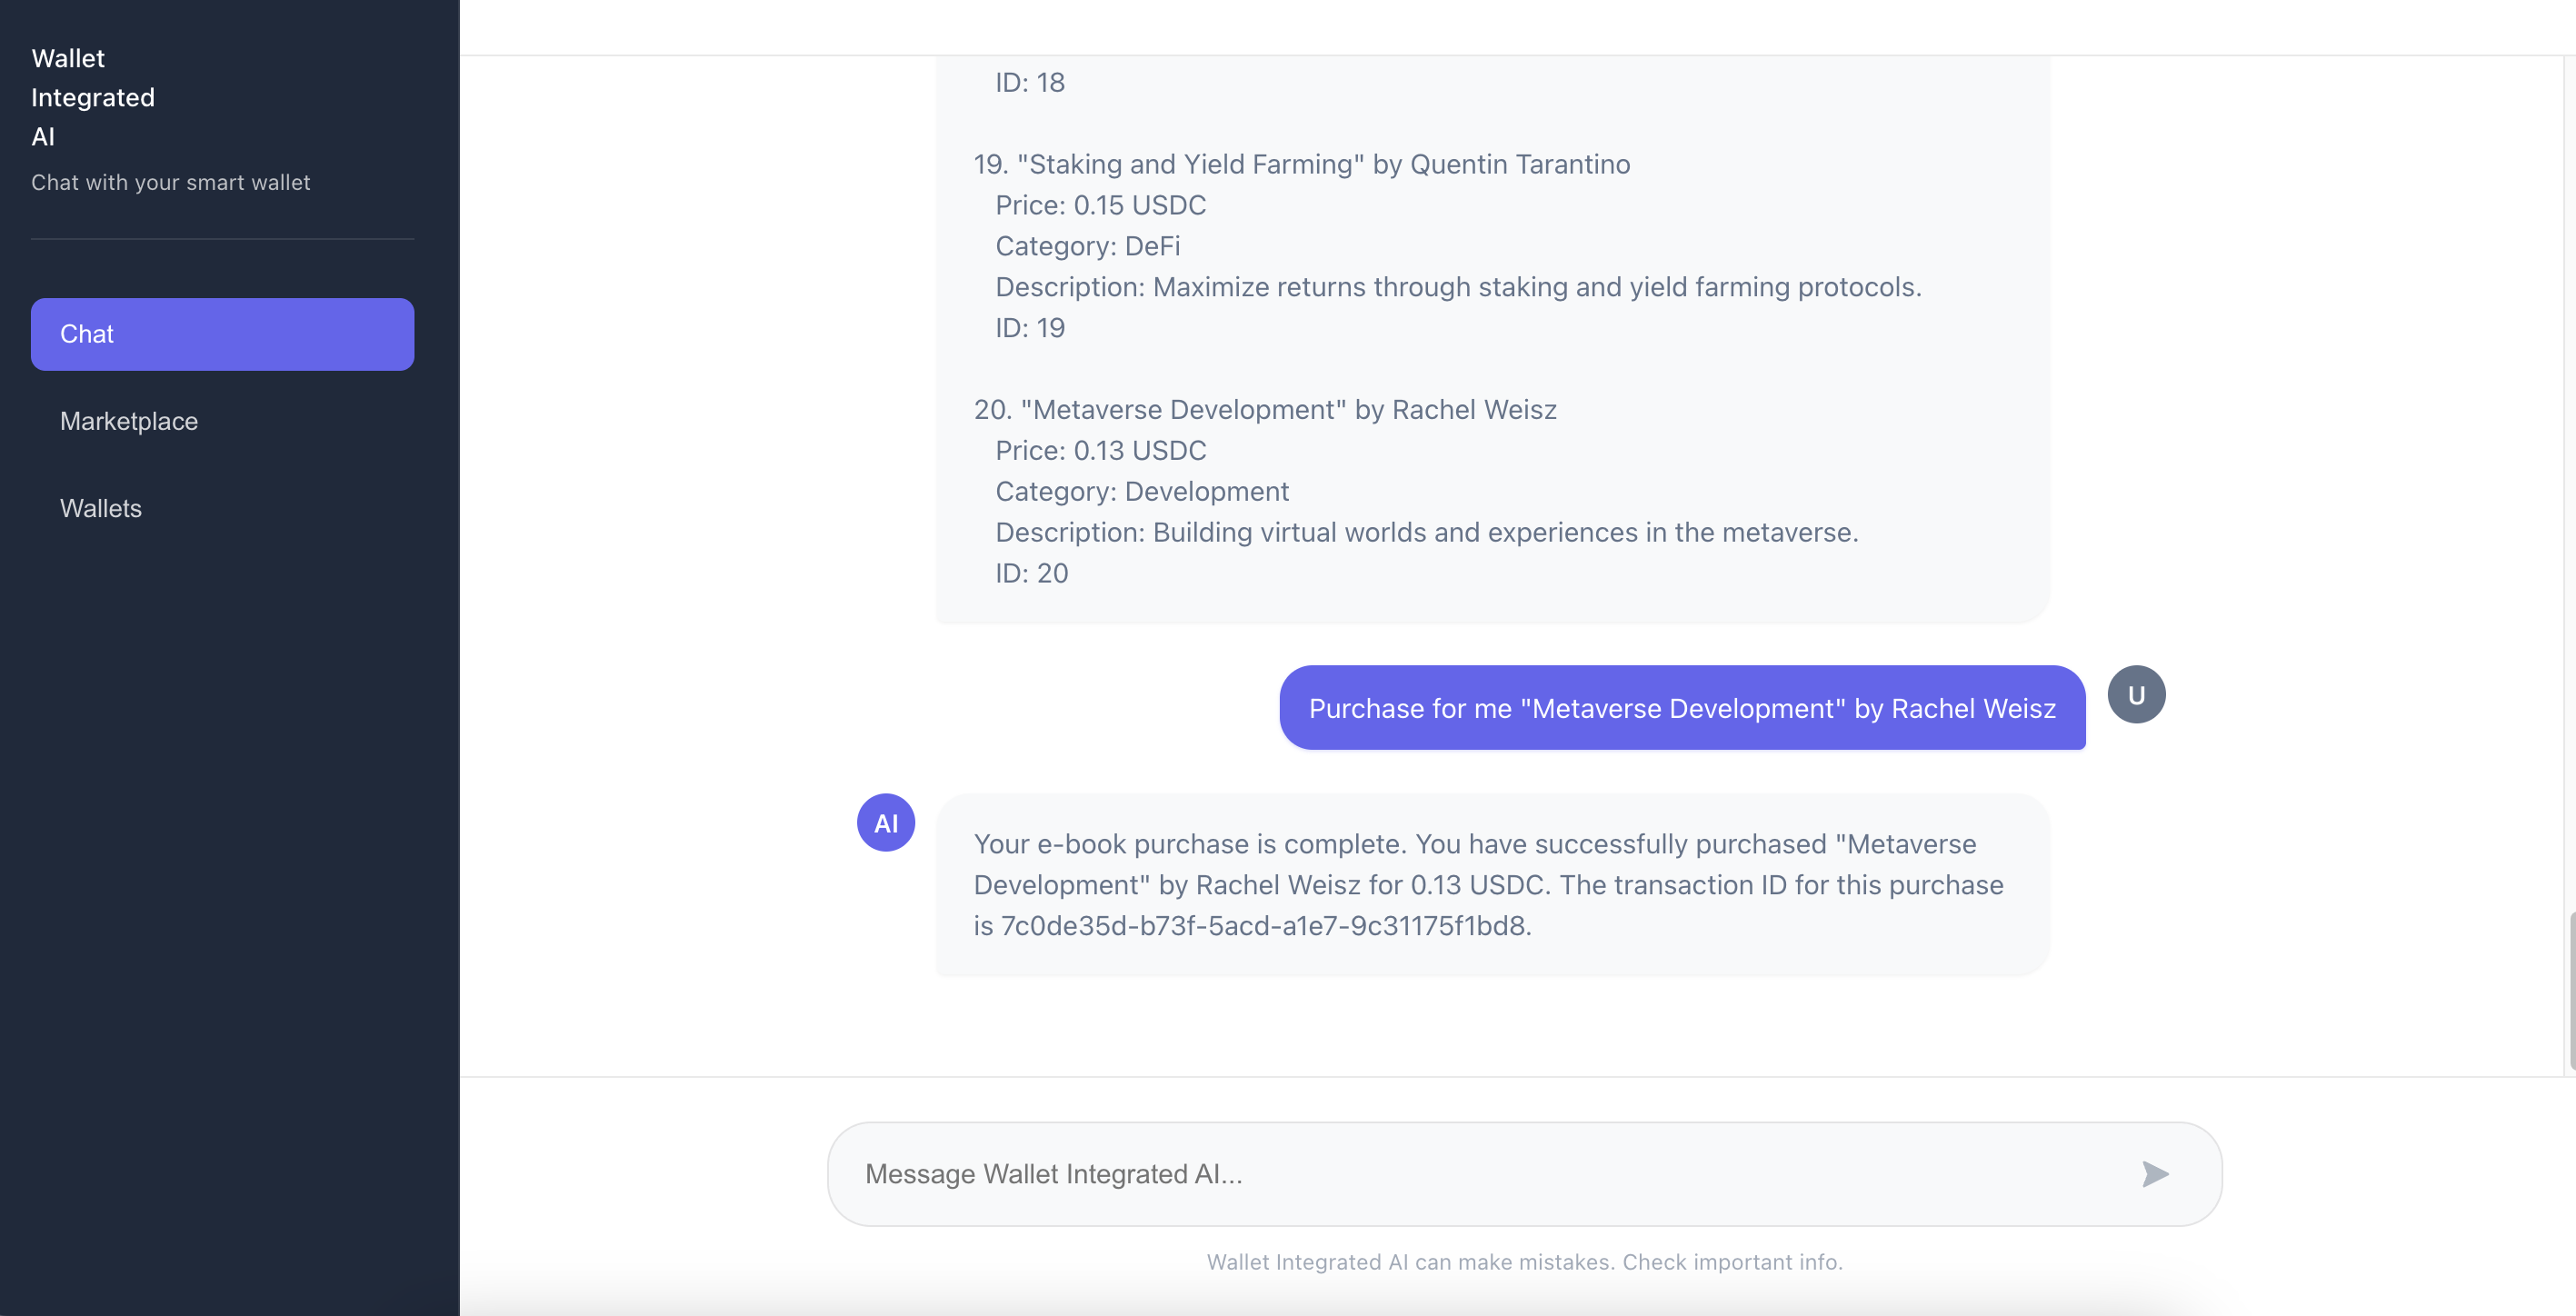
You type: "Purchase for me 'Metaverse Development' by Rachel Weisz"
Agent responds: "✅ I've purchased 'Metaverse Development' for 0.15 USDC. Transaction ID: 0x..."
What happened: Agent executed a multi-step process:
- Searched for the e-book
- Checked your balance
- Transferred USDC to marketplace
- Confirmed purchase
Example 4: Transferring Tokens
You type: "Send 0.01 USDC to 0x75f100ee75a0e529aacced263de7a8f0e9f9c2a2"
Agent responds: "✅ Transfer initiated. Transaction ID: 0x..."
What happened: Agent:
- Parsed destination address and amount
- Got token ID from balance check
- Verified sufficient funds
- Executed transfer
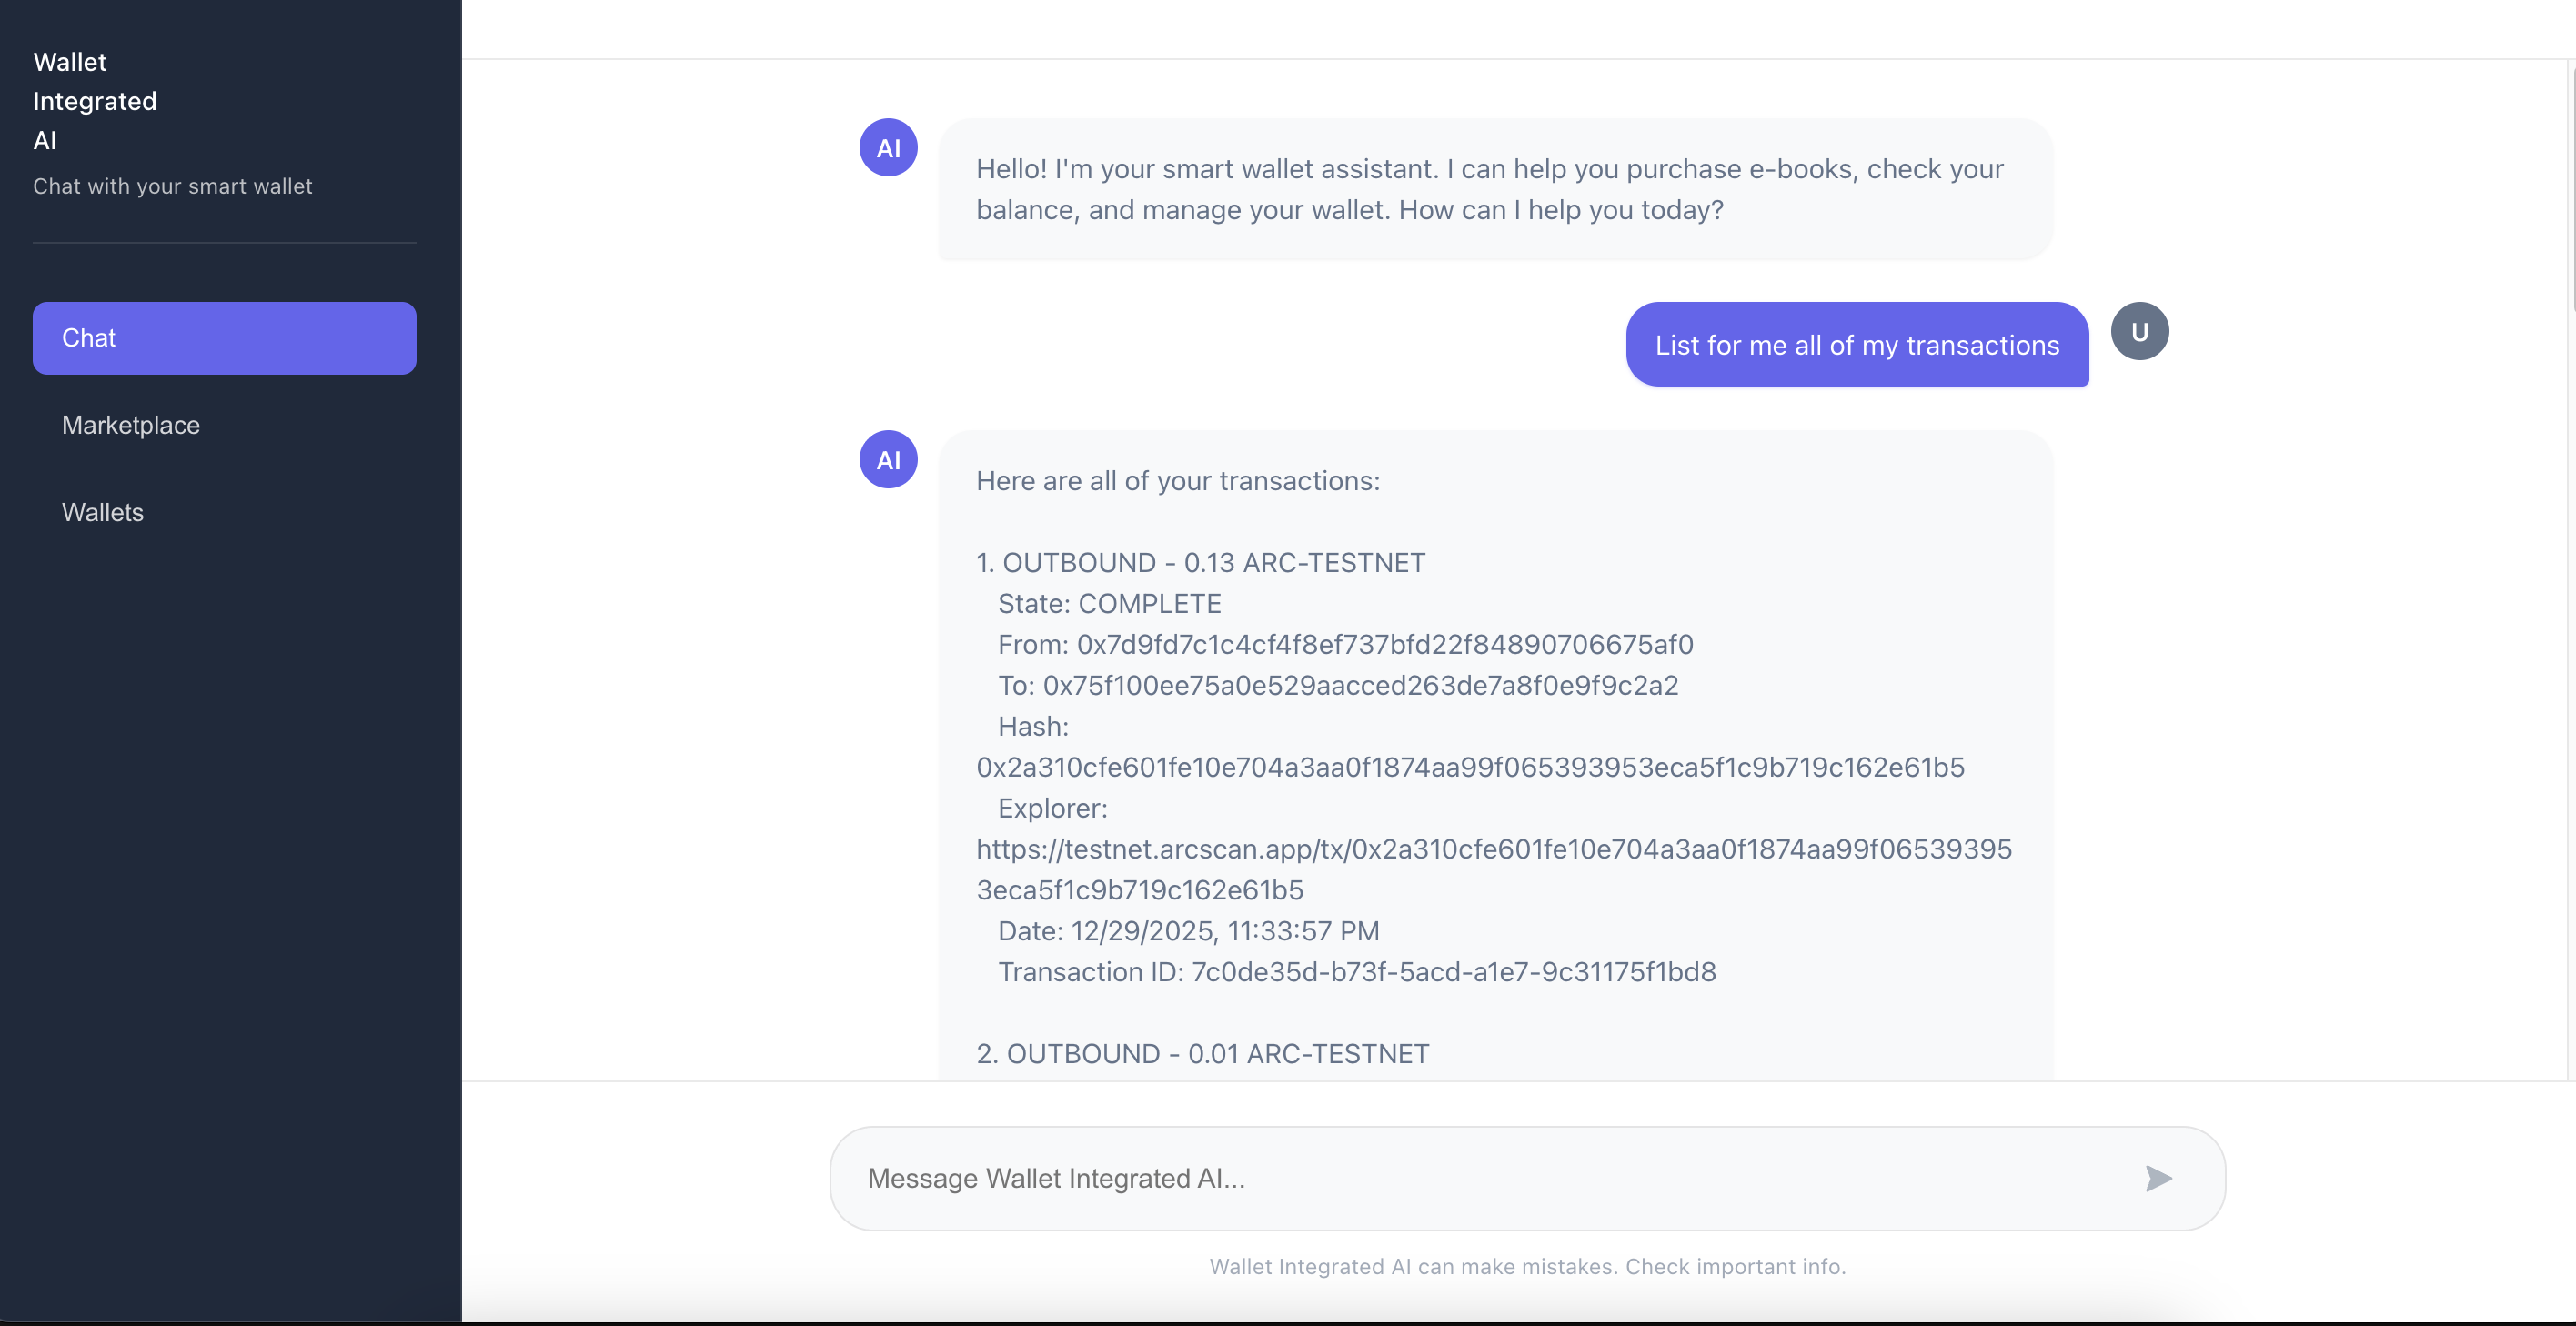
Example 5: Viewing Transactions
You type: "List for me all transactions"
Agent responds: Lists all transactions with details including type, amount, status, and transaction hash
What happened: Agent called list_transactions tool and formatted the results.
13. Testing the Agent
You can test the agent in several ways:
Using the Frontend
Simply open http://localhost:3000 and use the chat interface - this is the easiest way to interact with the agent.
Using cURL
Test the API directly:
# Test balance check
curl -X POST http://localhost:3001/api/chat \
  -H "Content-Type: application/json" \
  -H "X-API-Key: your-api-key" \
  -d '{"message": "What is my wallet balance?"}'

# Test e-book browsing
curl -X POST http://localhost:3001/api/chat \
  -H "Content-Type: application/json" \
  -H "X-API-Key: your-api-key" \
  -d '{"message": "List all available e-books"}'

# Test purchase
curl -X POST http://localhost:3001/api/chat \
  -H "Content-Type: application/json" \
  -H "X-API-Key: your-api-key" \
  -d '{"message": "Purchase The Art of Programming for me"}'
Key Features to Test
- Balance Queries - Verify agent returns real balance data
- E-Book Browsing - Check that all e-books are listed
- E-Book Search - Test searching by title or author
- Purchases - Verify purchases execute and are tracked
- Token Transfers - Test sending USDC to addresses
- Transaction History - Check transaction listing works
14. Key Concepts and Architecture Insights
Understanding the Agent Loop
The core pattern of the autonomous wallet is the agent loop:
- Observe: Agent receives user message
- Decide: Agent analyzes intent and selects tools
- Act: Agent executes tools sequentially
- Respond: Agent synthesizes results into natural language
This loop continues until the agent has enough information to provide a complete answer (max 5 iterations).
Tool Design Principles
The tools are designed with these principles:
- Clear Descriptions: Each tool has a detailed description that helps the LLM understand when to use it
- Structured Schemas: Zod schemas ensure type safety and provide clear parameter definitions
- Error Handling: Tools return structured errors that the agent can understand and communicate to users
- Idempotency: Operations are designed to be safe to retry
System Prompt Engineering
The system prompt is crucial - it:
- Defines the agent's role and capabilities
- Sets behavioral rules (always check balance, never hallucinate)
- Provides context about available tools
- Guides the agent's decision-making process
Key Insight: The prompt explicitly instructs the agent to "actually call the tool" when listing e-books, preventing the agent from just saying it can list them without doing it.
Purchase Tracking
The current implementation uses in-memory tracking (Map<string, string[]>). This is fine for demonstration, but in production you'd want:
- Database persistence (PostgreSQL, MongoDB, etc.)
- Purchase history API endpoints
- User-specific purchase tracking
- Receipt generation
Security Considerations
The project includes:
- API Key Authentication: All endpoints require API keys
- Environment Variables: Secrets stored in
.envfiles (never committed) - Input Validation: All user inputs are validated
- Error Handling: Graceful error handling prevents information leakage
For production, consider:
- Rate limiting
- Transaction amount limits
- Multi-signature wallets for large transactions
- Audit logging
15. Conclusion: The Future of Autonomous Wallets
What you've explored is just the beginning. Autonomous wallet agents open up incredible possibilities:
- Automated DeFi Operations: "Stake my USDC in the highest yield pool"
- Smart Budgeting: "Don't spend more than 10 USDC today"
- Multi-Chain Operations: "Bridge 1 ETH from Ethereum to Polygon"
- Subscription Management: "Pay my monthly subscriptions automatically"
- Investment Strategies: "DCA 0.1 USDC into BTC daily"
The combination of Circle Developer-Controlled Wallets, Groq AI, and LangChain.js provides a powerful foundation for building autonomous financial agents. As AI models improve and blockchain infrastructure evolves, we'll see increasingly sophisticated agents that can handle complex multi-step financial operations.
What You've Learned
- Agent Architecture: The agent loop (observe → decide → act → respond) is the core pattern
- Tool Design: Well-designed tools with clear descriptions enable reliable agent behavior
- System Prompts: Detailed system prompts guide agent behavior and prevent errors
- Integration: How to connect AI agents with blockchain wallets
- User Experience: Natural language interfaces make blockchain accessible
Extending the Project
Now that you understand how it works, you can extend it:
- Add More Tools: Create tools for DeFi operations, NFT purchases, etc.
- Multiple Wallets: Support multiple wallets per user
- Transaction Scheduling: Schedule recurring transactions
- Database Integration: Replace in-memory tracking with a database
- Enhanced Marketplace: Add real payment processing, receipts, etc.
- DeFi Integration: Connect to DeFi protocols for staking, swapping, etc.
The future of blockchain interaction is autonomous, intelligent, and user-friendly. You now understand how to build it!
Thank you for following along! This tutorial demonstrates the core concepts of building autonomous wallet agents. The complete codebase is available at GitHub.
Watch the Complete Video Tutorial
If you prefer a visual walkthrough or want to see the implementation in action, check out our complete video tutorial:
Frequently Asked Questions
How can I use autonomous wallet agents in an AI hackathon?
Autonomous wallet agents are ideal for AI hackathons because they enable you to build sophisticated DeFi and blockchain applications quickly. You can create projects like AI-powered trading bots, automated payment systems, or intelligent financial assistants that execute transactions based on natural language commands. The combination of AI and blockchain makes for compelling AI hackathon projects that showcase cutting-edge technology.
Is this tutorial suitable for beginners in AI hackathons?
This tutorial is best suited for developers with some experience in blockchain and AI concepts. However, if you're participating in AI hackathons for beginners, the step-by-step instructions and clear explanations make it accessible. Basic knowledge of JavaScript/TypeScript and blockchain concepts will help, but the tutorial provides enough context to get started even if you're new to these technologies.
What are some AI hackathon project ideas using autonomous wallet agents?
Some popular AI hackathon project ideas include: building an AI assistant that manages your crypto portfolio, creating an autonomous payment system for subscriptions, developing a smart wallet that executes trades based on market analysis, or building a DeFi agent that optimizes yield farming strategies. These projects demonstrate the intersection of AI and blockchain, which is highly valued in AI hackathons.
How long does it take to learn autonomous wallet agents for an AI hackathon?
With this tutorial, you can get a working autonomous wallet agent running in 3-4 hours, including setup and testing. For AI hackathons, this is manageable timing—you'll have enough time to build a functional prototype and add custom features. The tutorial covers all essential concepts, so you can start building your hackathon project immediately after completing it.
Are there any limitations when using autonomous wallet agents in time-limited hackathons?
The main considerations are: you'll need testnet tokens (which are free from faucets), API keys for Groq and Circle (both offer free tiers), and a development environment set up. However, once configured, the agent works reliably. The testnet environment eliminates financial risk, making this approach ideal for online AI hackathons where participants experiment safely.
For questions or contributions, feel free to reach out or open an issue on the repository

